
Many organizations operate in hybrid data environments where critical assets live in Snowflake while analytics workloads run on AWS, which can create governance gaps, discovery friction, and duplicated efforts when the two aren’t connected.
With Amazon SageMaker Unified Studio, you can govern data across Snowflake and AWS through its integrated catalog and AWS Glue Data Quality, a capability of AWS Glue. You connect directly to Snowflake tables without moving data, apply quality rules using AWS Glue Visual ETL, and publish validated assets to Amazon SageMaker Catalog, maintaining consistent governance across your entire distributed data estate.
Without this integration, cataloging Snowflake data requires building extraction pipelines, often taking days. With SageMaker Unified Studio connected to Snowflake, you can query, catalog, and validate the quality of federated data in 5–15 minutes. No data replication or custom ETL code required.
In this post, we show you how to connect Snowflake to Amazon SageMaker Unified Studio, register data assets in Amazon SageMaker Catalog, configure data quality validation using AWS Glue Visual ETL, and publish assets for unified collaboration. By following these steps, you enrich federated assets with data quality scores so that consumers across your organization can discover and trust the data, all while keeping it in Snowflake.
Solution overview
This solution integrates Snowflake with Amazon SageMaker Unified Studio for centralized data cataloging and quality validation.
The architecture uses an AWS Glue connection to federate the Snowflake catalog into Amazon SageMaker Unified Studio. Tables become available in the project catalog without complex storage configurations. You can query data directly using SQL analytics, publish datasets to Amazon SageMaker Catalog for organization-wide discovery, and apply data quality rules through AWS Glue Visual ETL pipelines.
The workflow consists of the following steps:
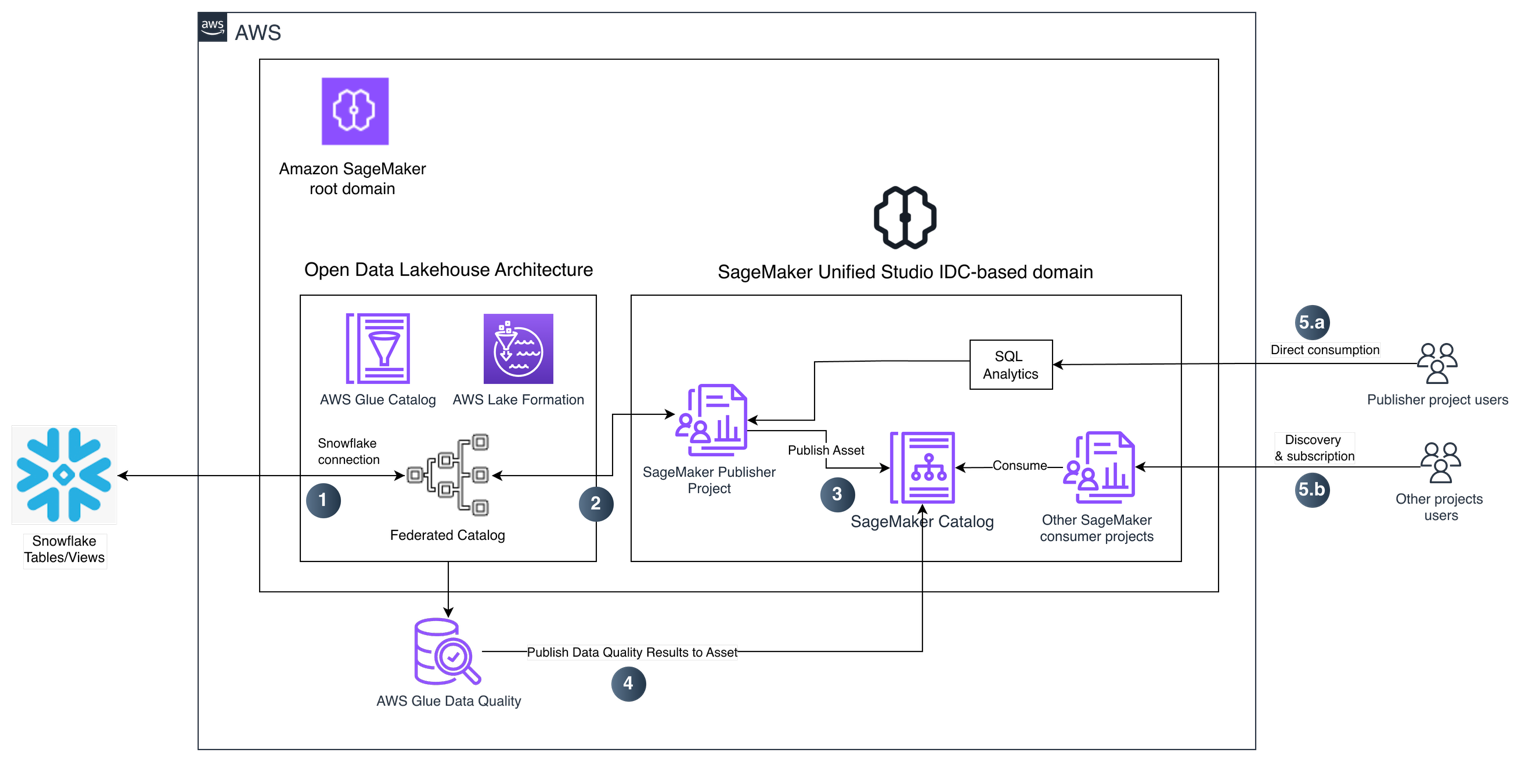
Figure 1: Architecture for federating Snowflake into SageMaker Unified Studio and validating data quality
- Snowflake connection creation on Amazon SageMaker Unified Studio — Amazon SageMaker Unified Studio uses an AWS Glue connection to federate Snowflake tables and views into its open data lakehouse architecture. The federated catalog entry is registered in AWS Glue Data Catalog and governed by AWS Lake Formation for centralized access control, without moving data out of Snowflake.
- Federate Snowflake tables into the Amazon SageMaker publisher project — The Amazon SageMaker publisher project discovers the federated Snowflake tables through the AWS Glue Data Catalog integration.
- Publish the dataset to Amazon SageMaker Catalog — The publisher project publishes the dataset as a governed asset to the Amazon SageMaker Catalog, making it discoverable for data consumers across the organization.
- Validate data quality — AWS Glue Data Quality runs validation rules against the federated Snowflake data and publishes the data quality results directly to the corresponding asset in Amazon SageMaker Catalog.
- Consume data — Users access Snowflake data through two paths:
- Publisher project users — Query data with SQL Analytics — Users in the publisher project can query the Snowflake data directly using Amazon SageMaker Unified Studio SQL Analytics for interactive exploration and analysis, without copying or moving data.
- Consumer project users — Discovery and subscription through SageMaker Catalog — Other Amazon SageMaker consumer projects discover the published asset in the Amazon SageMaker Catalog, subscribe to it, and consume the data for their analytics and machine learning workloads.
Prerequisites
To follow along, you need:
Your AWS Glue job execution role requires specific permissions to interact with Amazon SageMaker Catalog.
Required IAM policies for the AWS Glue job role
1. Amazon SageMaker Catalog search and listing permissions: Attach a policy that allows the AWS Glue job to search and list assets in Amazon SageMaker Catalog.
2. Amazon SageMaker Catalog time series data posting permissions: Add permissions to post data quality metrics:
Configure the AWS Glue job role as an Amazon SageMaker domain user
Configure the IAM role used by your AWS Glue job as a domain user. In the Amazon SageMaker console, navigate to your domain, choose Access management, and add the AWS Glue job execution IAM role as a domain user.
Project-level permissions
Add the AWS Glue job execution role as a project member with Owner permissions. Navigate to your project, go to Project settings > Members, and add the role.
For more information about IAM roles for AWS Glue, see the AWS Glue security documentation. For Amazon SageMaker Unified Studio permissions, refer to the Amazon SageMaker Unified Studio administrator guide.
Querying Snowflake datasets from Amazon SageMaker Unified Studio
The following sections walk you through connecting Snowflake to Amazon SageMaker Unified Studio and running data quality validation with results displayed in Amazon SageMaker Catalog.
Identifying information in Snowflake
First, gather your Snowflake connection details. You need a Snowflake account with tables or views created at the schema level within a database.
To obtain Snowflake connection information:
- Navigate to your Snowflake environment and sign in with administrator credentials.

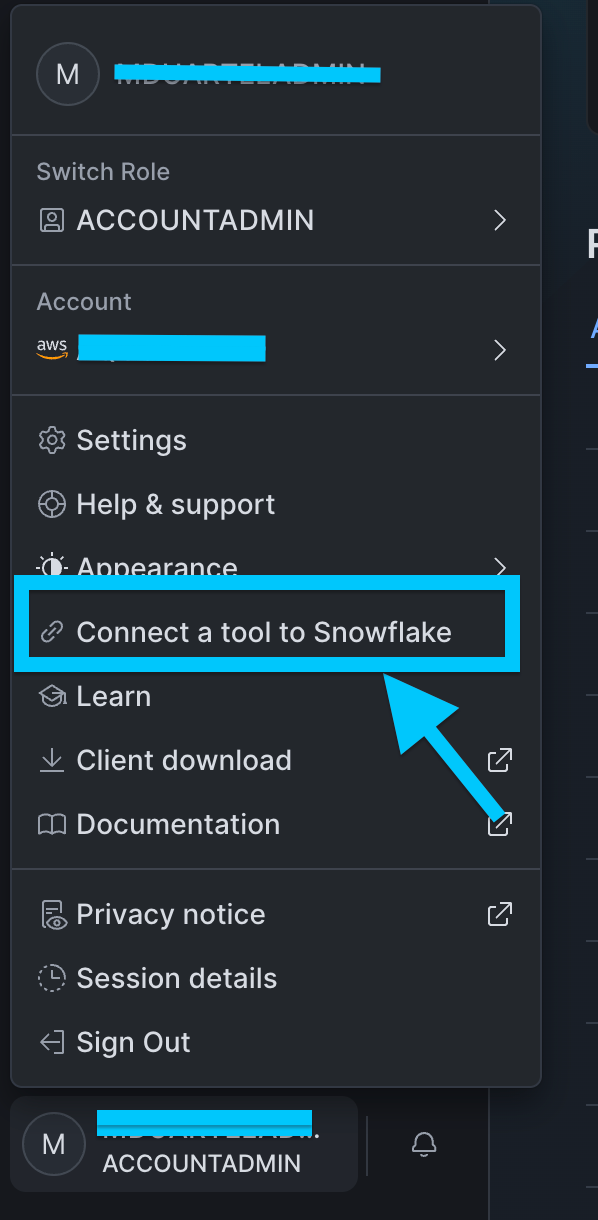
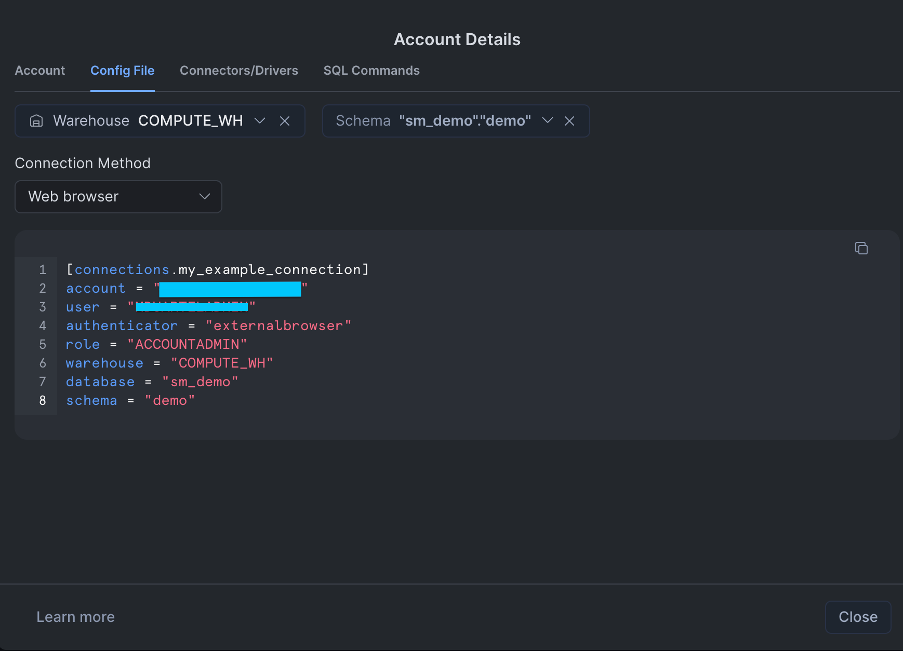
- Choose your user account and choose Connect a tool to Snowflake.

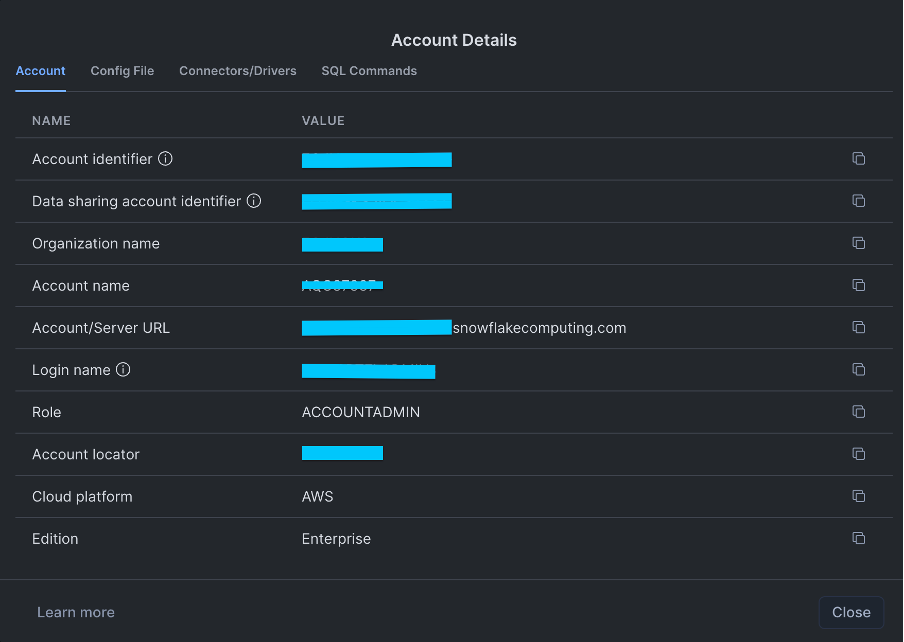
- Note the Account/Server URL displayed on the screen.
- Choose the Config File tab, select values for Warehouse, Database, and Schema, and copy these values for use in the next section.


Creating the connection in Amazon SageMaker Unified Studio
The Add Connection feature stores Snowflake connectivity details including credentials, server, and database information. Amazon SageMaker Unified Studio uses this connection to federate the Snowflake catalog through AWS Glue, so you can query data within minutes of setup.
You need an Amazon SageMaker Unified Studio domain and a project, which acts as a data producer project.
To create the Snowflake connection:
- In your Amazon SageMaker Unified Studio project, go to Overview.
- Choose Data.

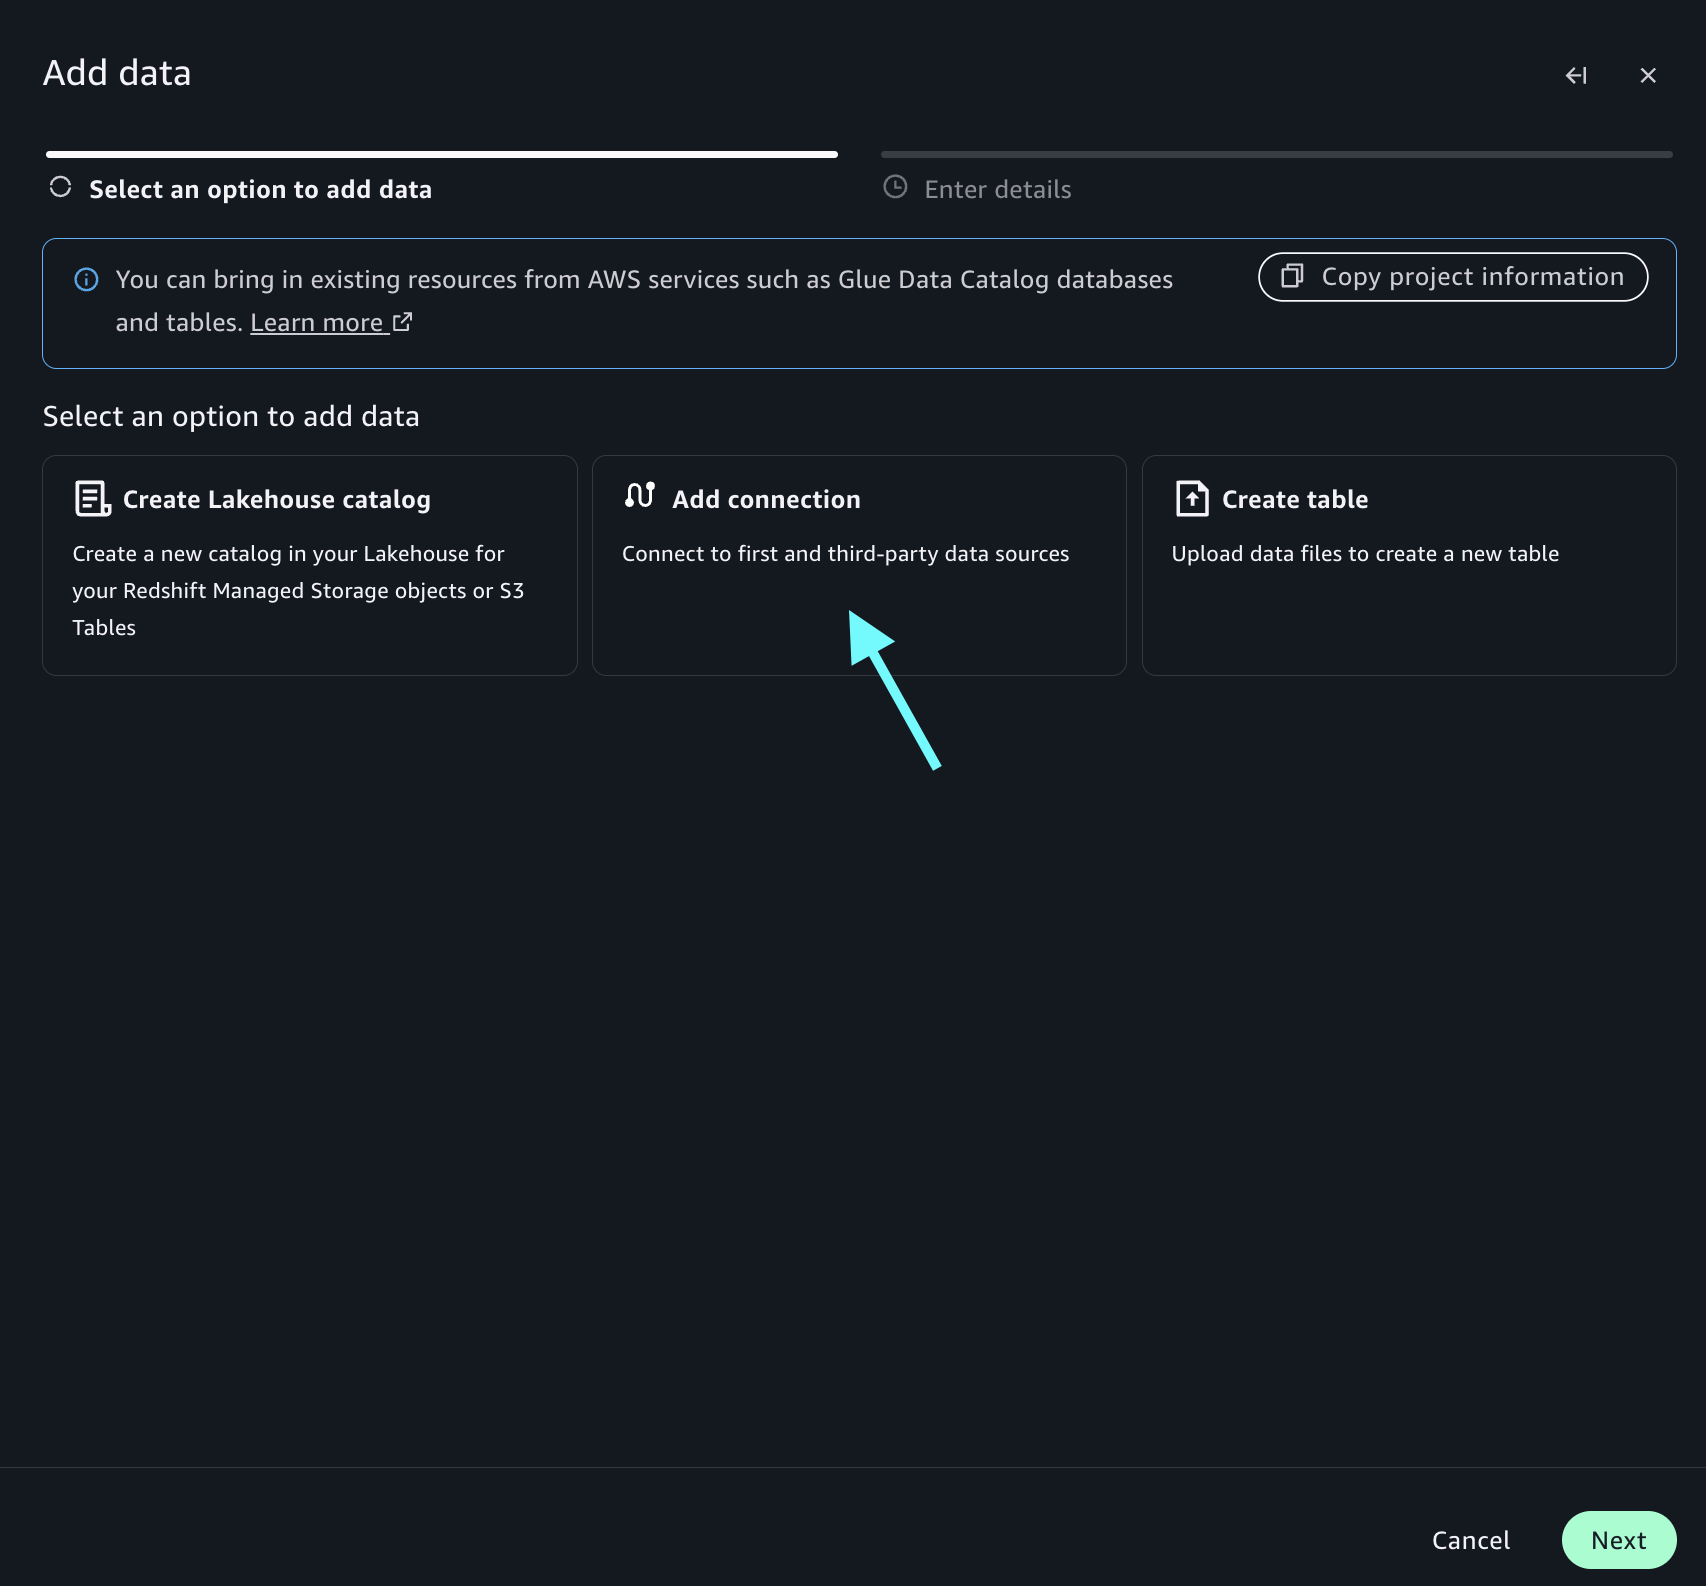
- Choose + Add, then choose Add Connection.
- Choose Next.
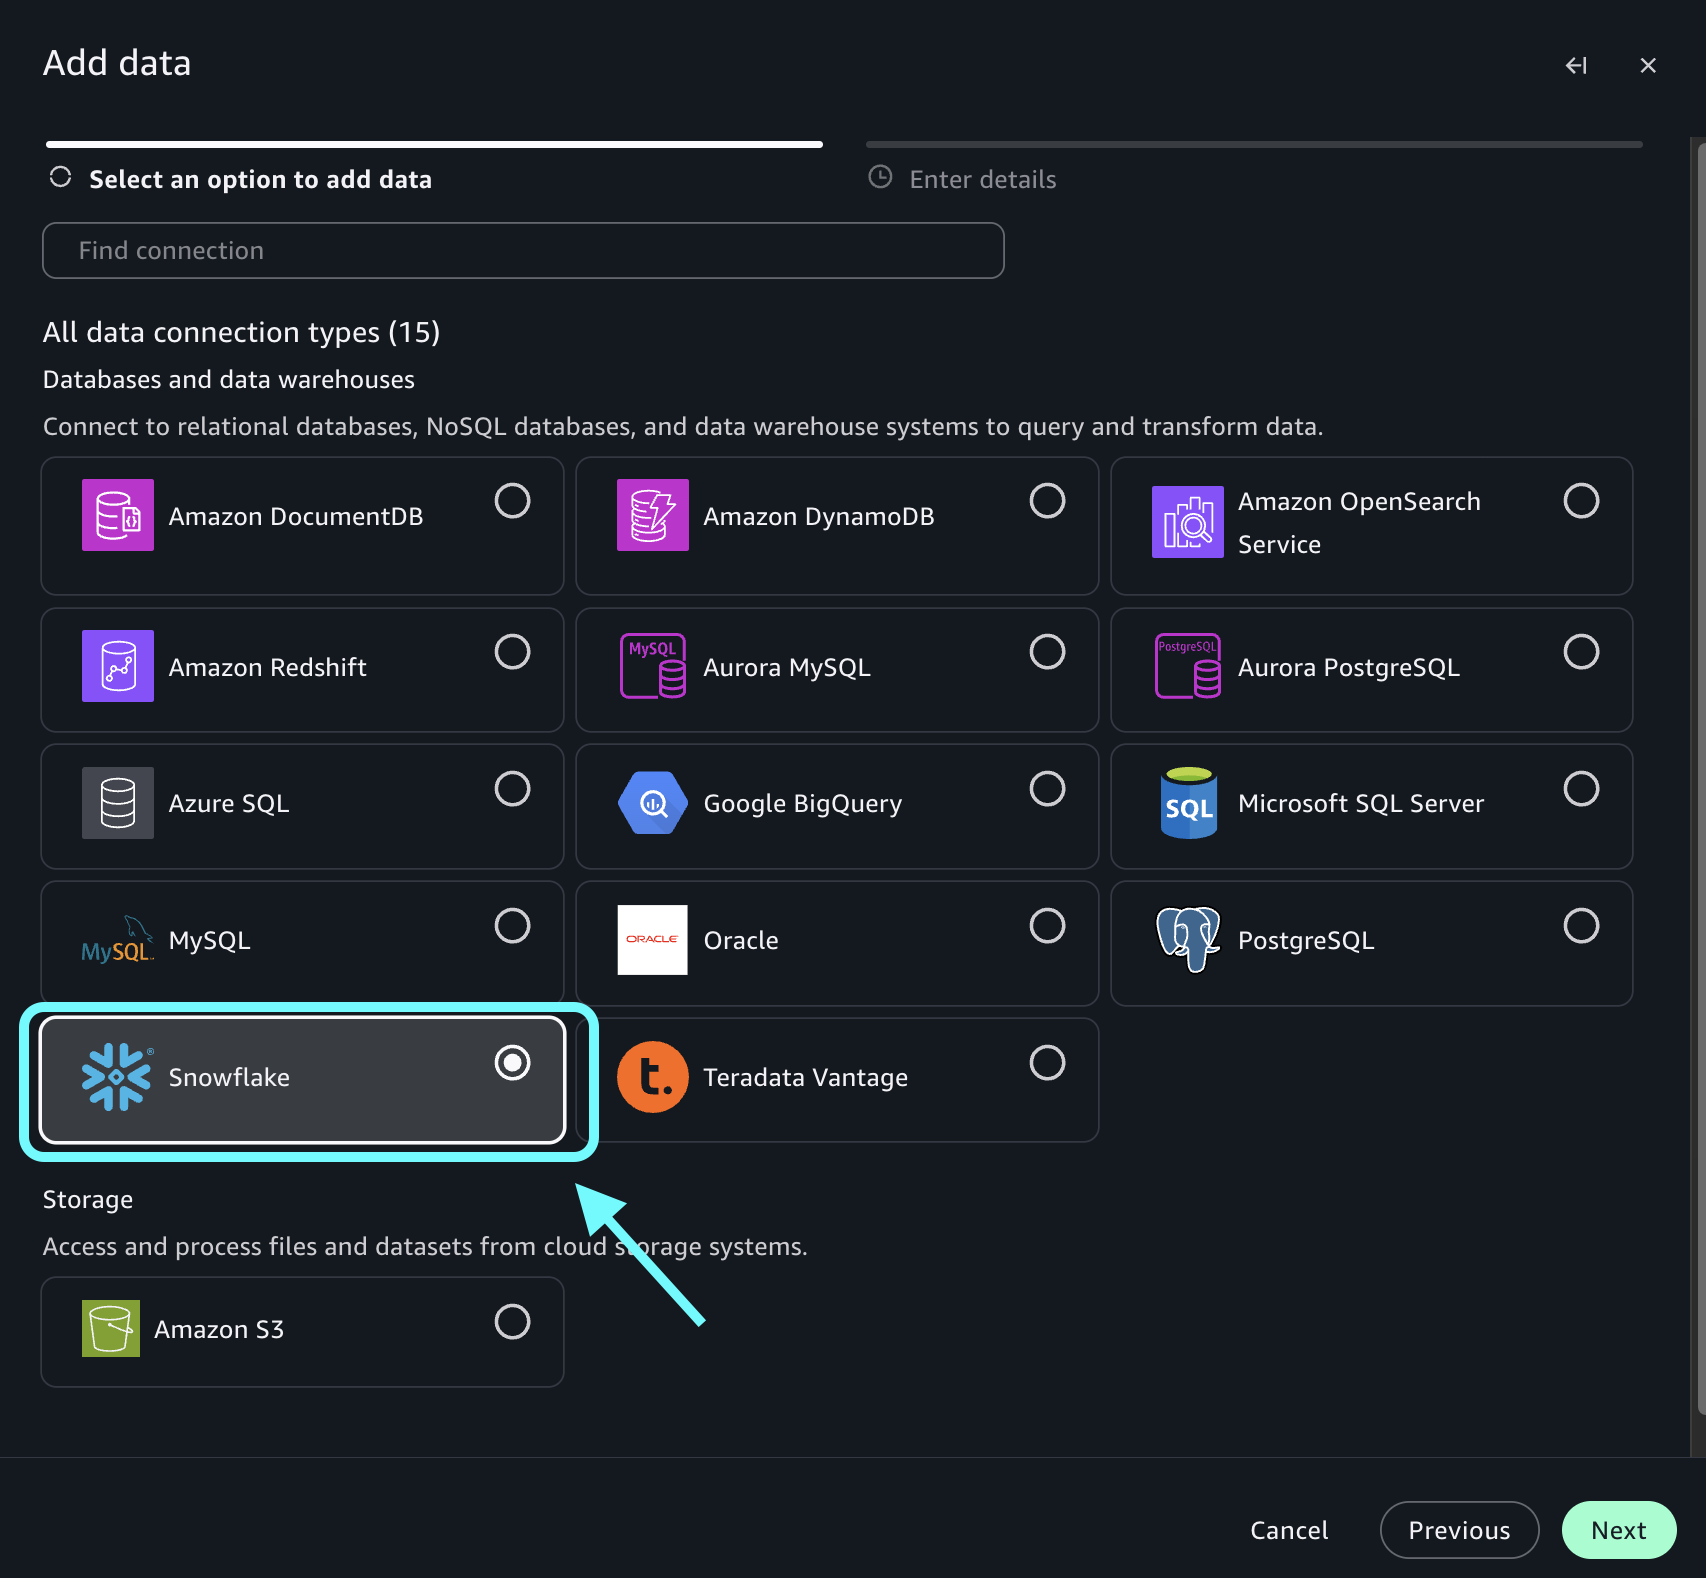
- Select Snowflake and choose Next.
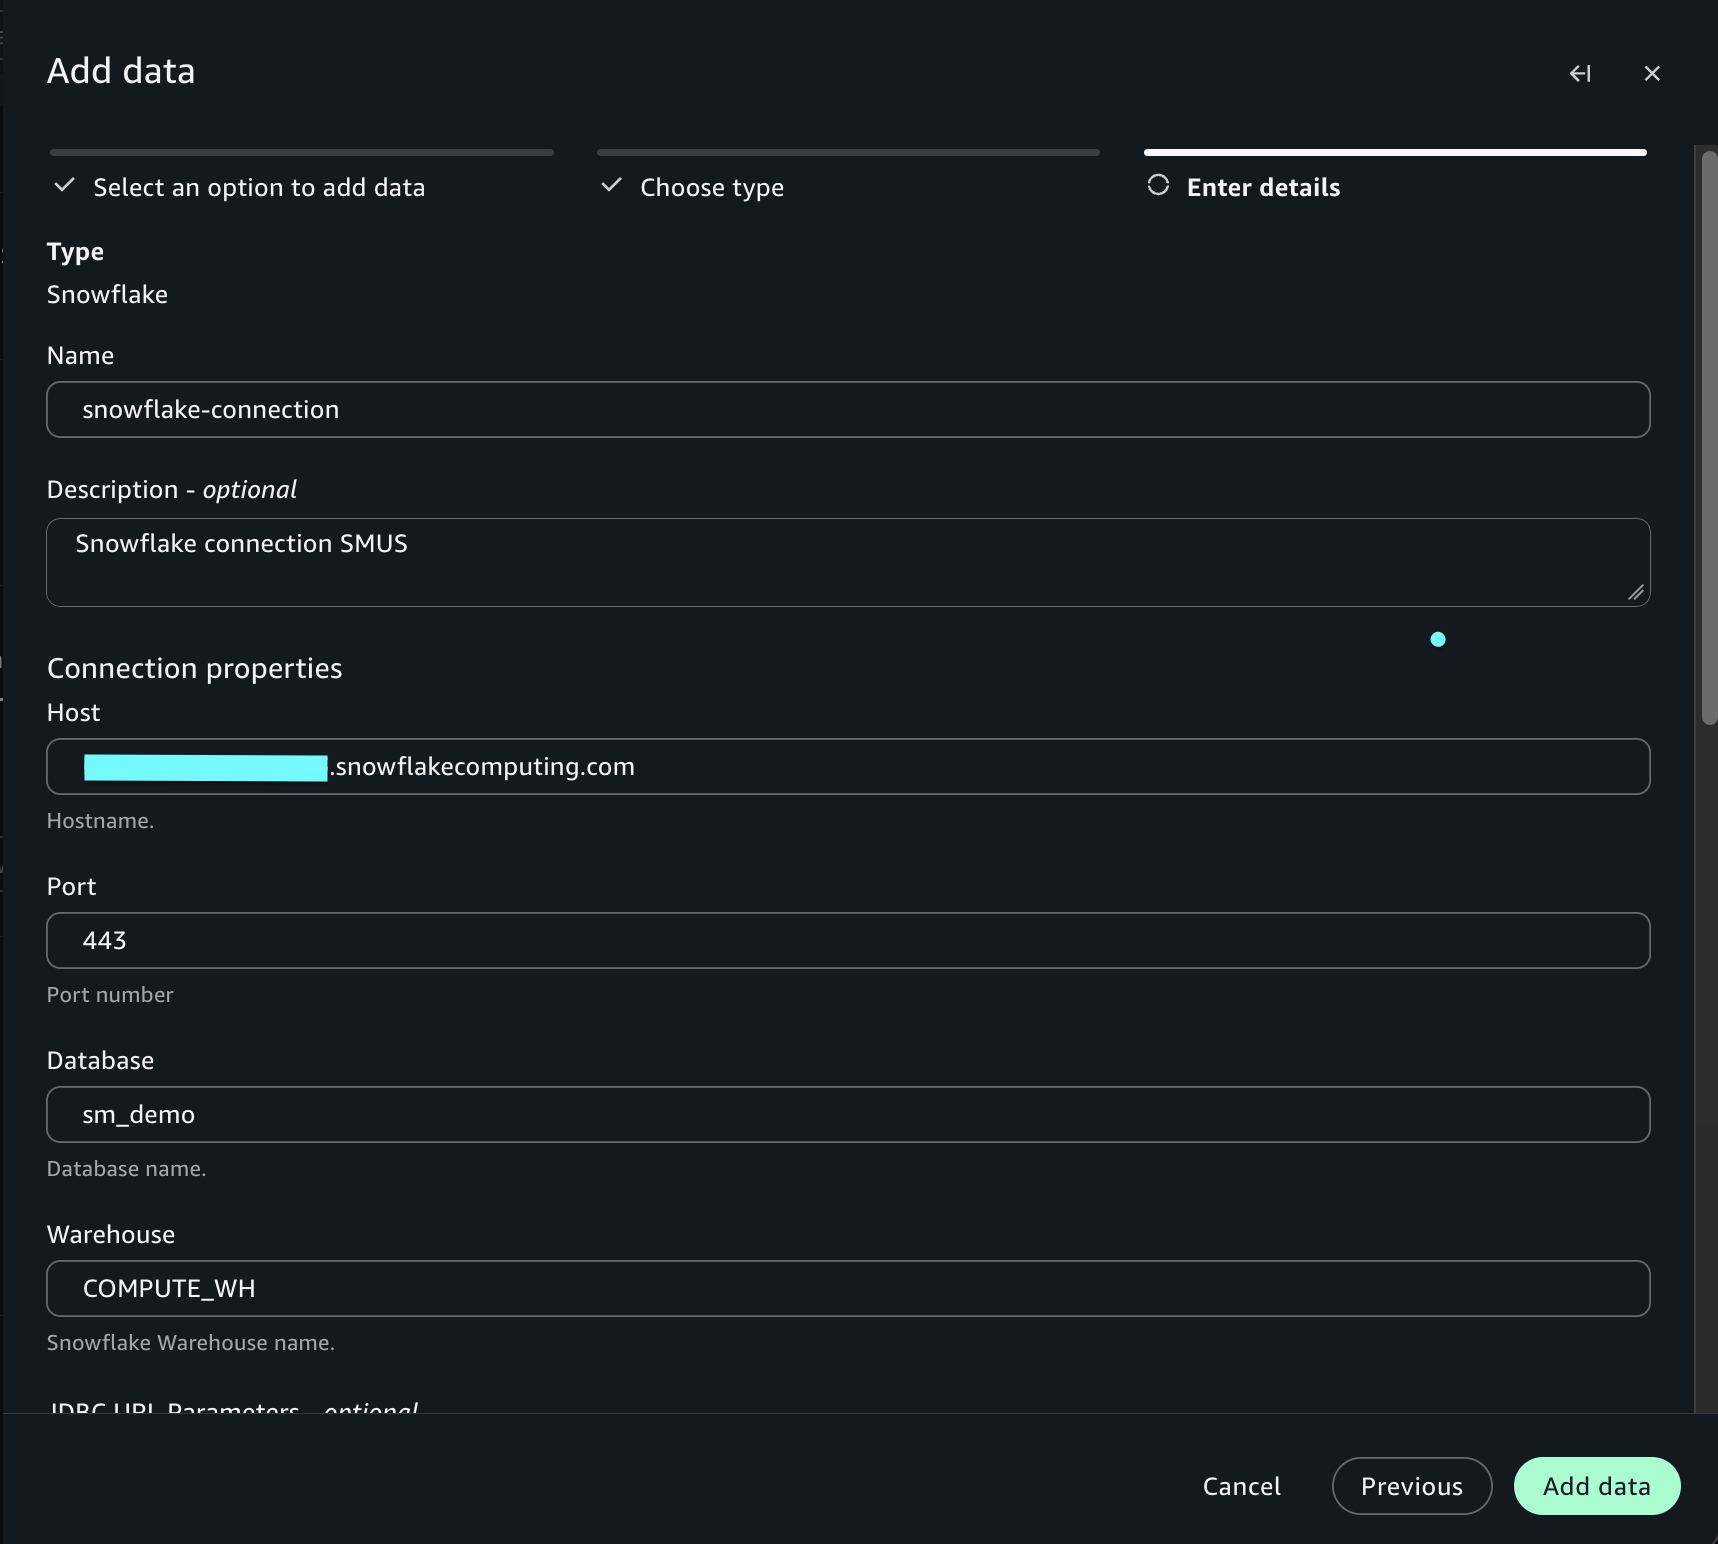
- Complete the connection details:
- Name:
snowflake-connection. - Description (Optional): Enter a description for your connection.
- Host: Your Snowflake account URL (for example, XXXXXXXXX-XXX000000.snowflakecomputing.com).
- Port: 443.
- Database: Your database name (for example, sm_demo).
- Warehouse: Your warehouse name (for example, COMPUTE_WH).
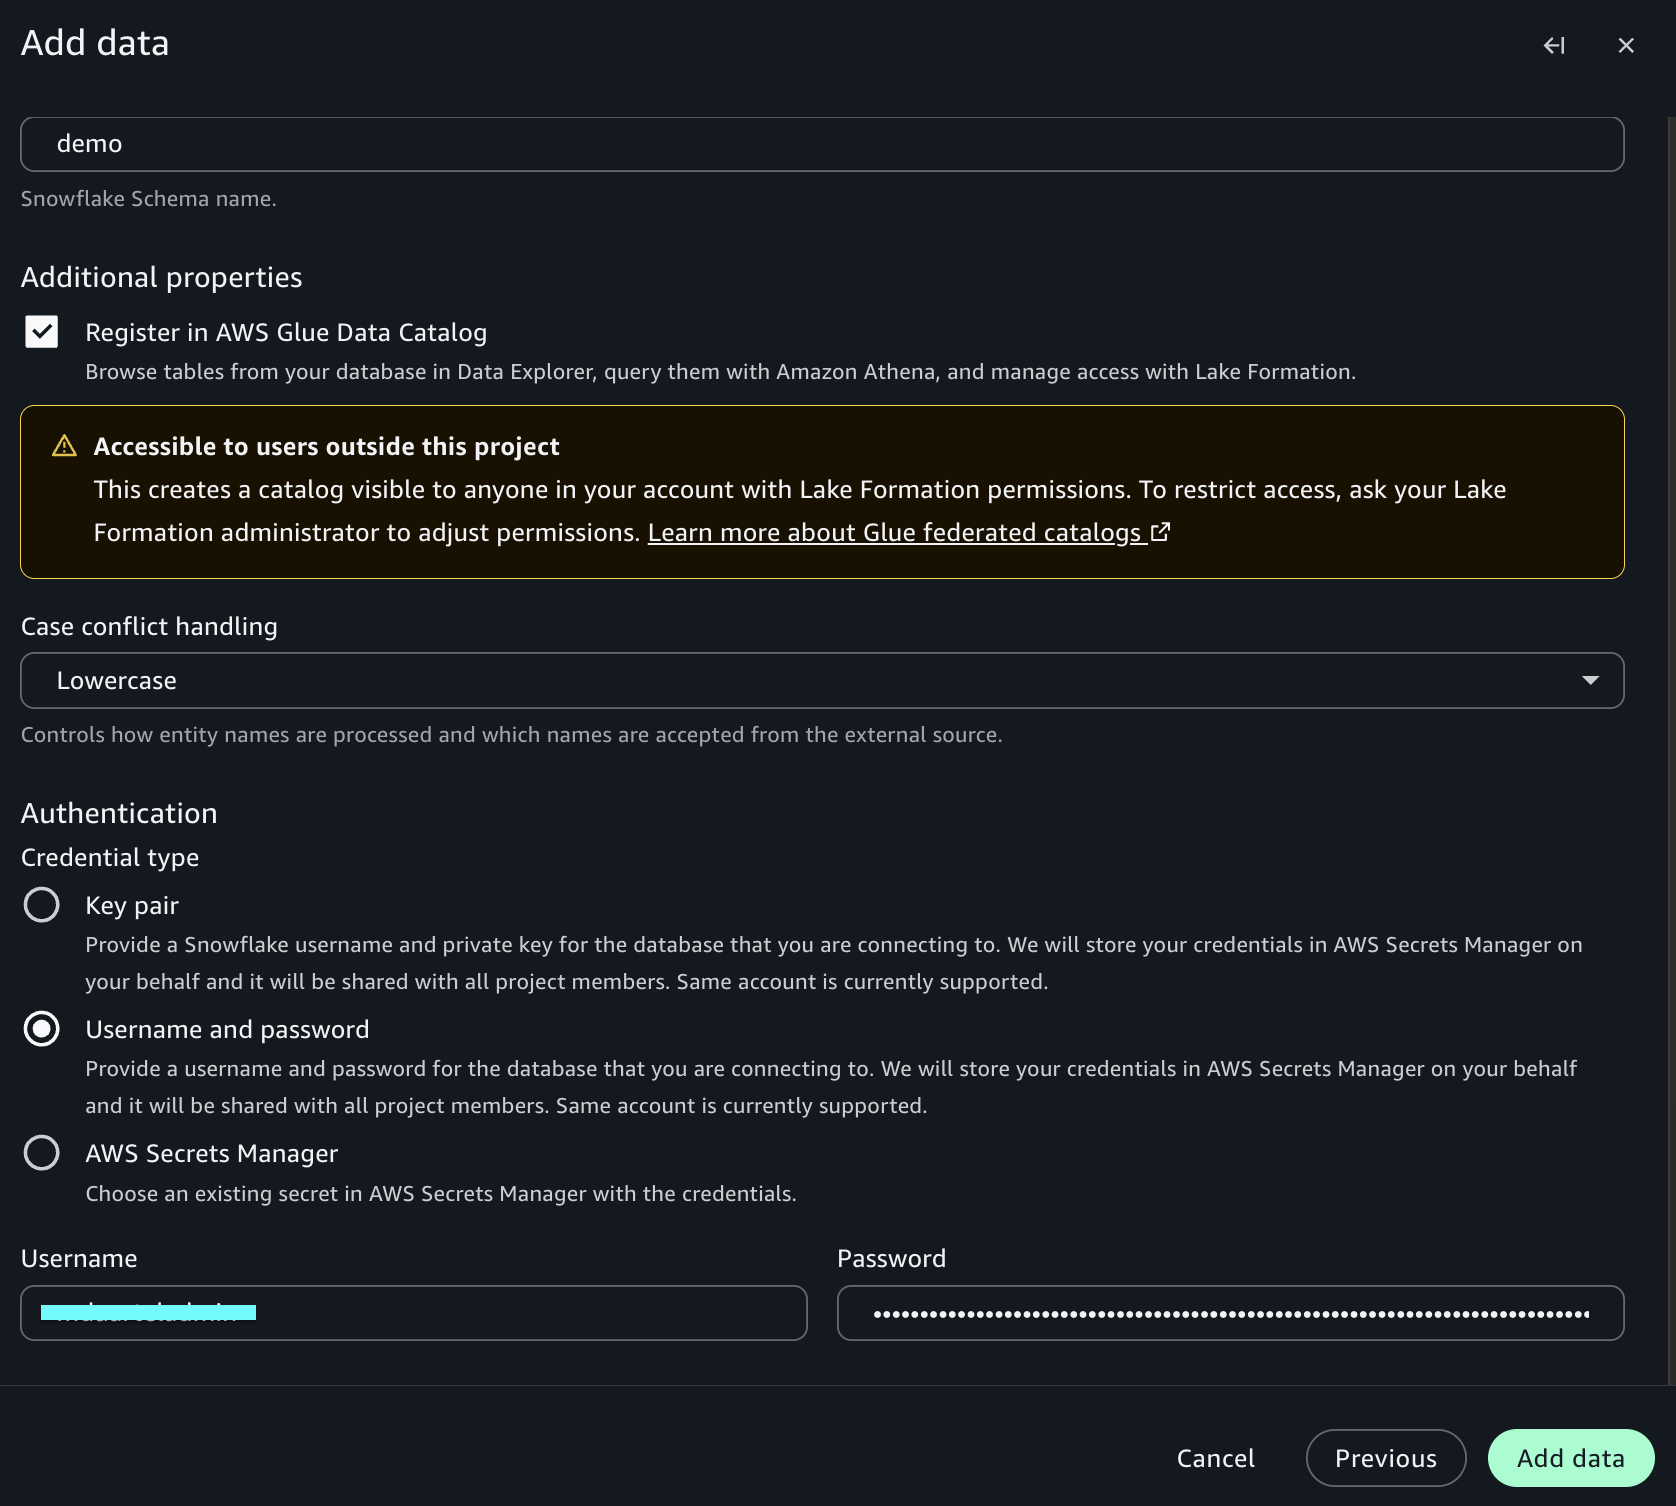
- Schema: Your schema name (for example, demo).
- Additional Properties:
- Register in AWS Glue Data Catalog: Turn on checkbox.
- Case conflict handling: Select the option based on Snowflake naming syntax.
- Authentication:
- Username: Your Snowflake username.
- Password: Your Snowflake password.
- Name:
- Choose Add Data.
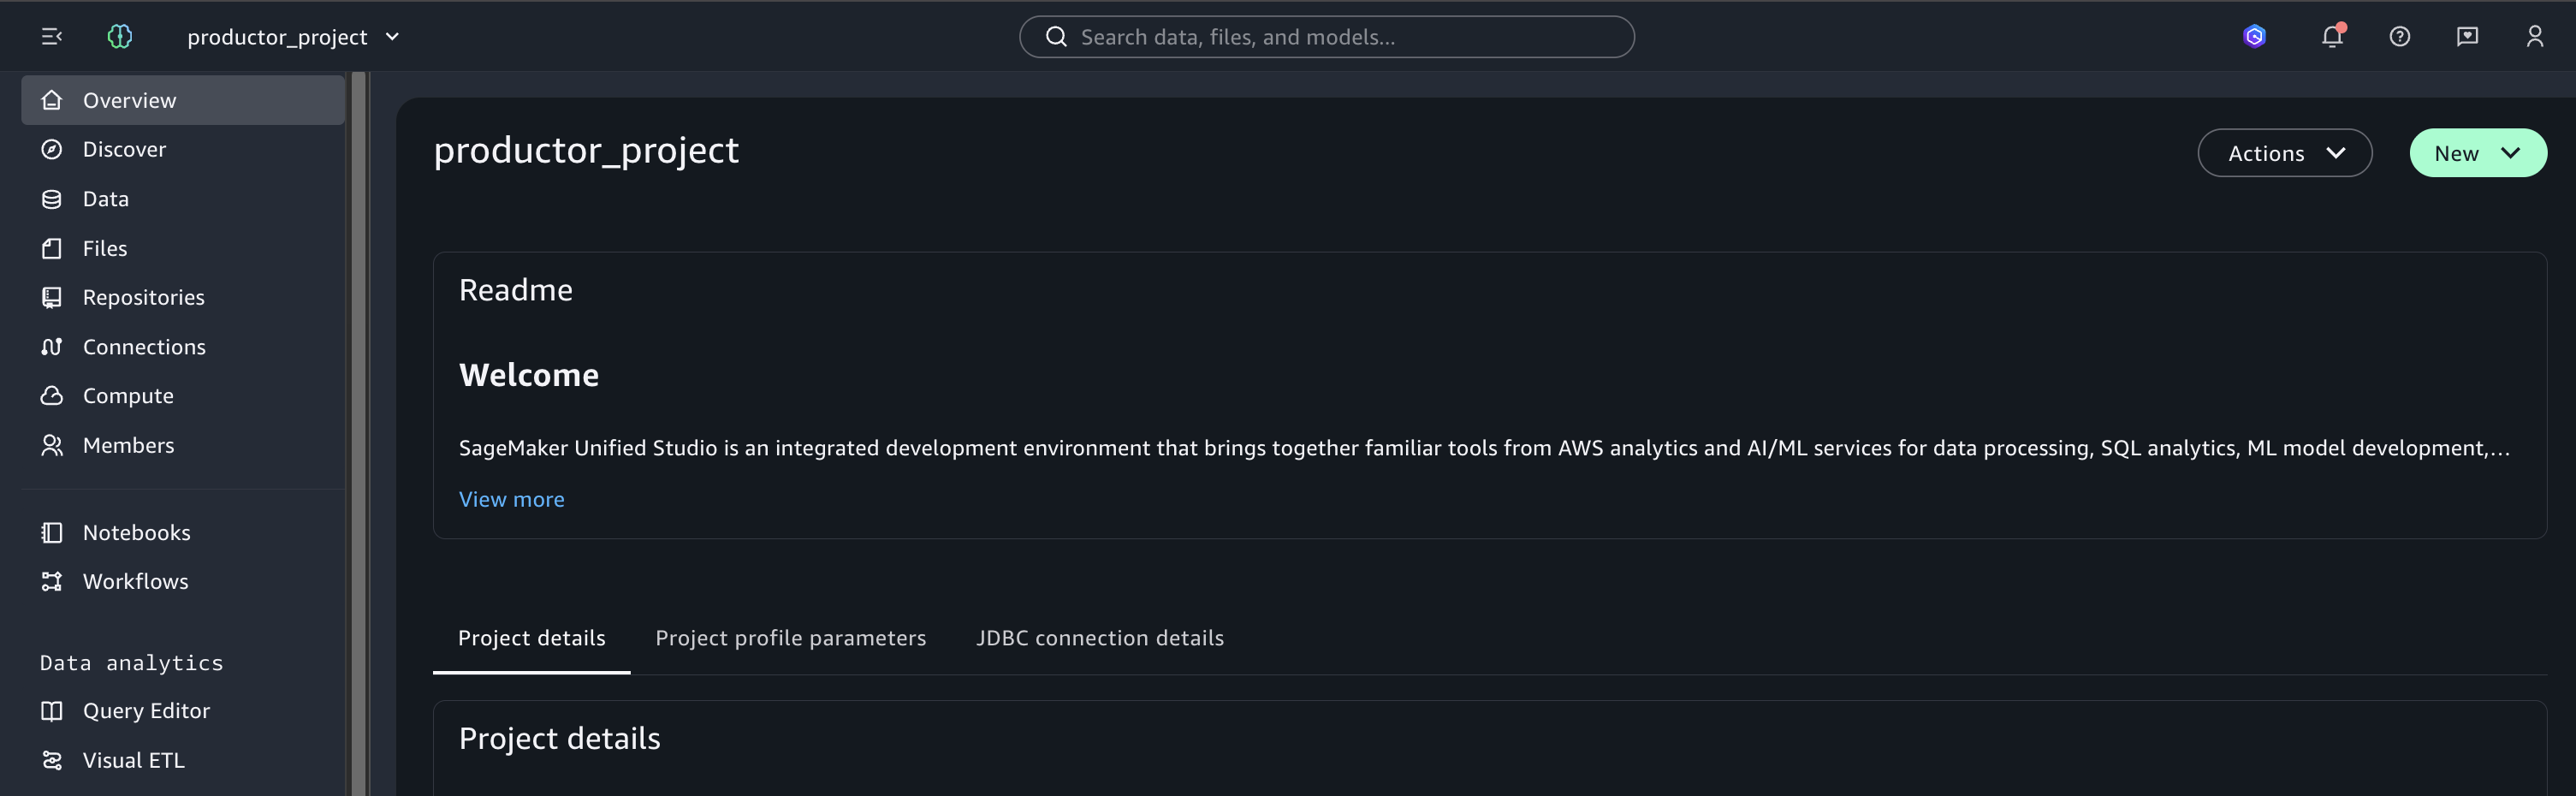
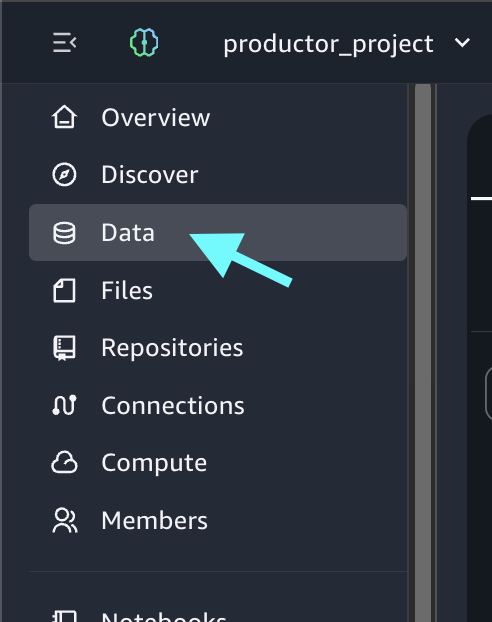
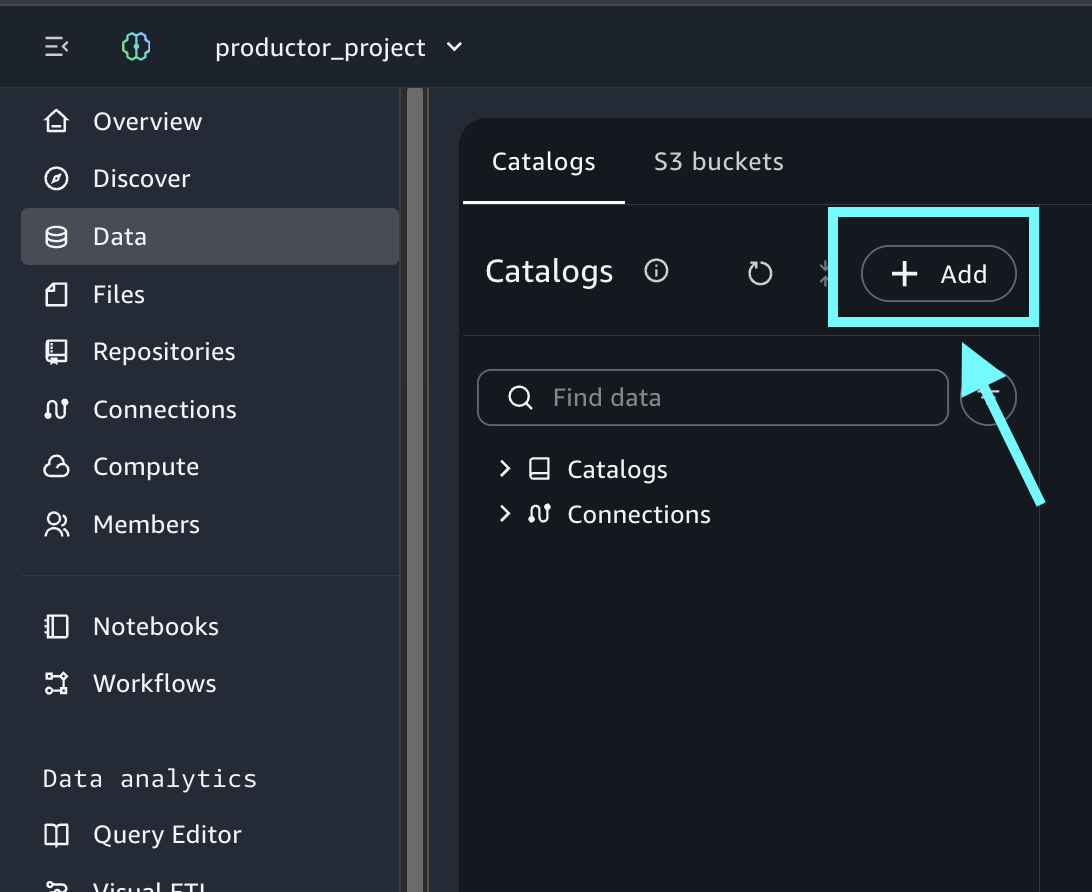
After creating the connection, wait a few minutes for the federated connection to be established. Search within Amazon SageMaker Unified Studio for the database and created objects.
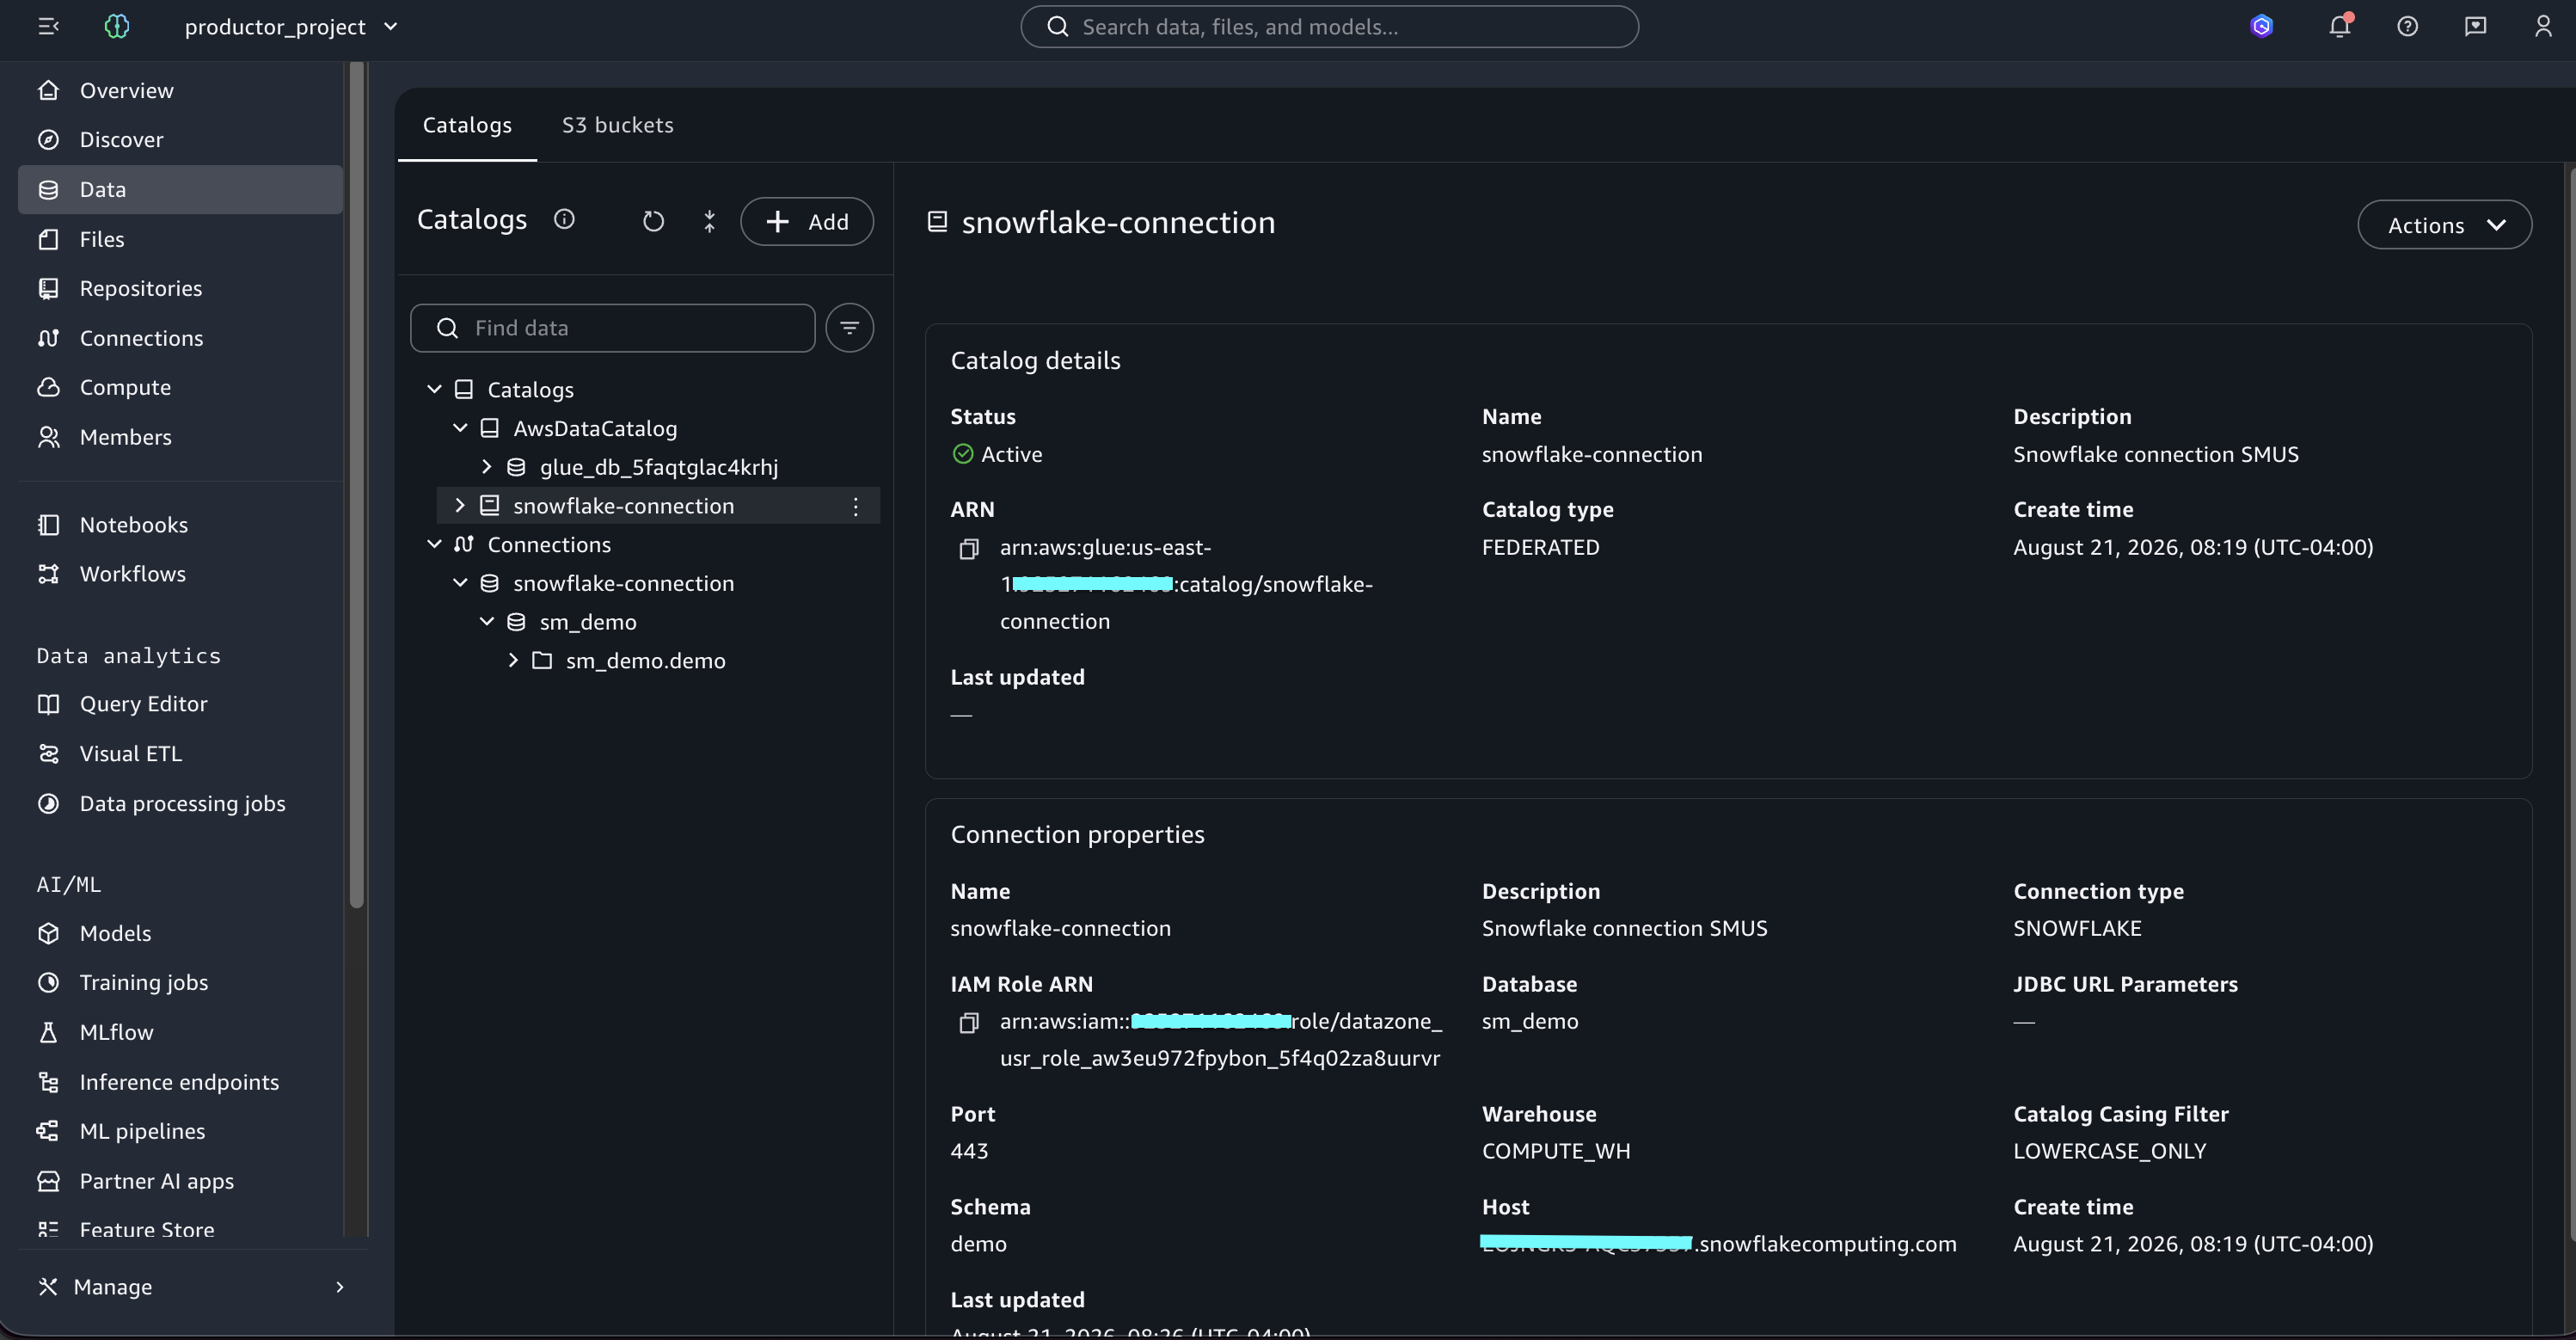
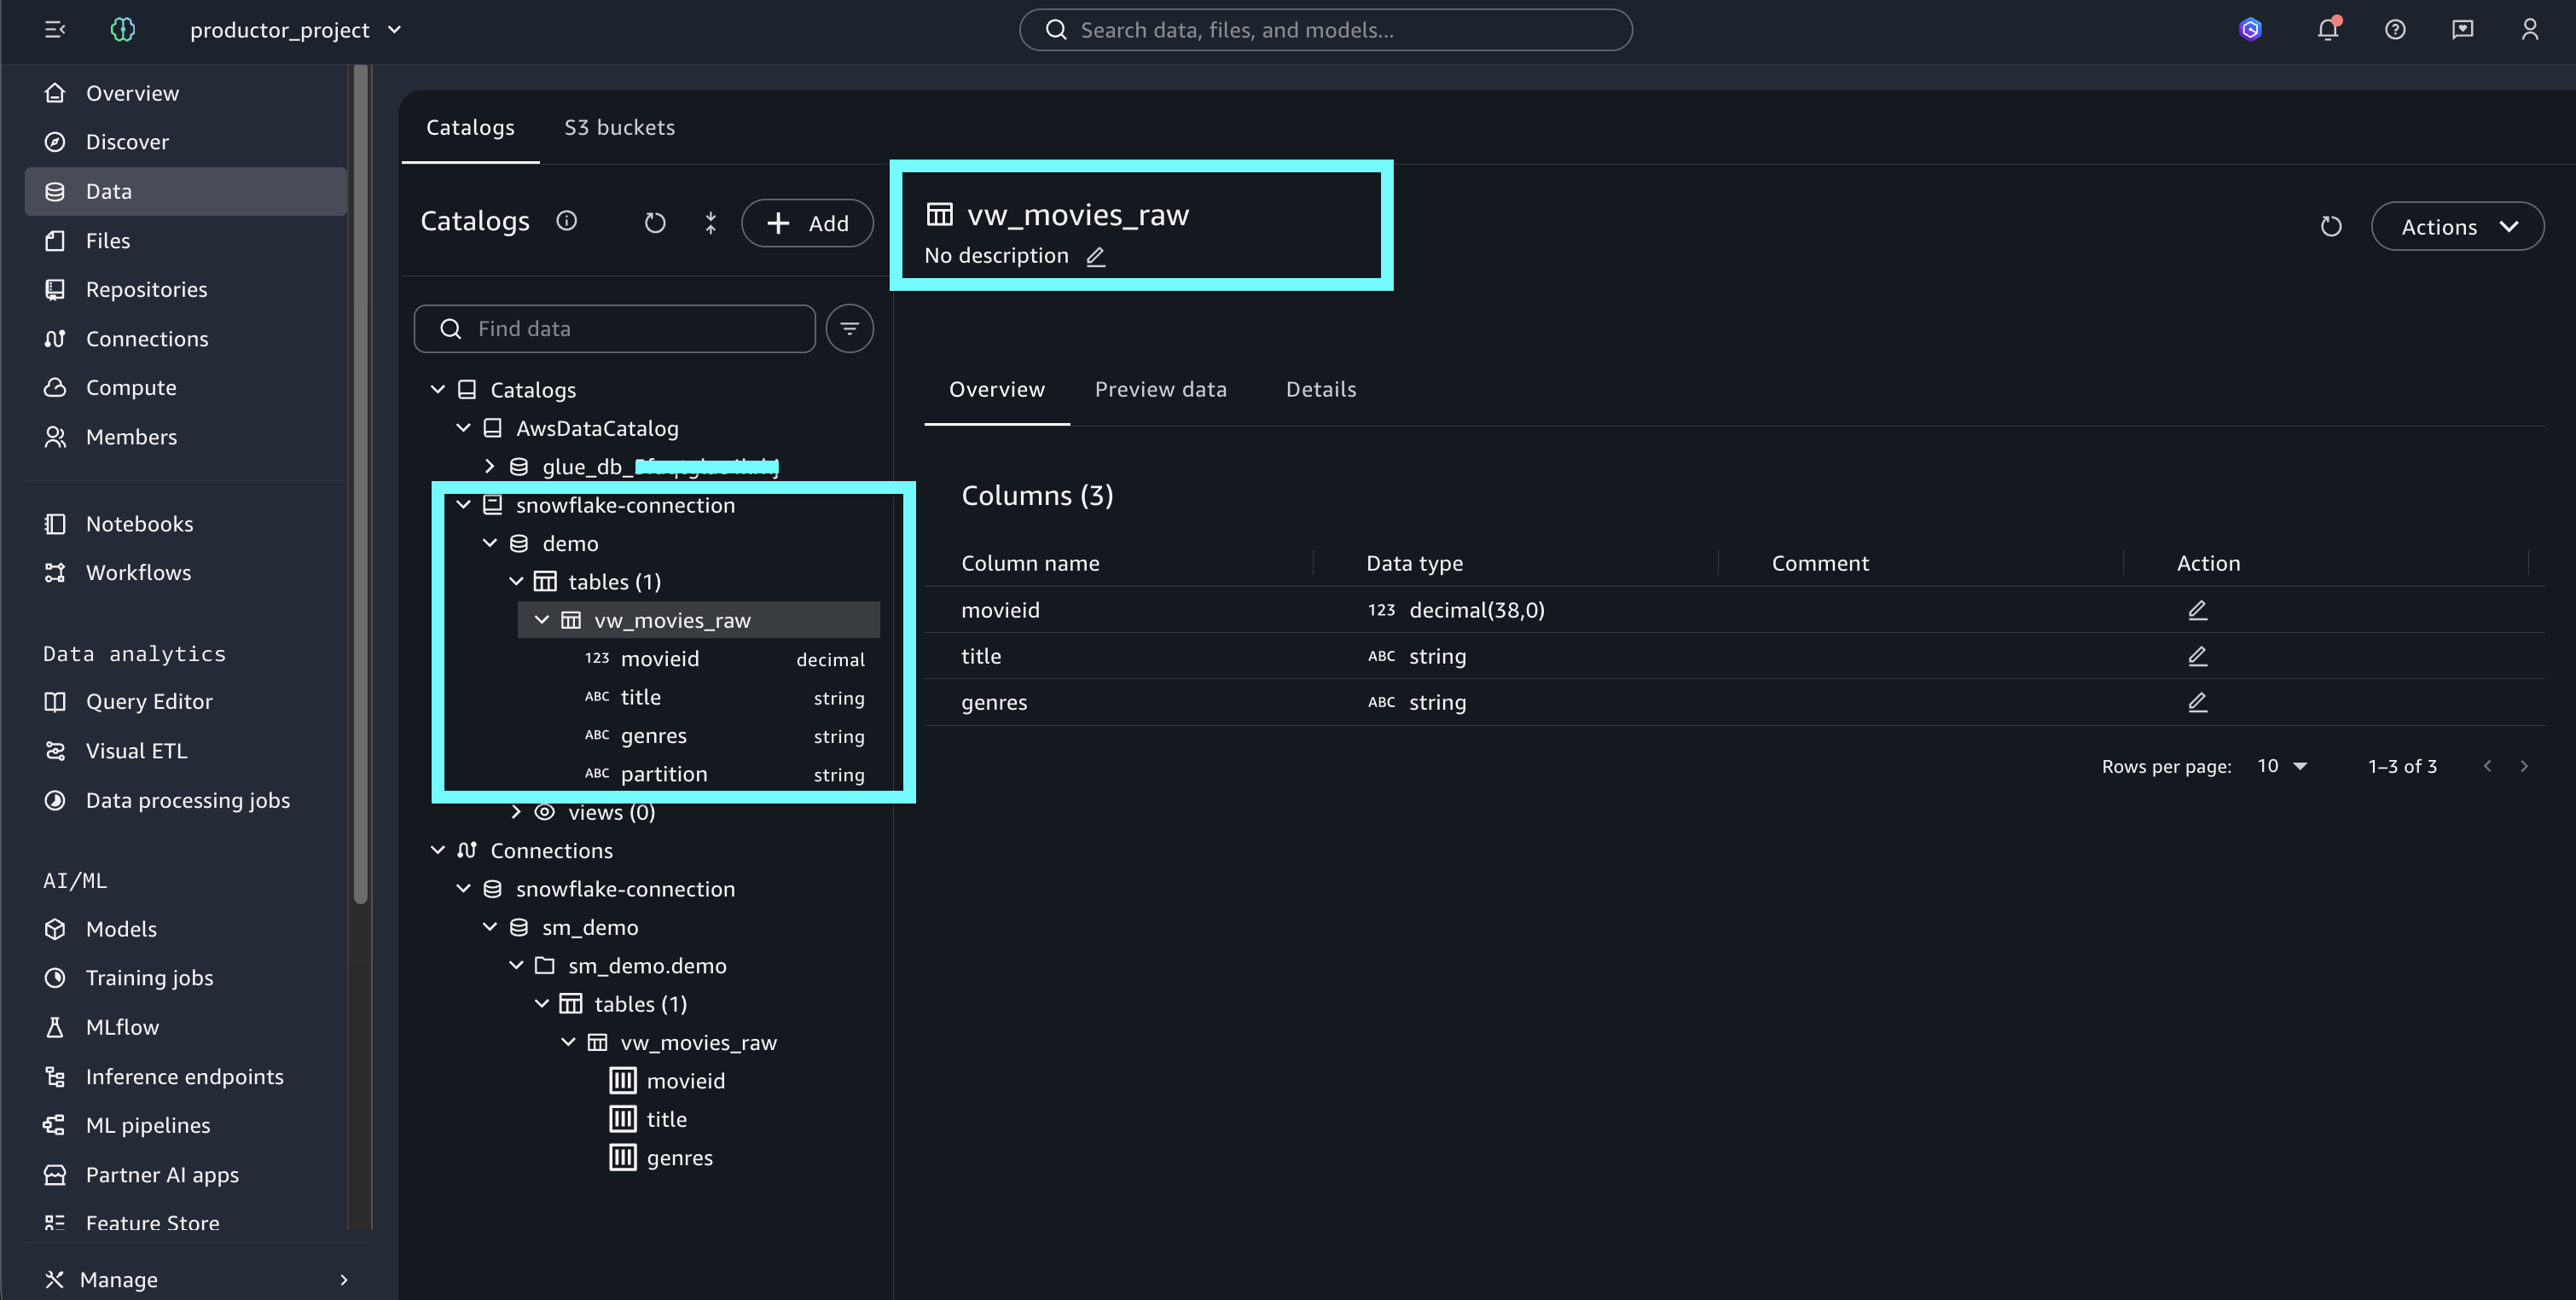
With the Snowflake connection established and the federated tables registered in AWS Glue Catalog, you’re now ready to query Snowflake data directly from Amazon SageMaker Unified Studio, without moving or replicating any data.
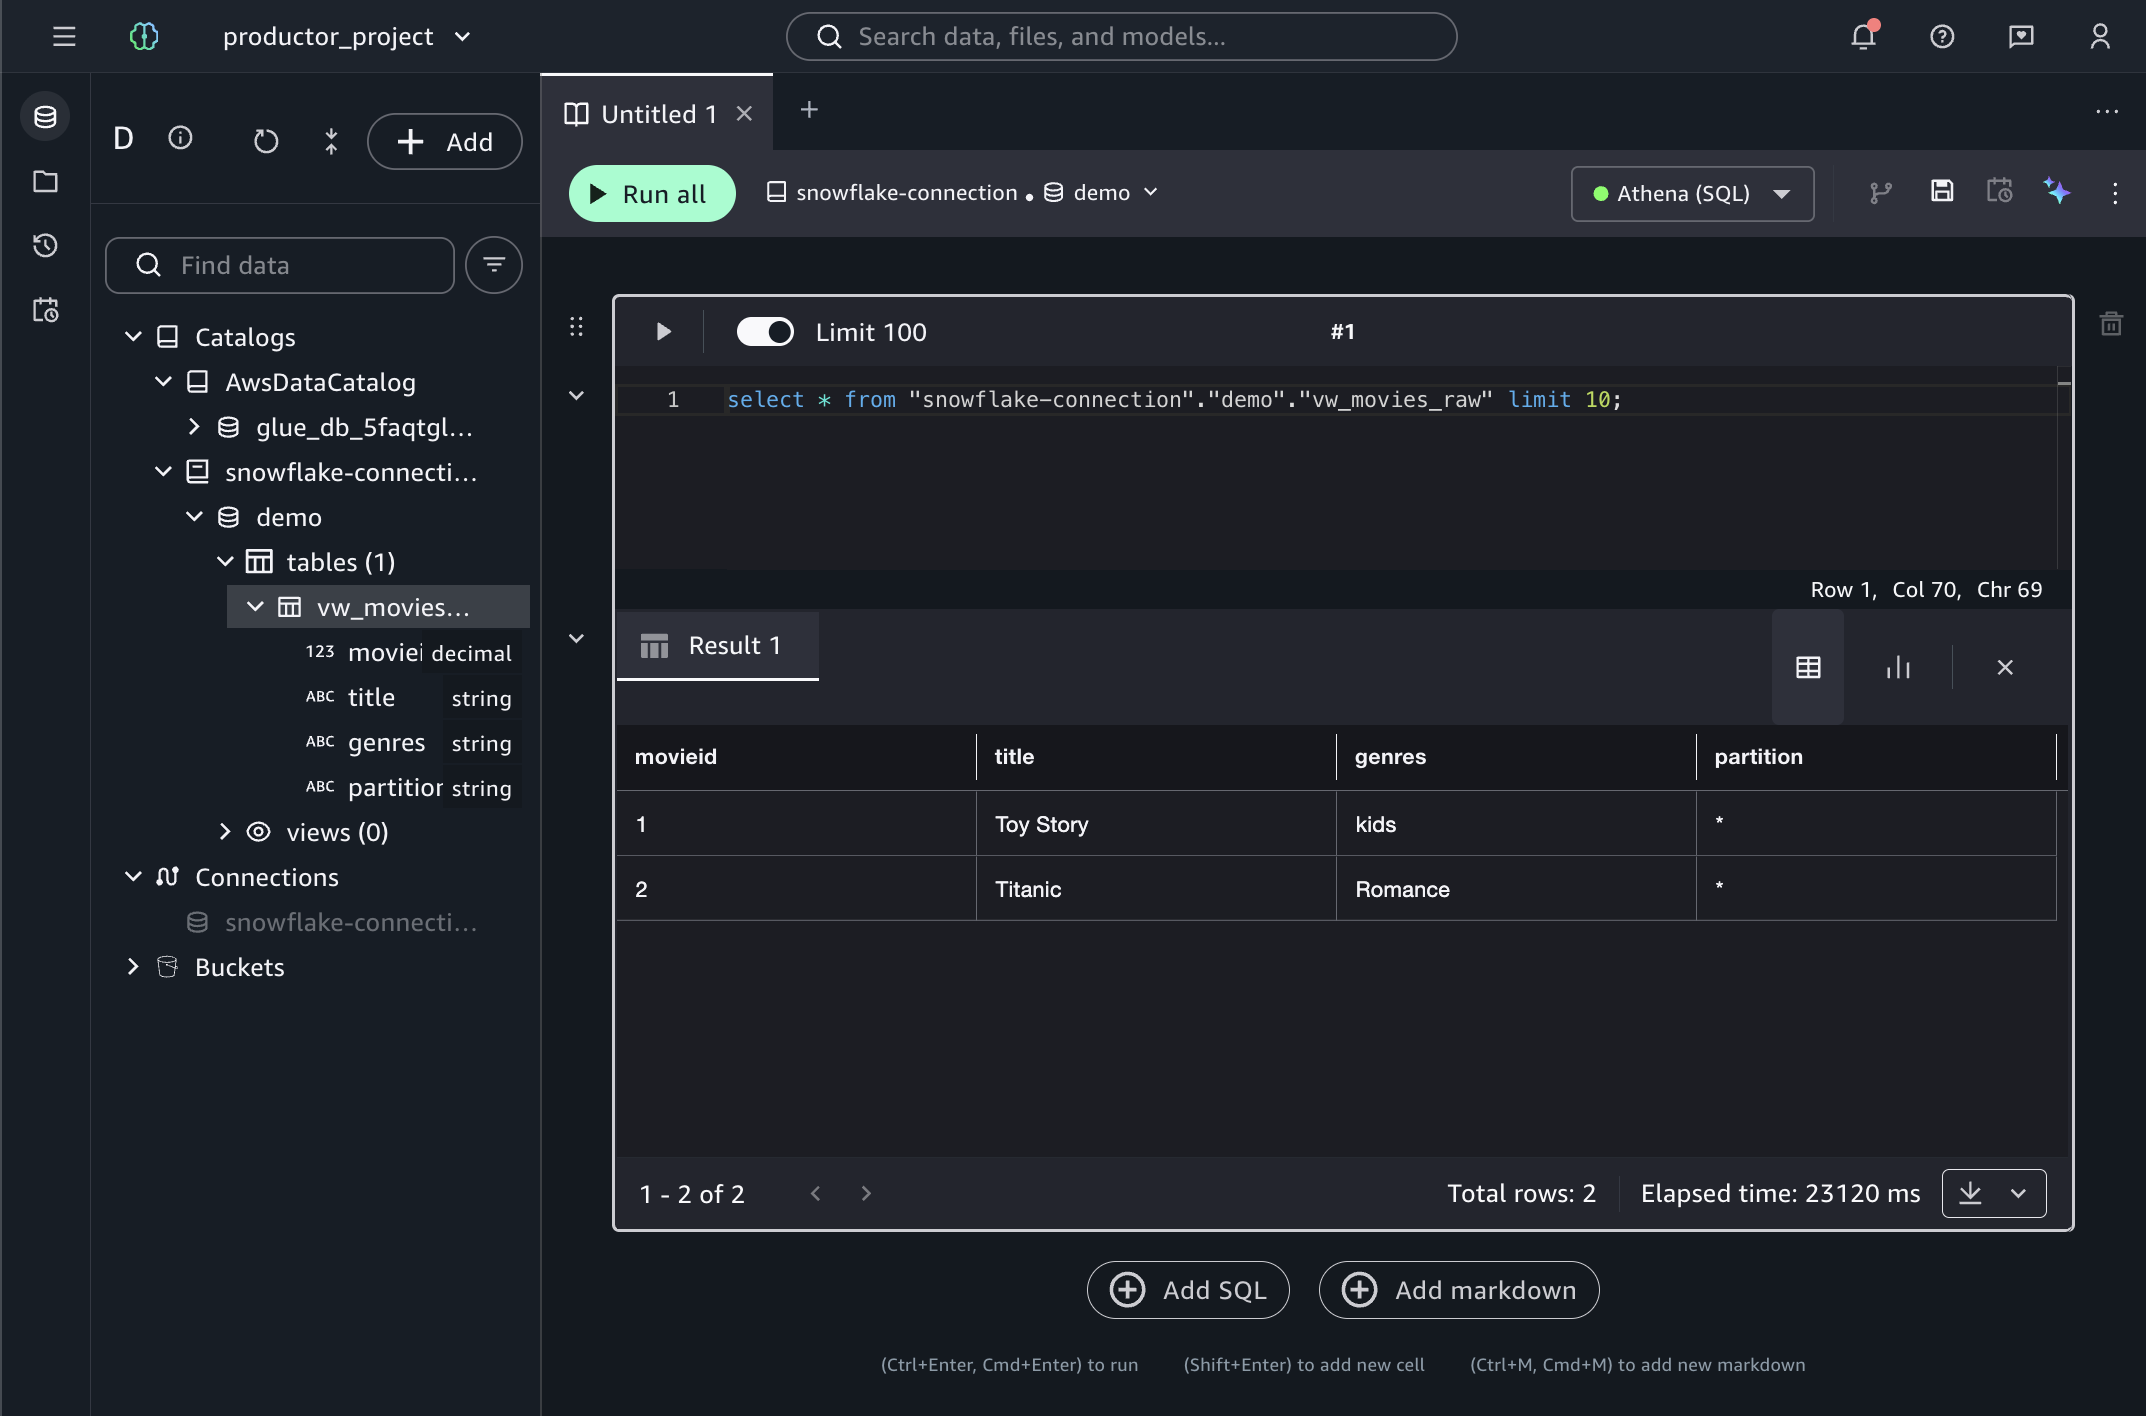
How federated queries work
When you run a query in the Amazon SageMaker Unified Studio query editor against a federated Snowflake table, Amazon Athena runs the request. Athena is the underlying query engine integrated into Amazon SageMaker Unified Studio. Athena reads the table definition from AWS Glue Catalog, connects to Snowflake through the established connection, and pushes the query down for execution. Athena returns results directly to the query editor while Snowflake processes the data in place, and only the query results travel across the connection. Amazon SageMaker Unified Studio doesn’t copy data to S3 or any intermediate storage.
After you’ve validated that queries return the expected results, the next step is to publish this dataset to Amazon SageMaker Catalog, making it discoverable and shareable across your organization.
Publishing Snowflake datasets to the SageMaker Catalog
Now that your Snowflake connection is configured, you can publish your datasets to the Amazon SageMaker Catalog, making them discoverable and shareable across your organization.
Creating data assets in SageMaker Catalog
Data assets in Amazon SageMaker Catalog are the cataloged representation of your data resources. They help teams discover, govern, and share data across your organization.
In this section, you create a data asset associated with a Snowflake table. This process transforms a technical Snowflake table into a cataloged resource enriched with business metadata.
To create a data source:
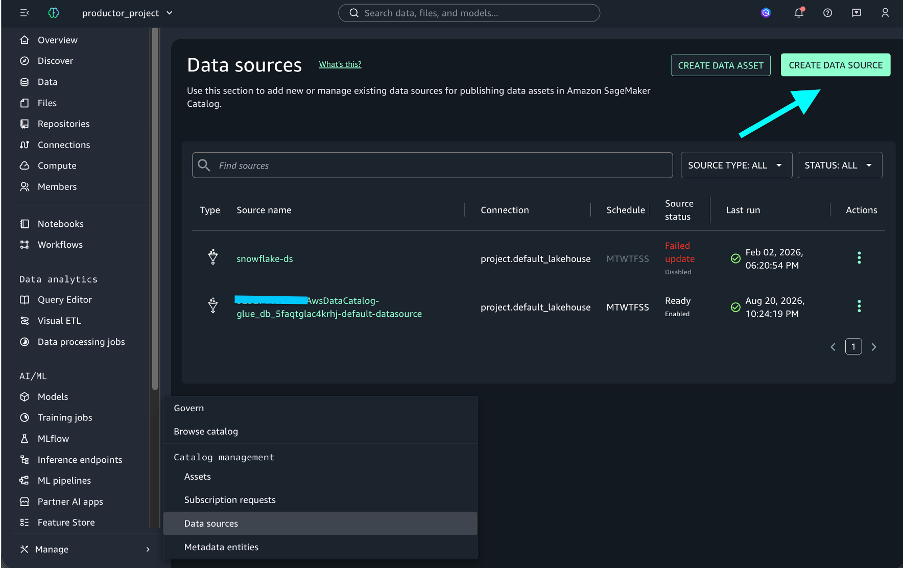
- In your Amazon SageMaker Unified Studio project, go to Manage.
- Choose Data Sources.
- Choose Create Data Source.

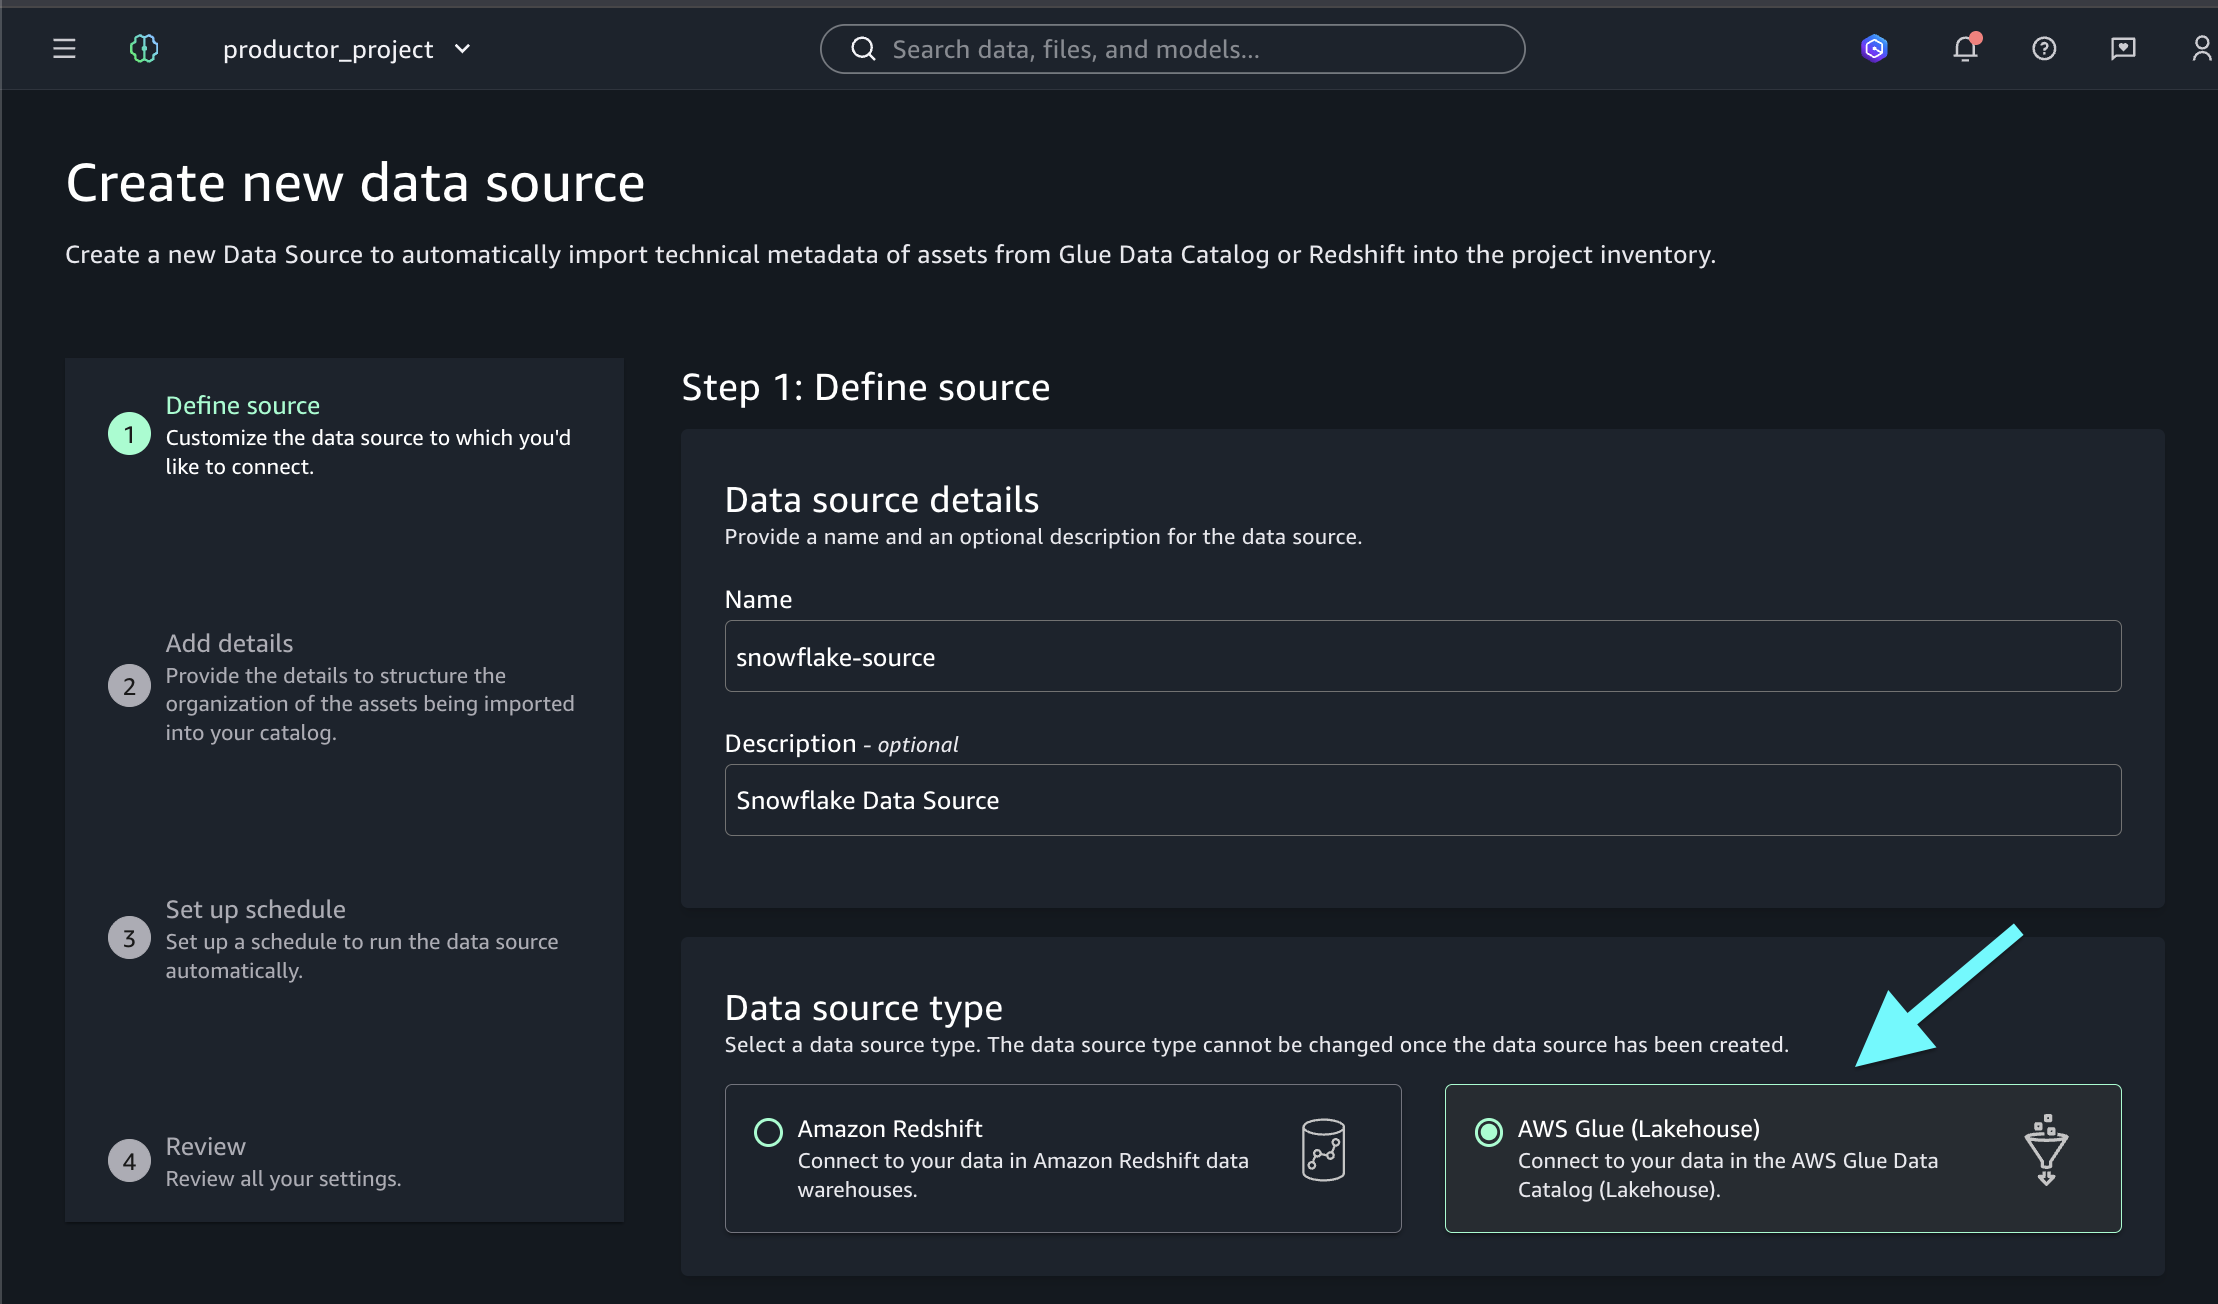
- Select the AWS Glue option.
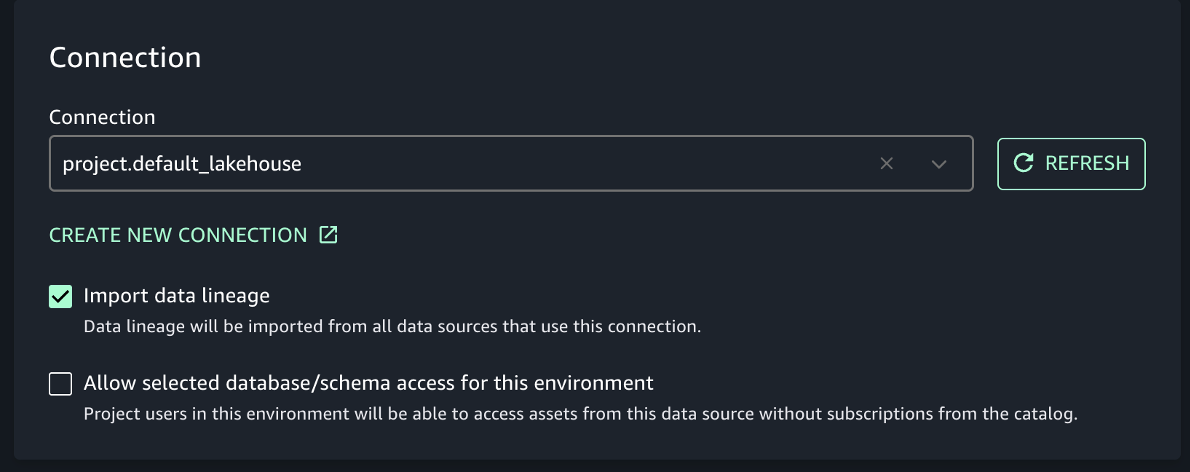
- Turn on the Import data lineage checkbox and select the connection: project.default_lakehouse.
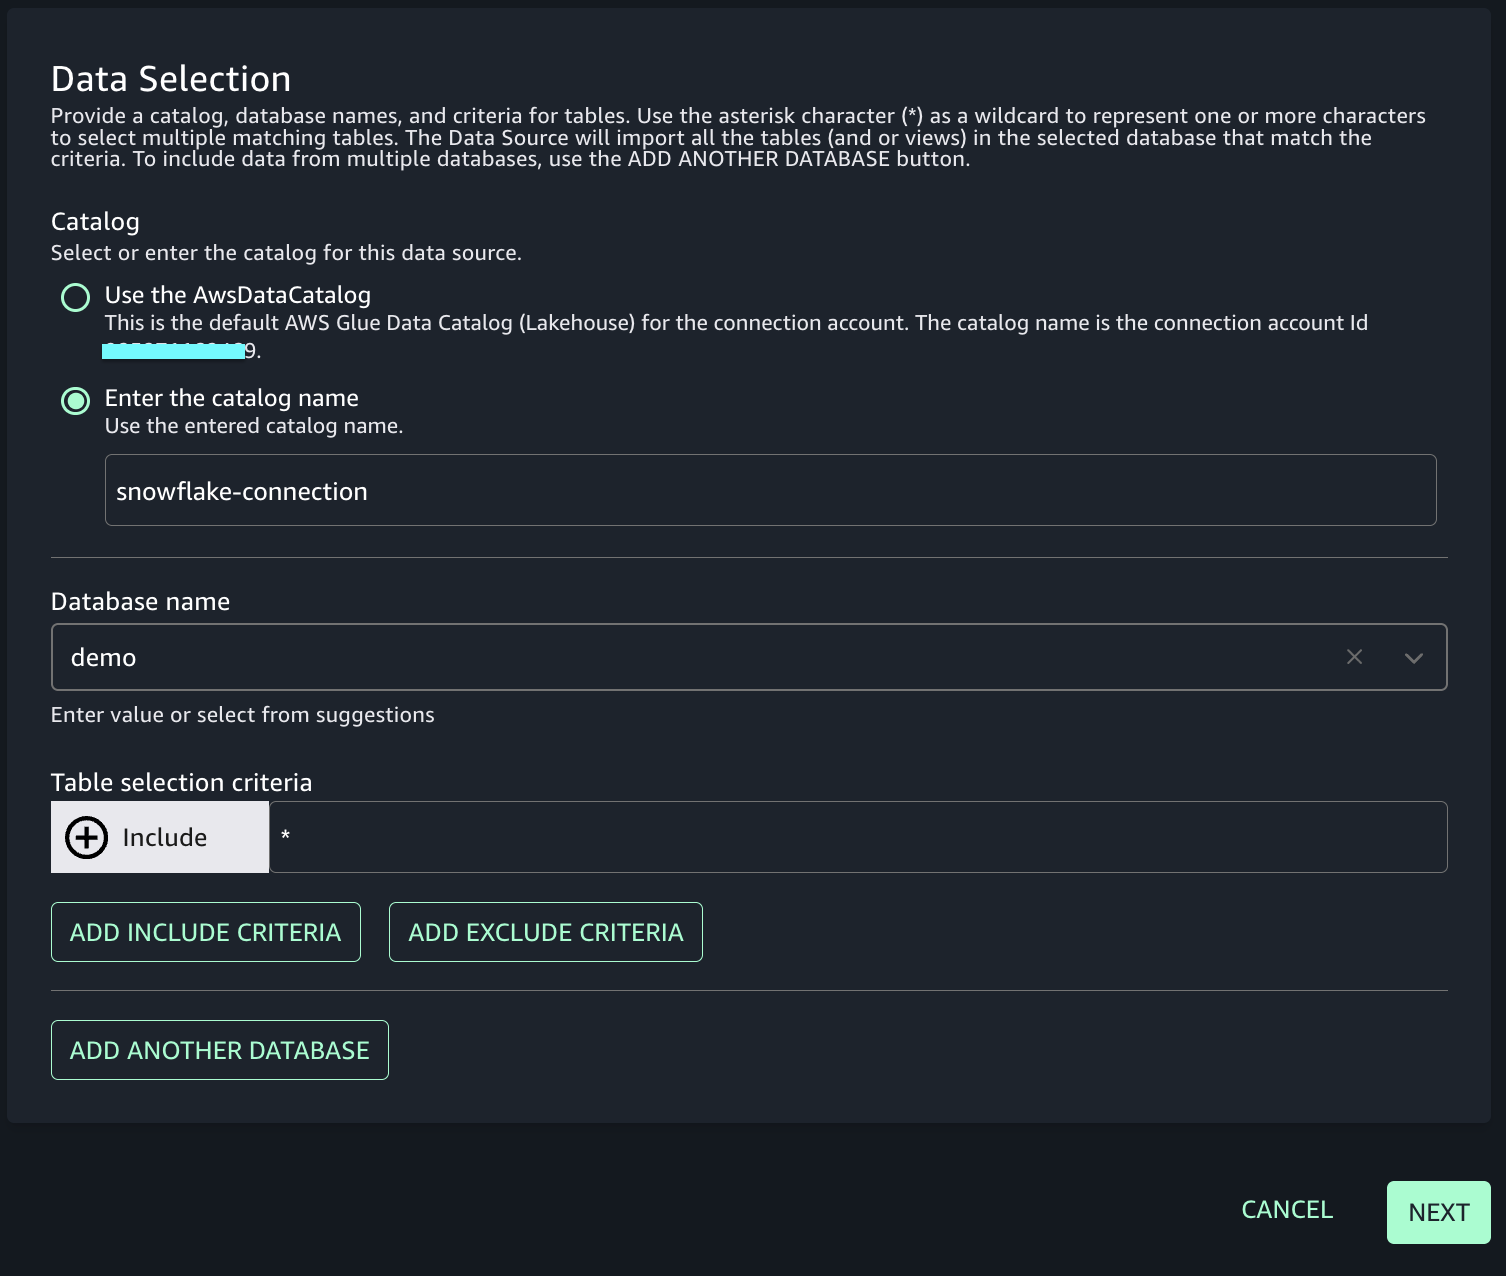
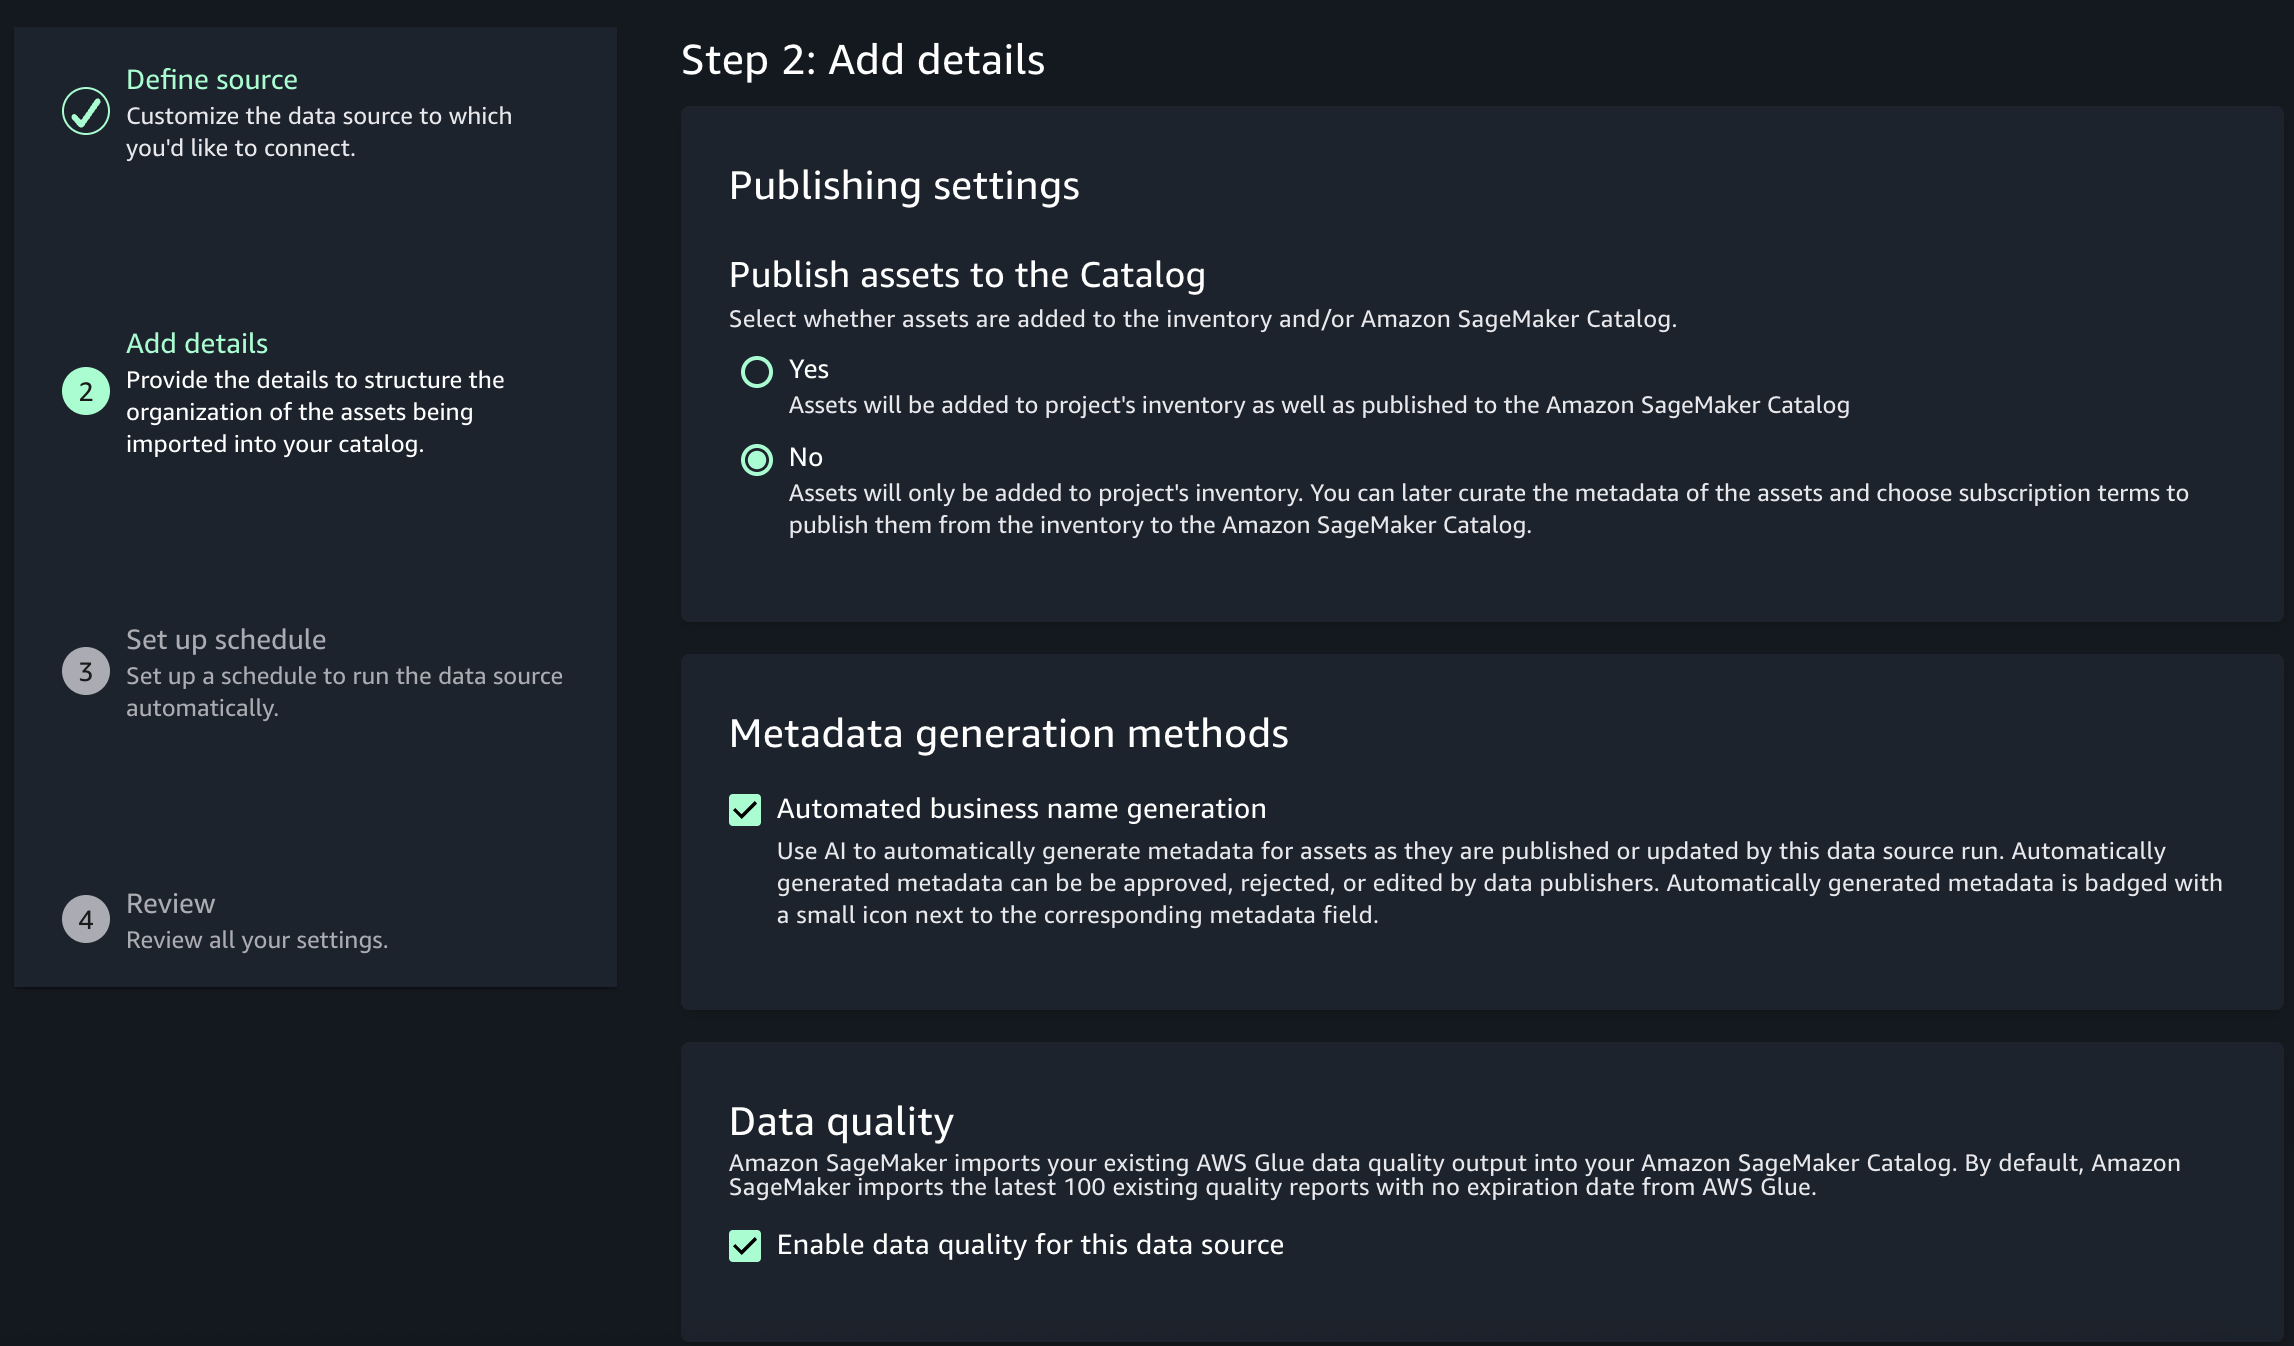
- Complete the form and choose Next:
- Catalog: Select Enter the catalog name and enter
snowflake-connection. - Database name: Enter your database name (for example, movies).
- Table selection criteria: Enter * for all tables in the database, or enter a specific table name.
- Catalog: Select Enter the catalog name and enter
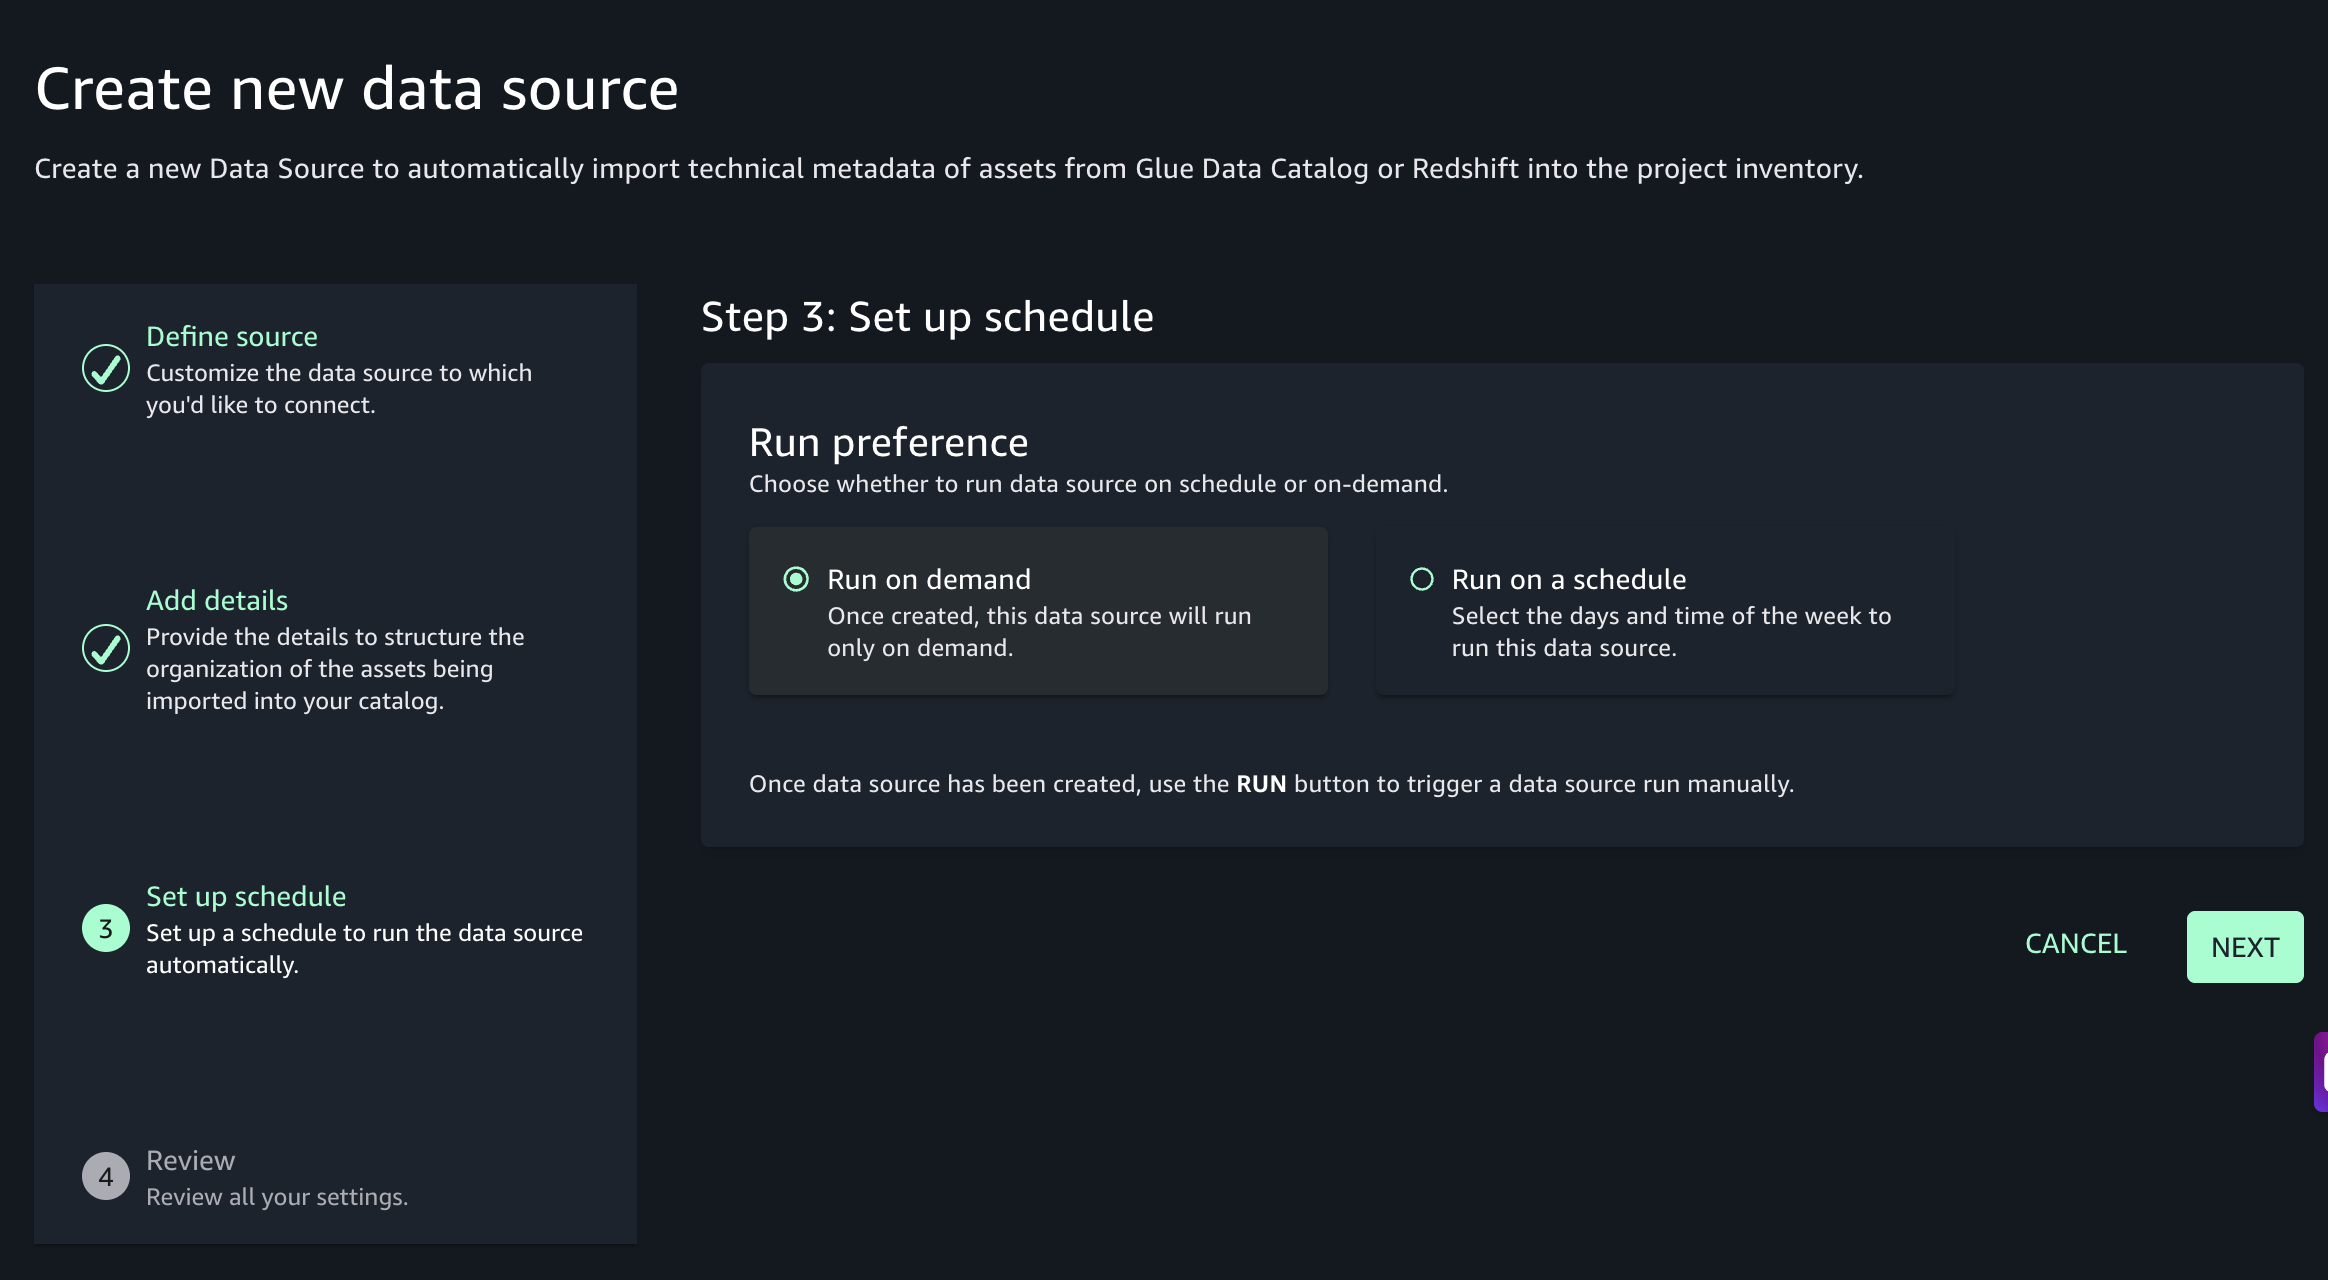
- Keep the default options and choose Next until you reach the summary screen.
- Review your settings and choose Create.
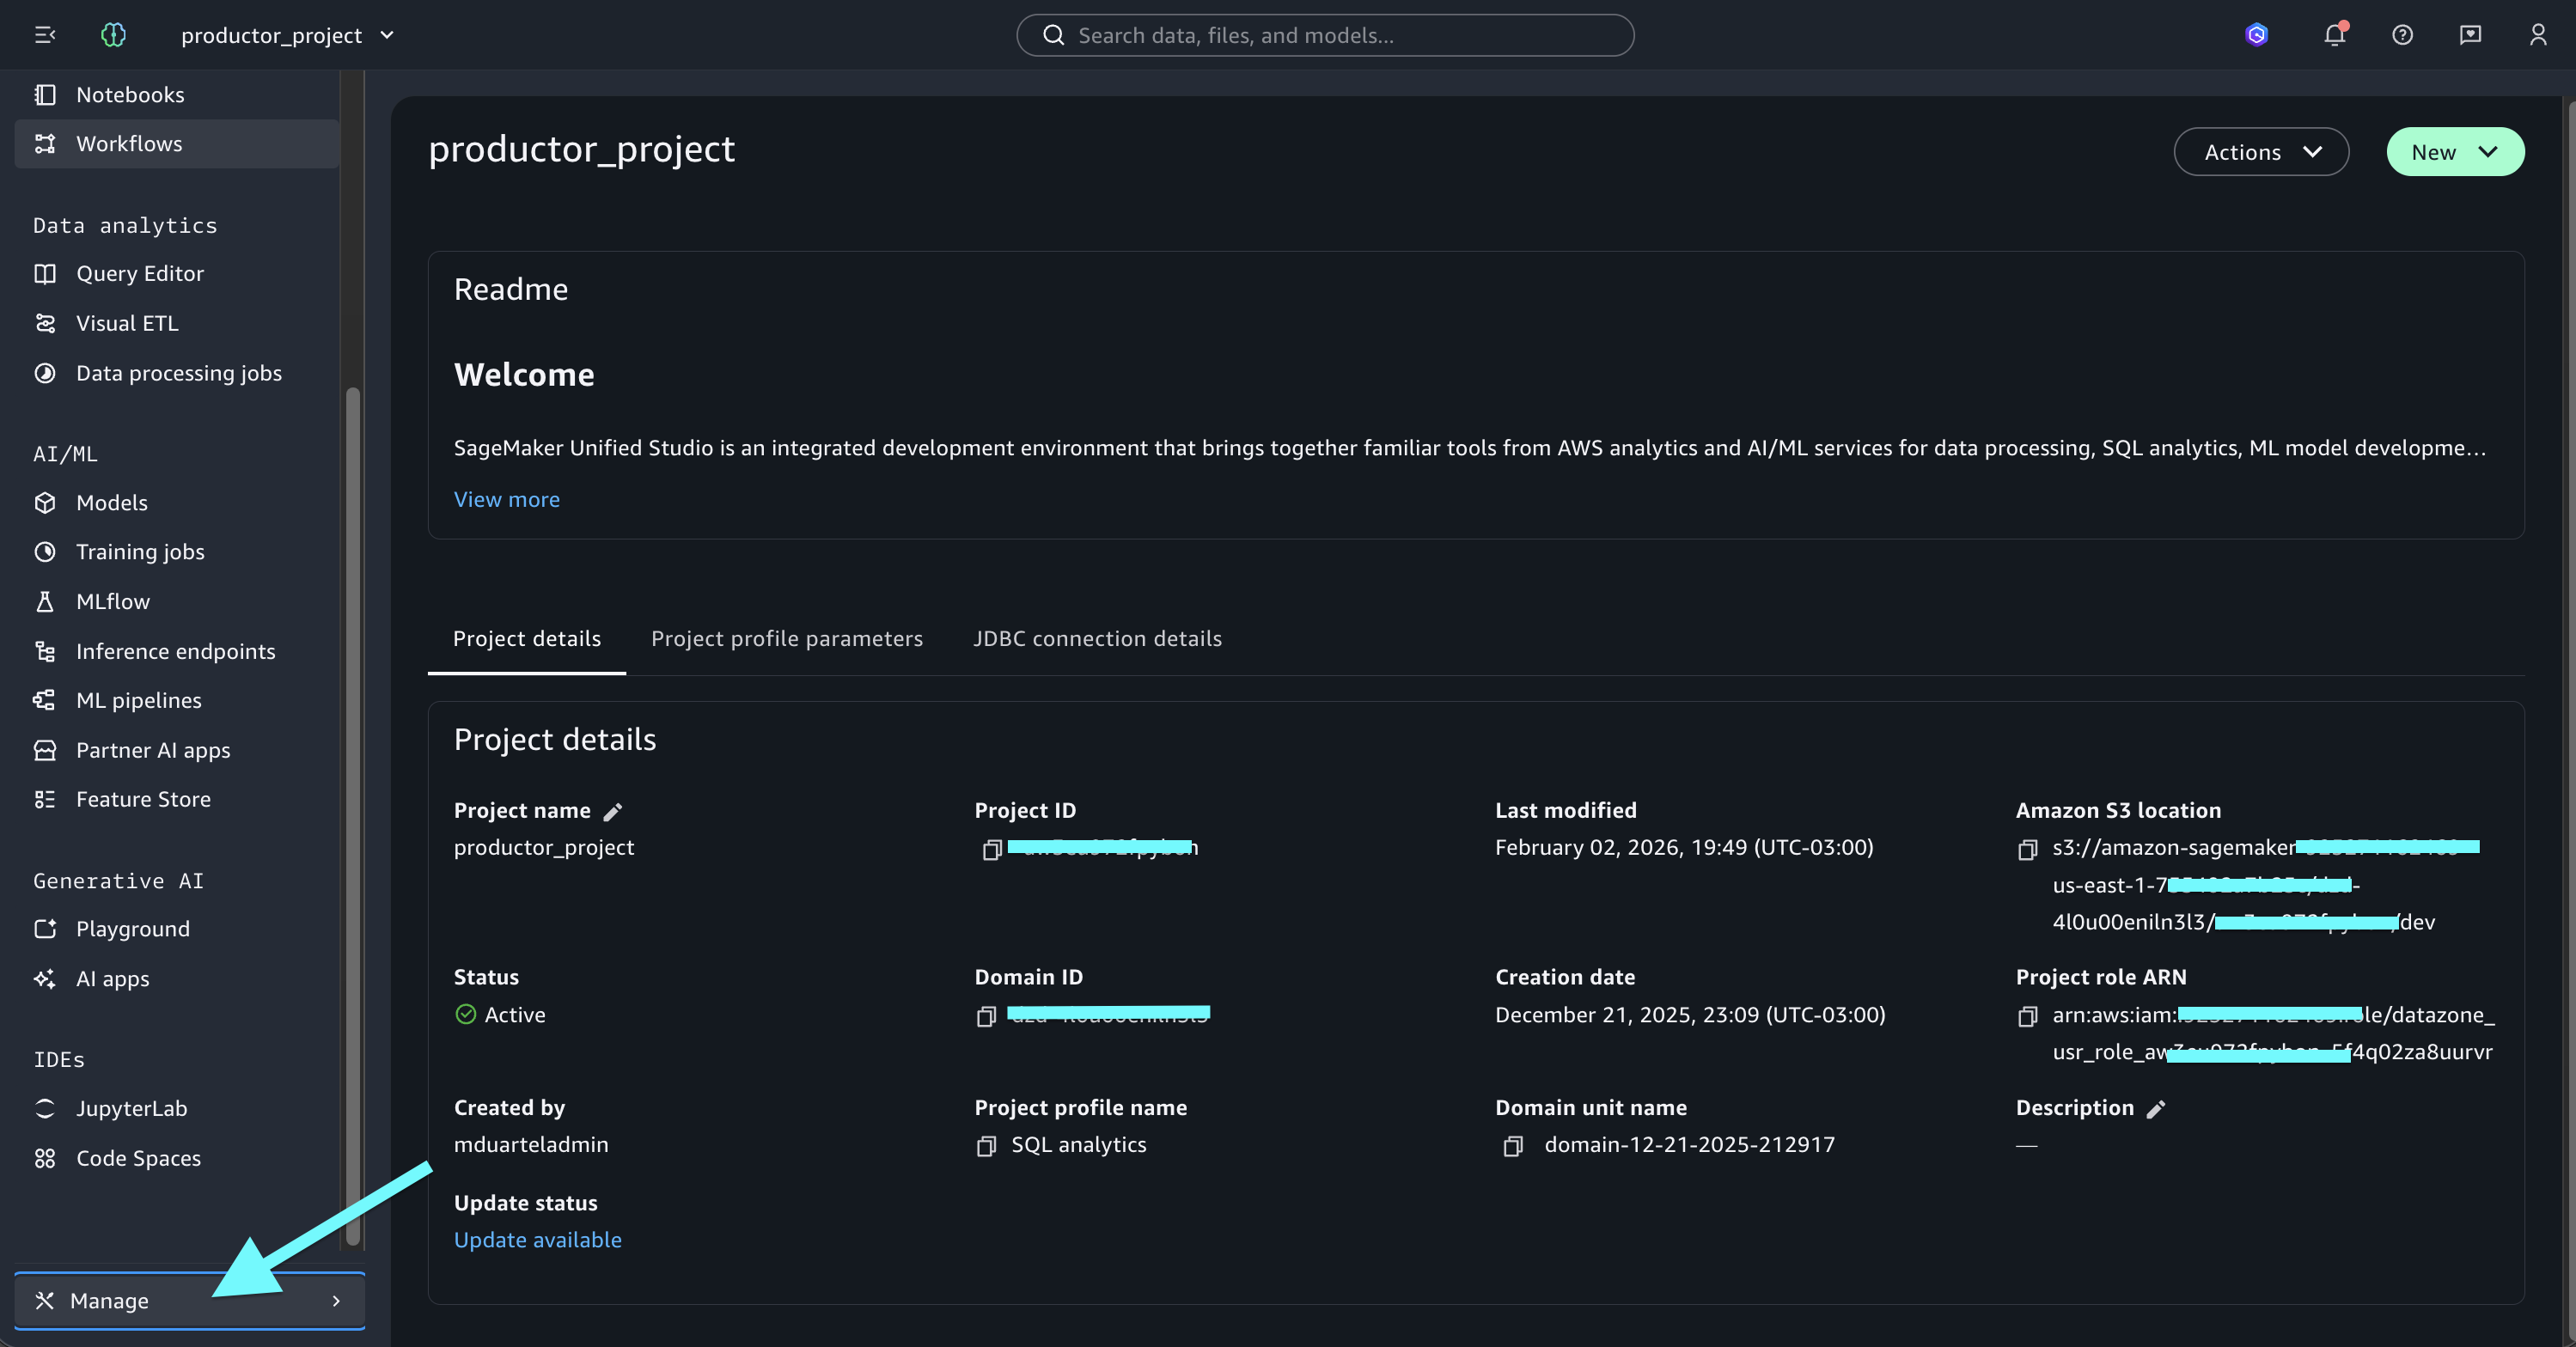
To extract metadata and publish assets:
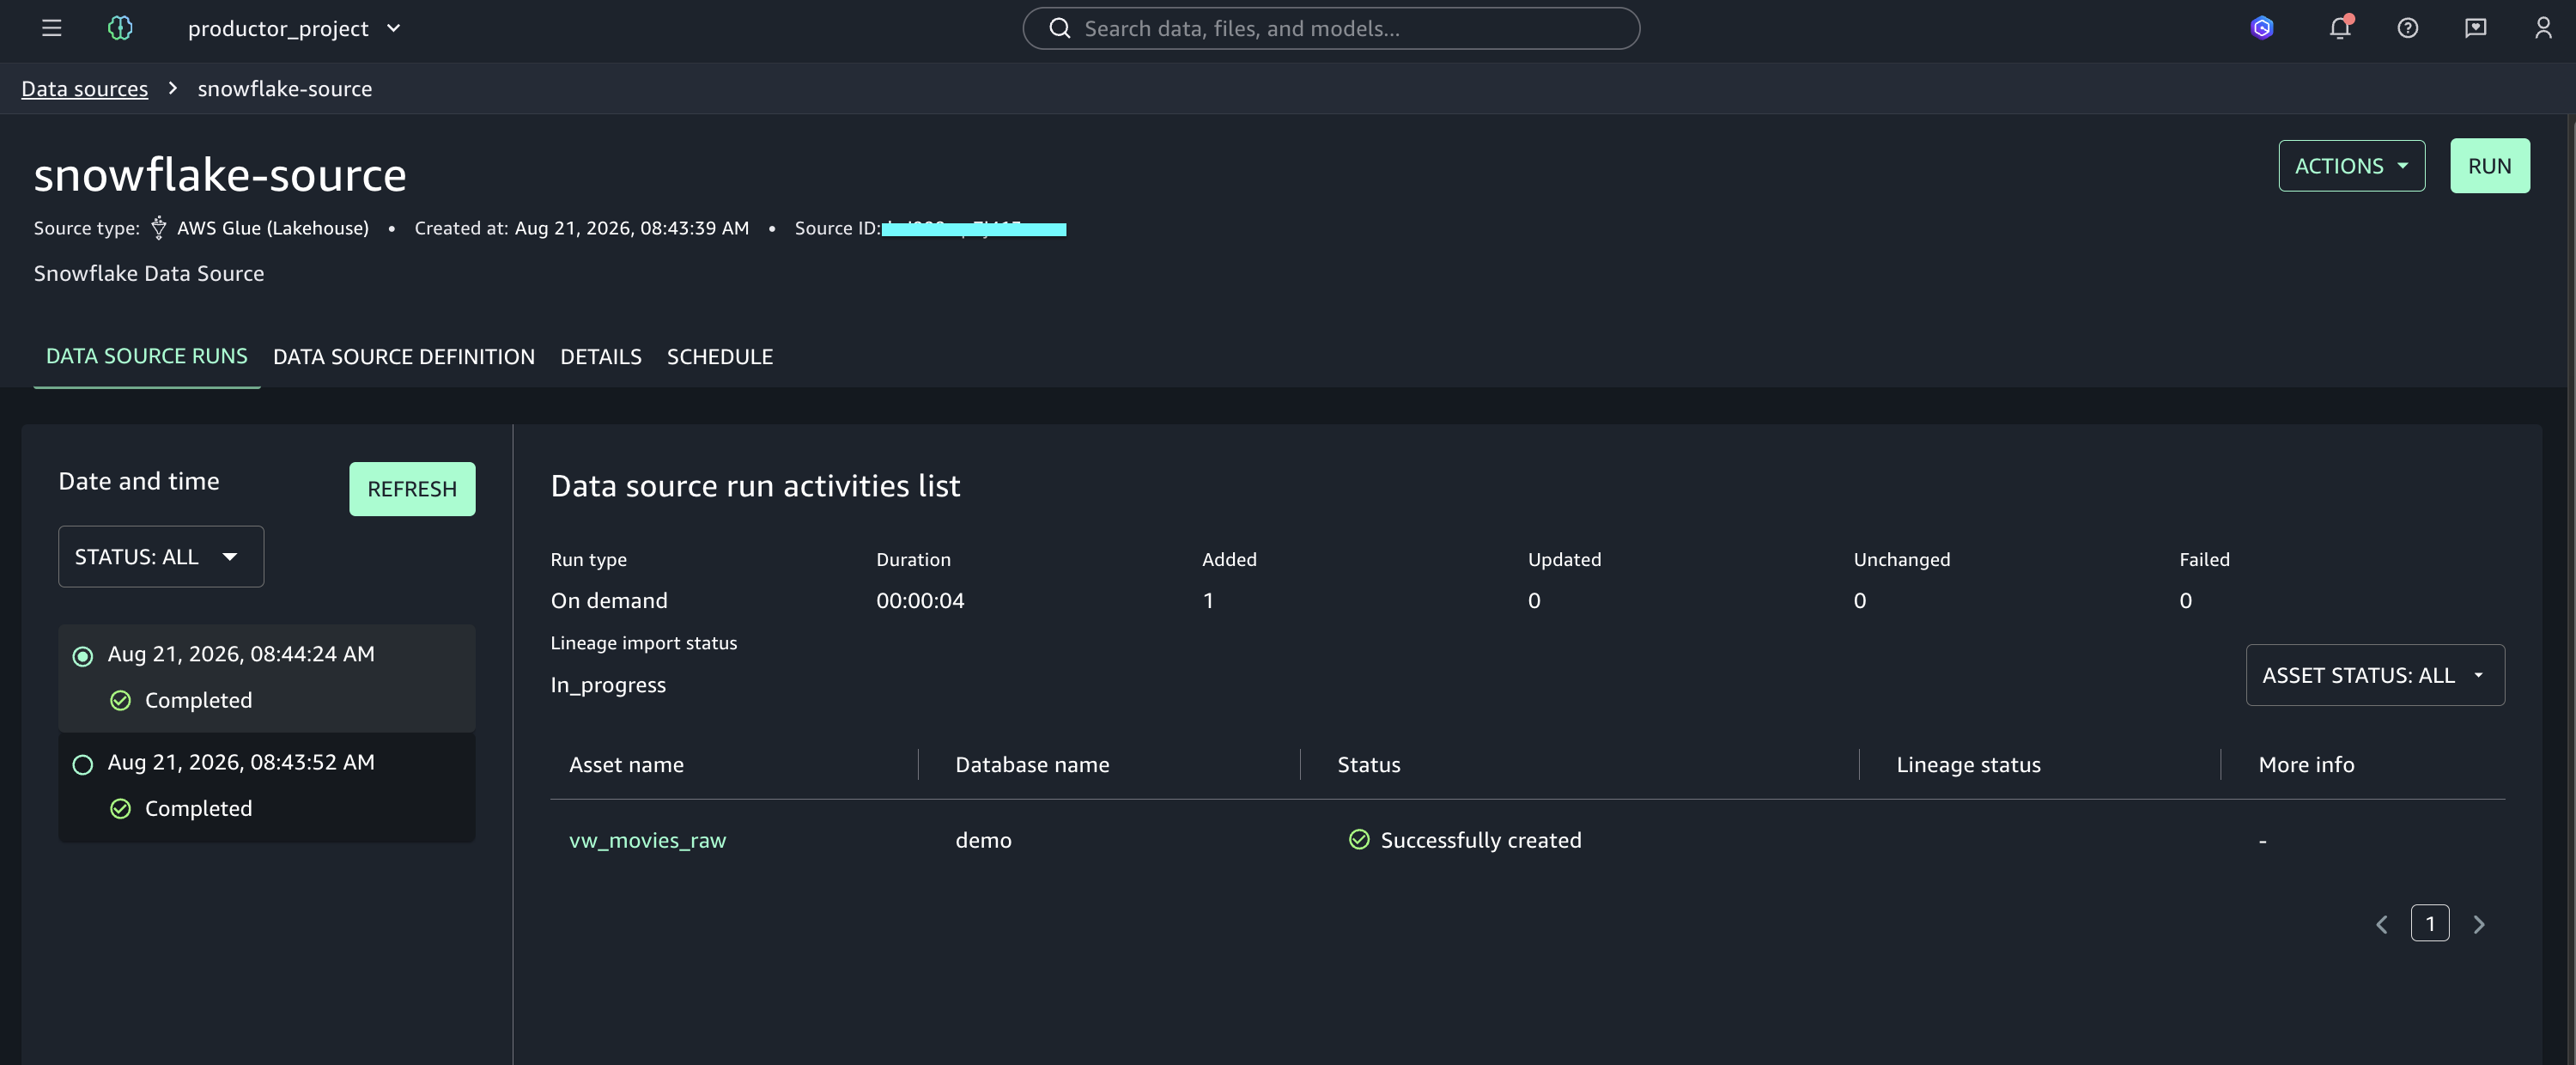
- Choose Run to start extracting metadata from AWS Glue Data Catalog.
- Wait for the run to complete.
- Go to Assets to view the Asset Inventory.
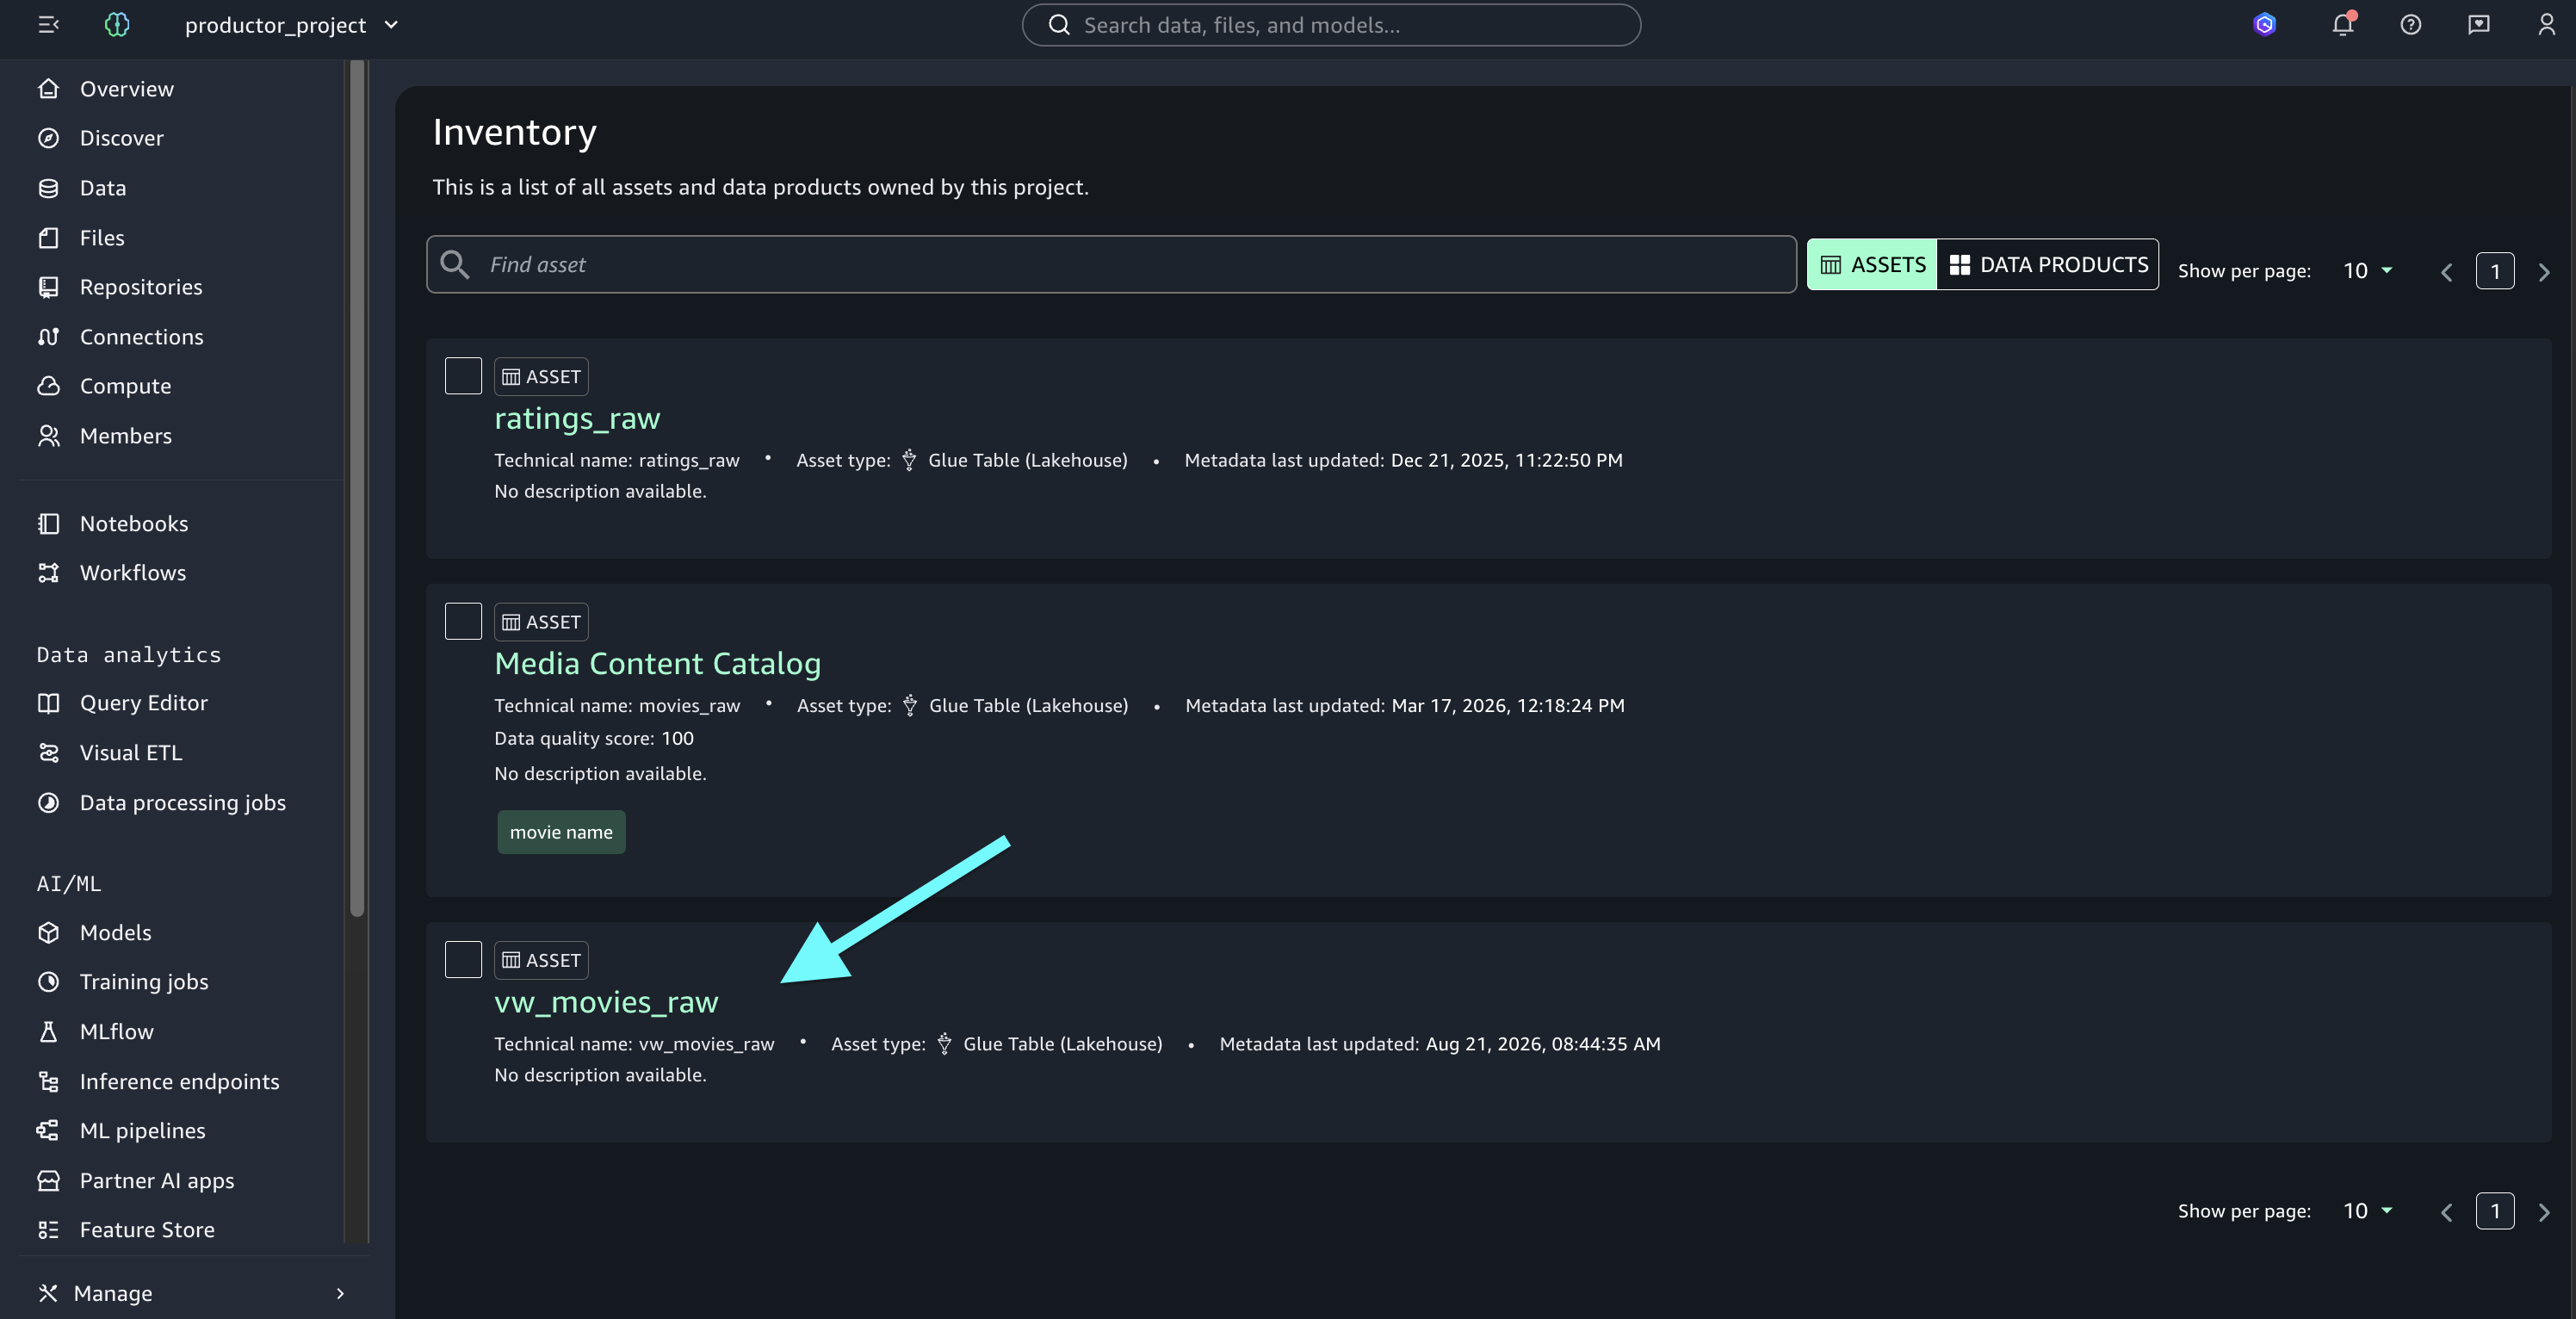
The following screenshot shows the asset inventory after the data source run completes.
- Choose an asset to view its details.
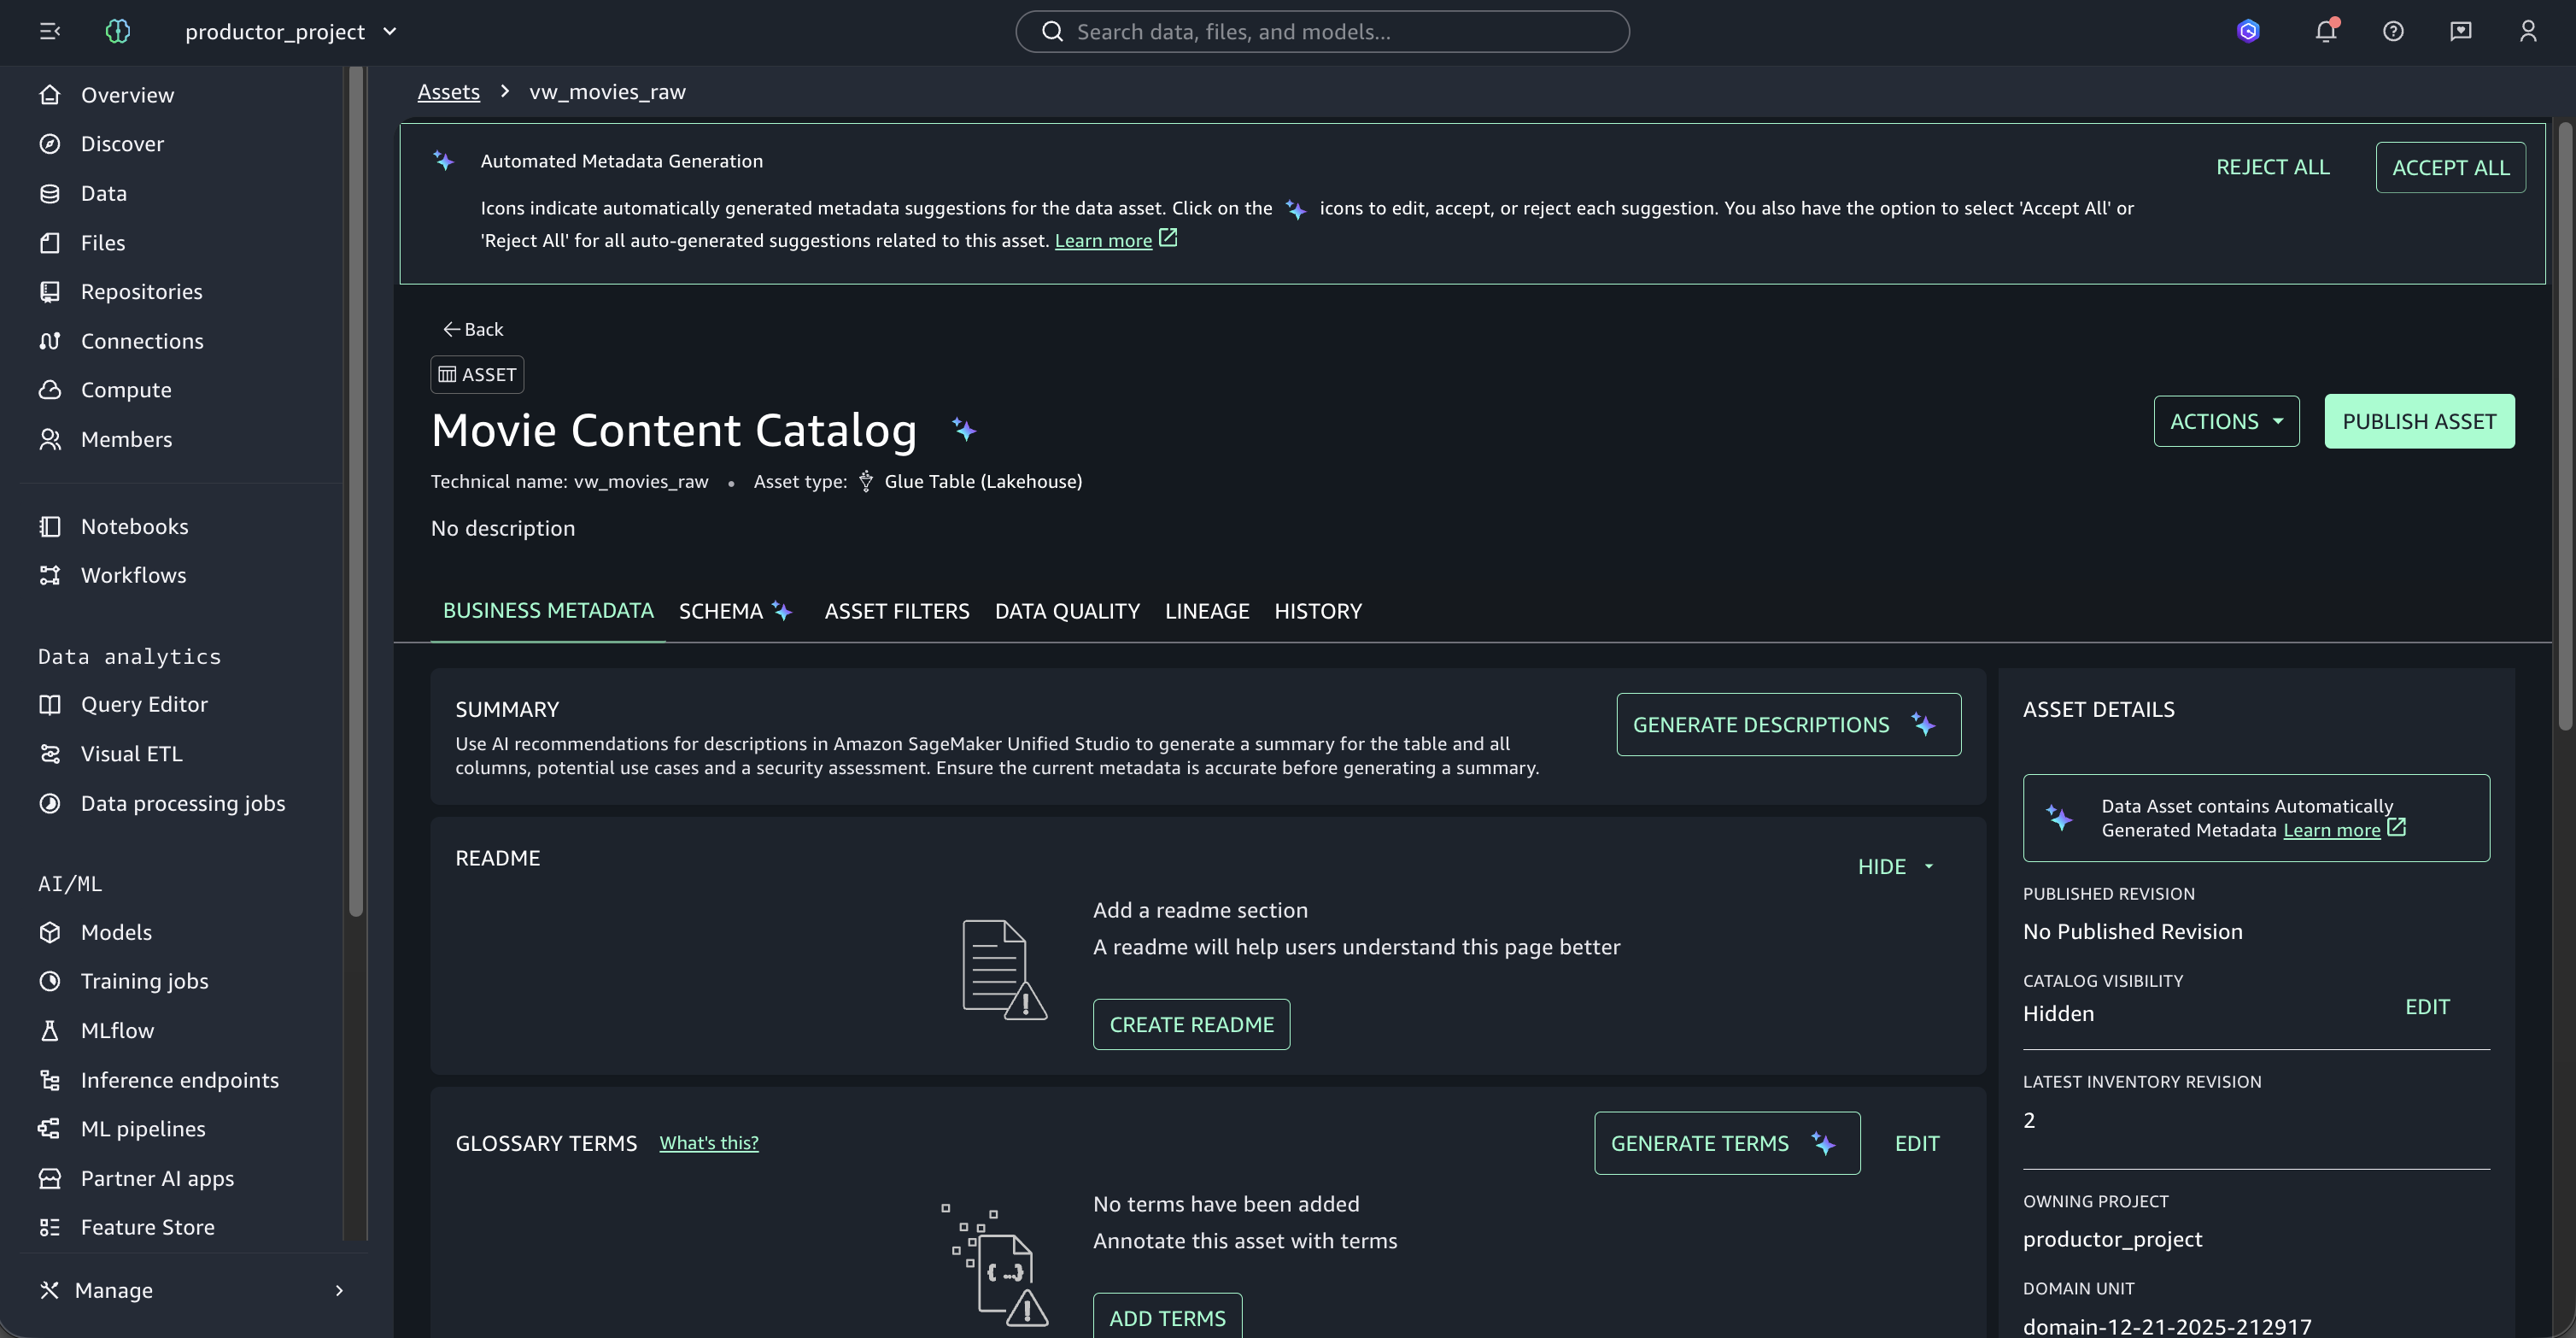
At this point, you can enrich the business context by choosing Generate Descriptions. Amazon SageMaker Catalog analyzes the asset’s technical structure and generate:
- Business descriptions in natural language for the asset.
- Contextual definitions for each field/column.
- Suggested glossary terms that could be applied.
- After your asset has been enriched with the necessary business metadata, you can publish it to the Amazon SageMaker Catalog by choosing Publish Asset.
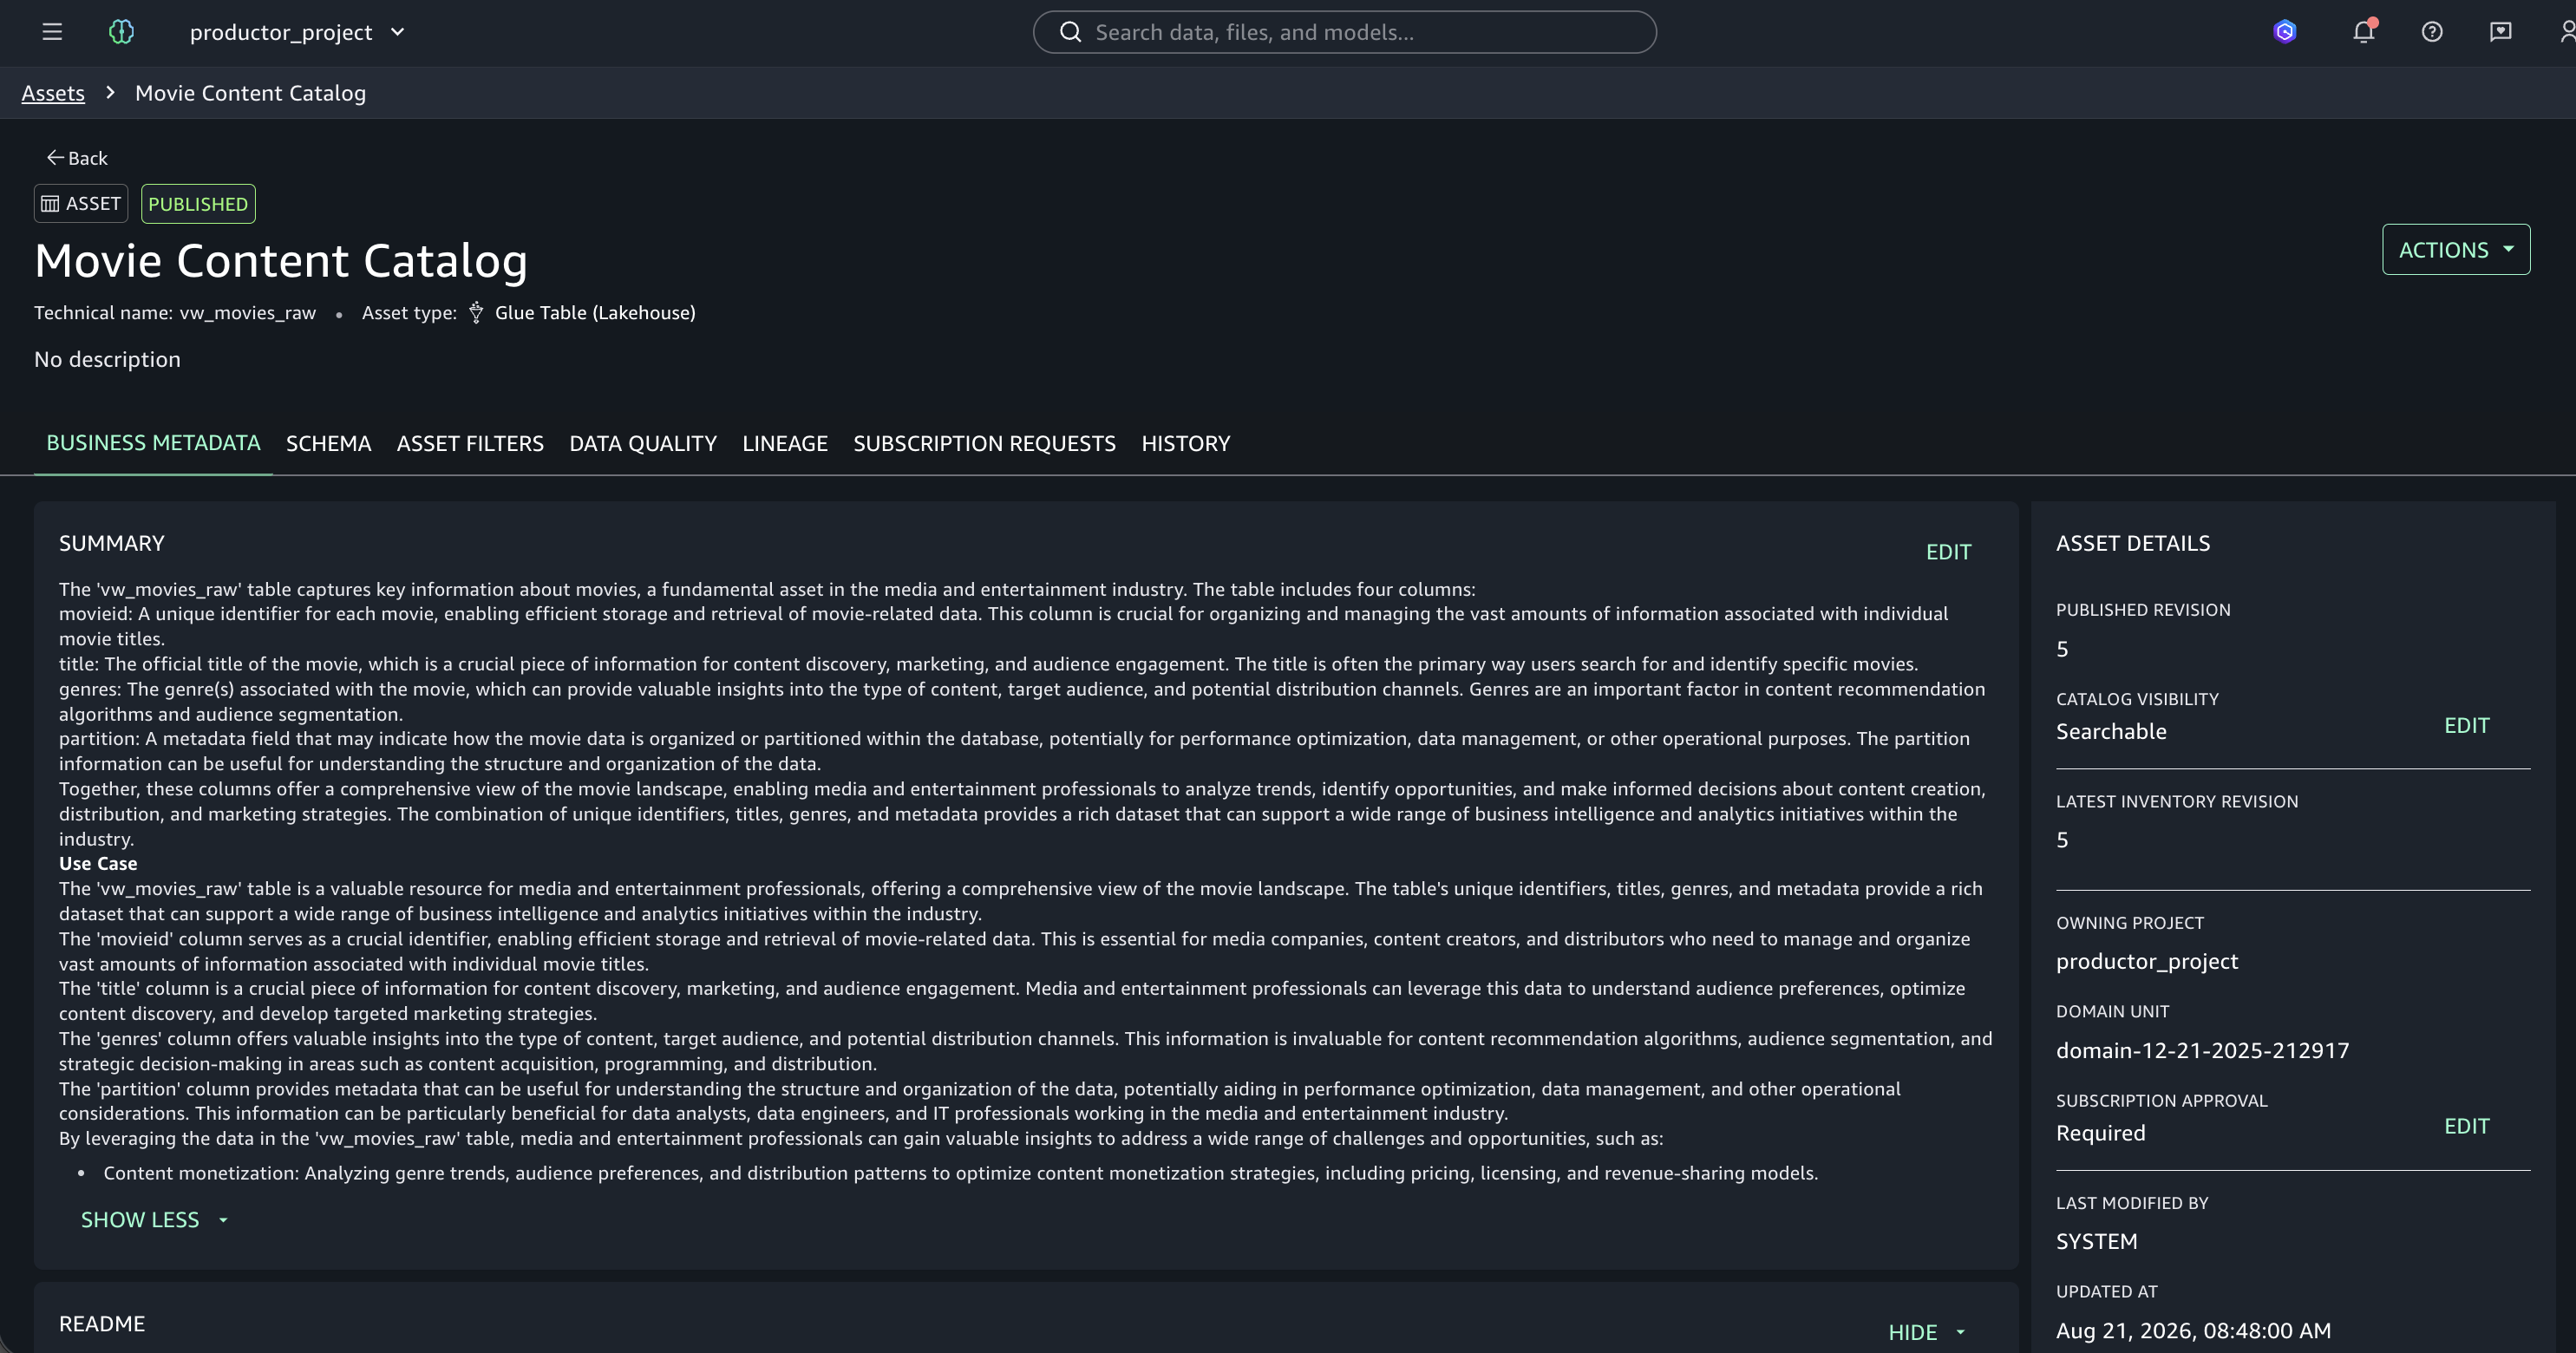
The Snowflake enriched asset is now available to data consumers across your organization. Other users can discover it, subscribe to it, and consume it without data replication.
Implementing data quality rules with AWS Glue Data Quality
This section explains how to apply data quality validations to Snowflake data using AWS Glue Data Quality and visualize results in Amazon SageMaker Catalog.
Setting up the custom transform
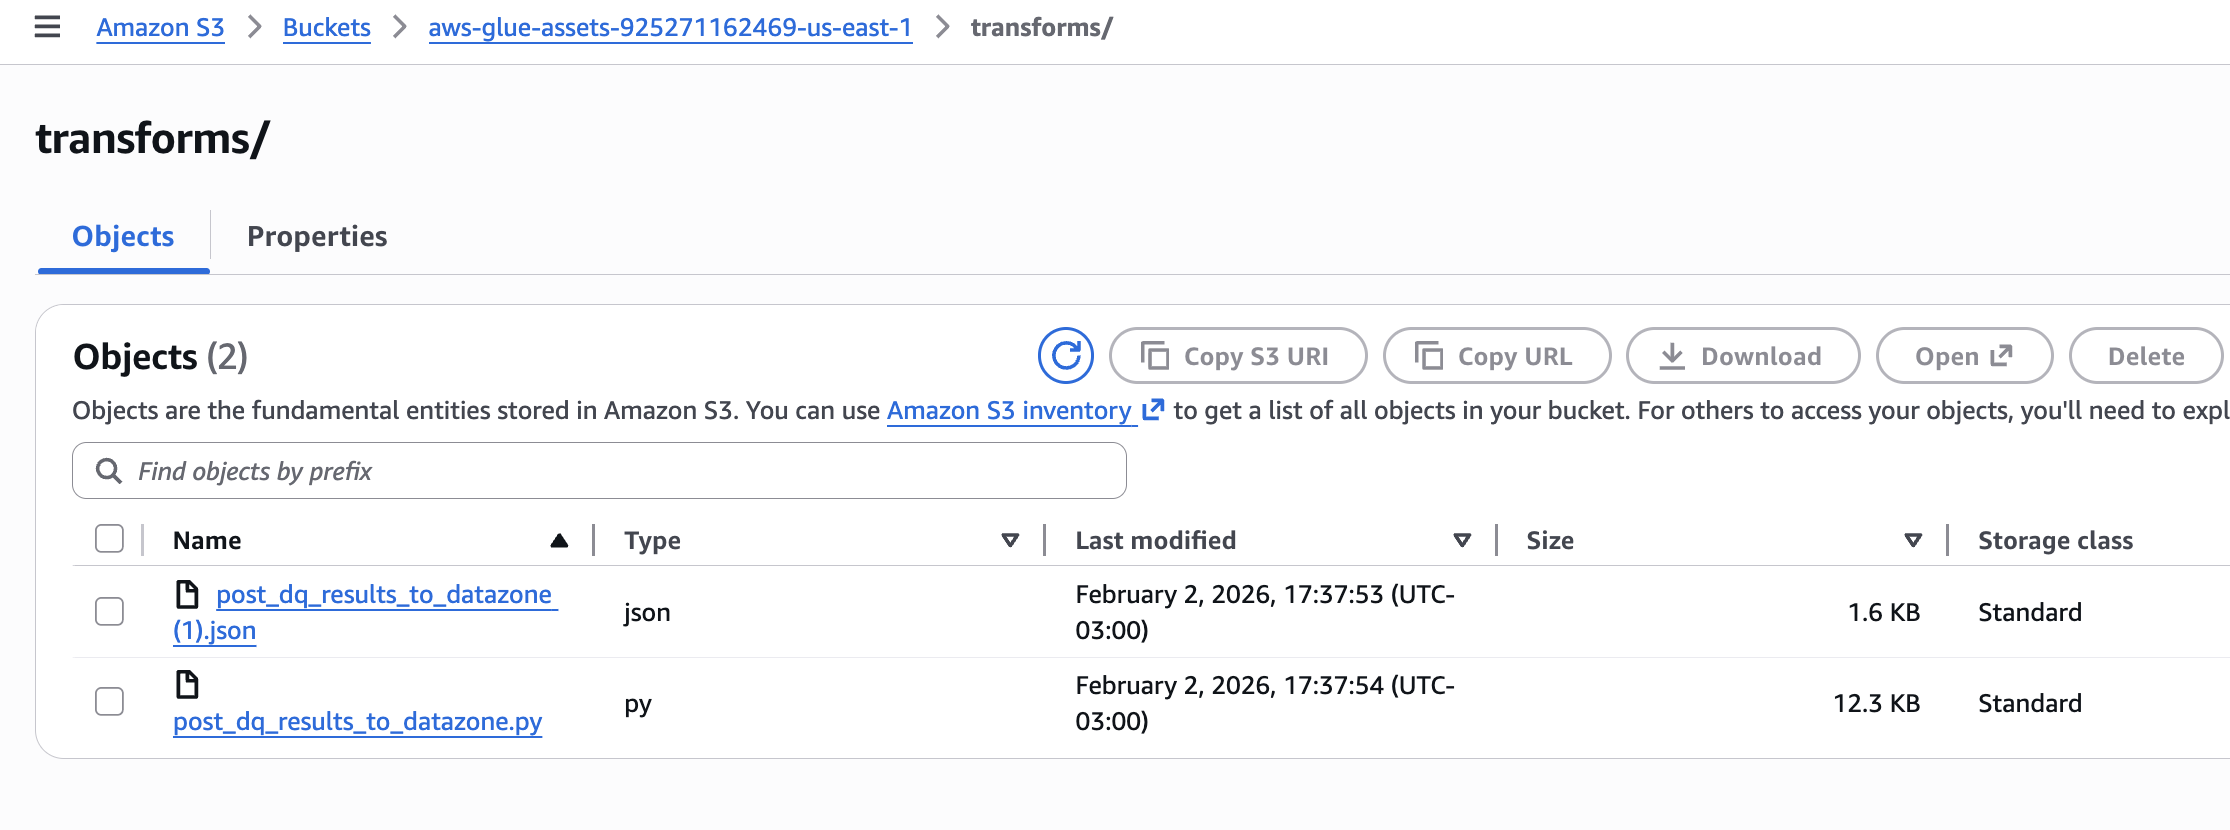
Upload two files to an Amazon S3 bucket in the same AWS account where you run AWS Glue:
Copy both files to your AWS Glue assets S3 bucket in the transforms folder (s3://aws-glue-assets-<account-id>-<region>/transforms). AWS Glue Studio reads all JSON files from this folder to register custom visual transforms.
In the following sections, we walk you through the steps of building an ETL pipeline for data quality validation using AWS Glue Studio.
Creating the AWS Glue Visual ETL job
AWS Glue for Spark provides built-in support for reading from Snowflake data sources.
To create a new visual ETL job:
- Open the AWS Glue console at https://console.aws.amazon.com/glue/. Choose ETL jobs, then Visual ETL.

Establishing the Snowflake connection
To add a Snowflake source:
- In the job pane, choose Snowflake as your source. For Snowflake connection, select the connection that you created earlier. Specify the relevant schema and table for data quality checks.
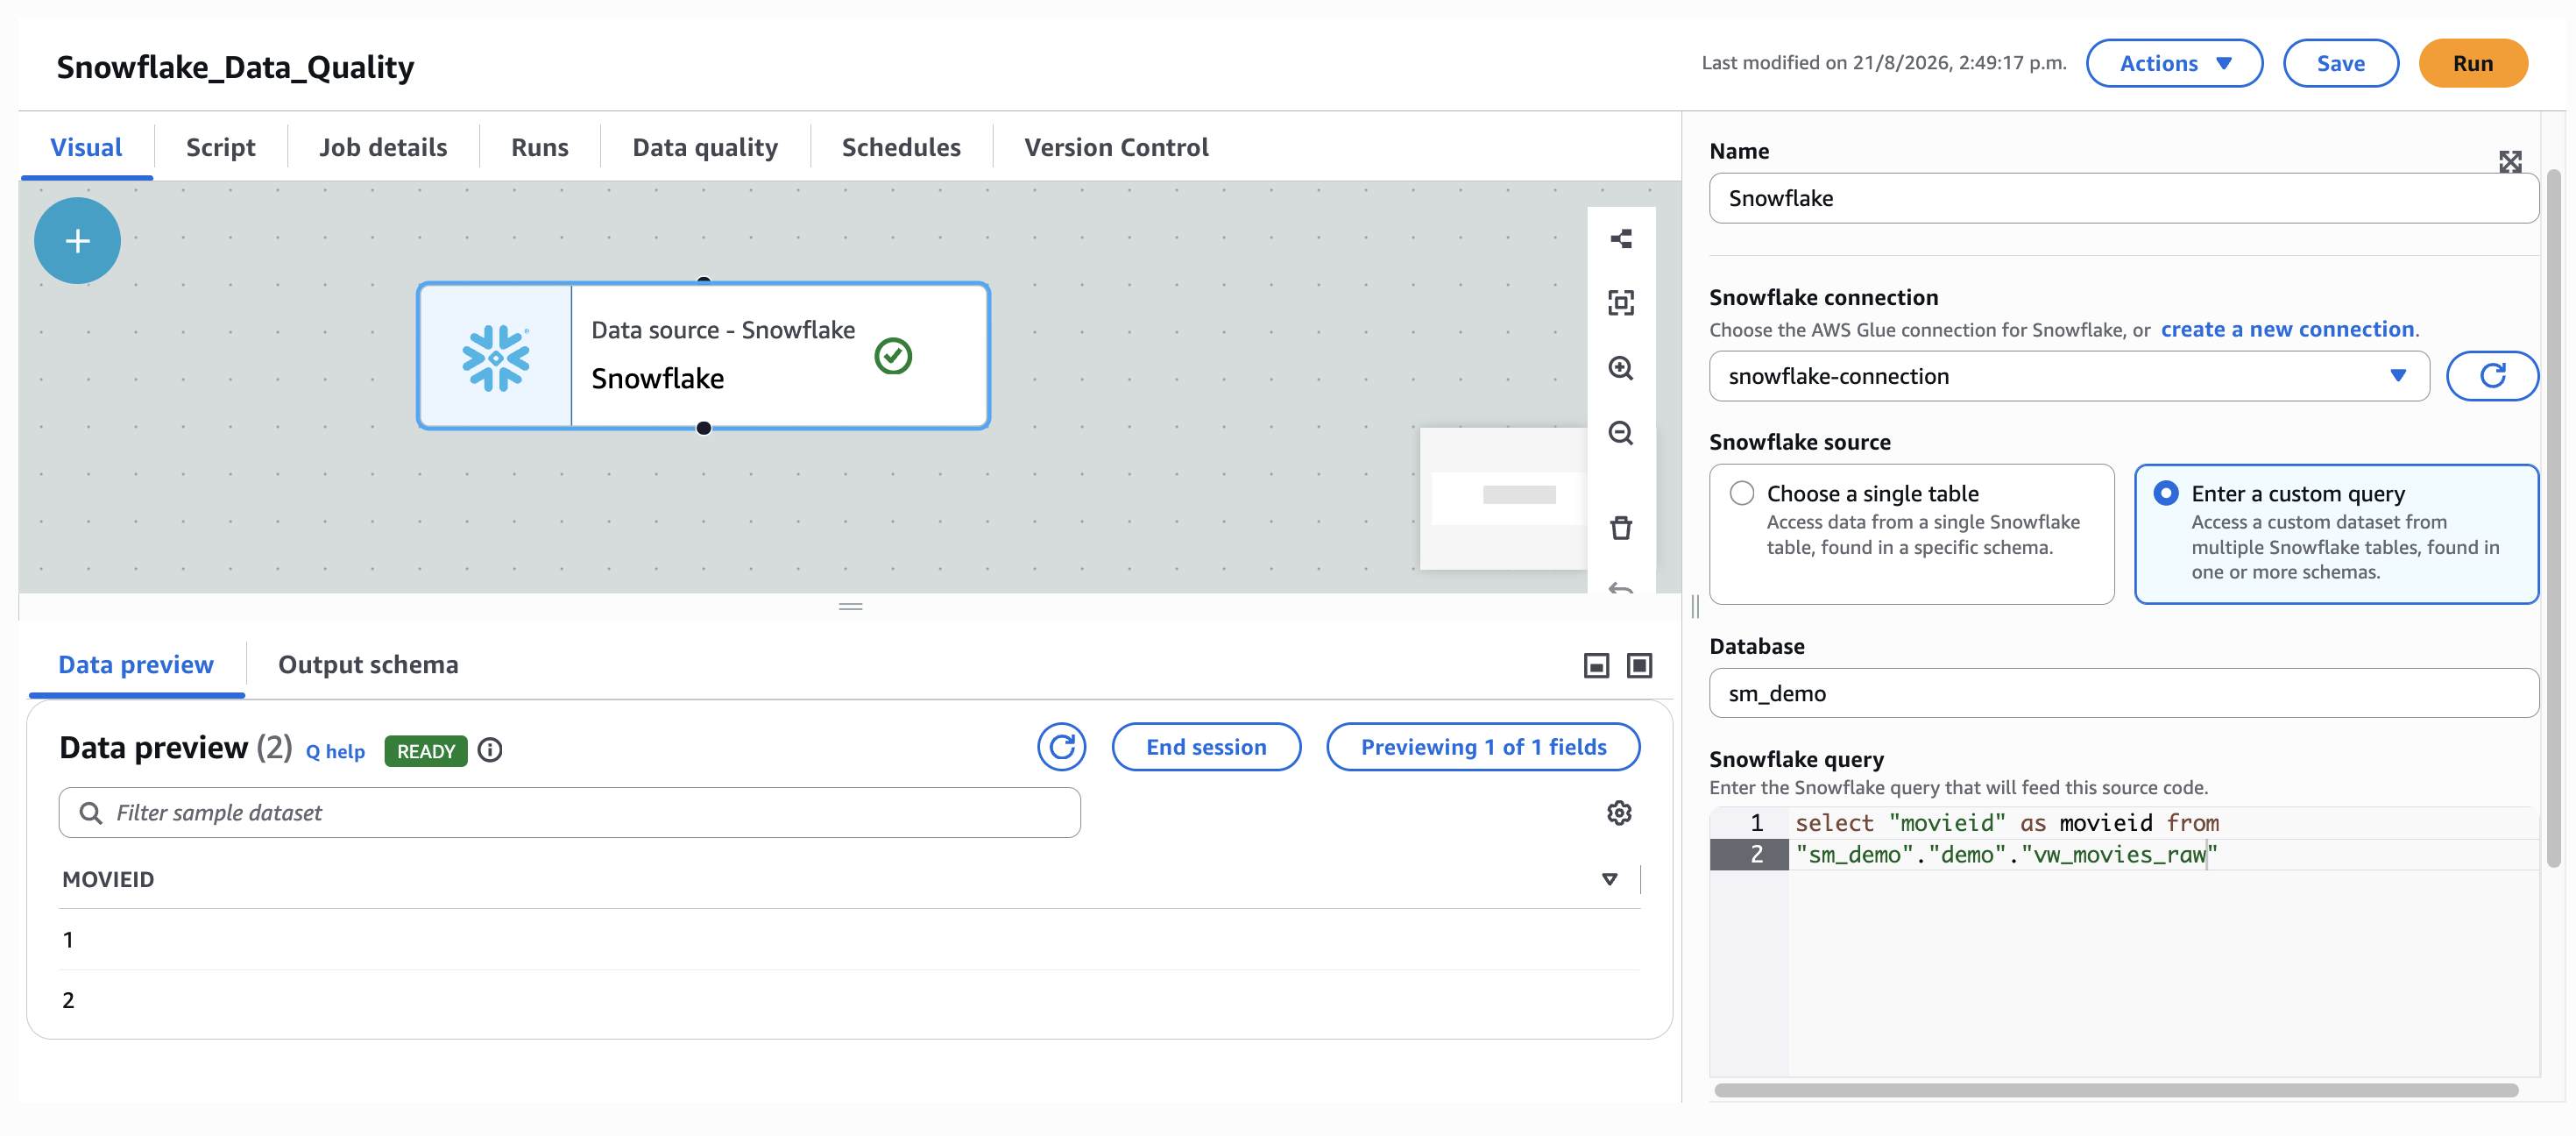
The visual editor displays the Data source properties panel where you select your connection, database, and enter a custom query targeting your Snowflake table.
Applying data quality rules
After establishing the Snowflake connection, configure the data quality evaluation step using the Data Quality Definition Language (DQDL).
To add data quality validation:
- Choose Transform and choose Evaluate Data Quality.
- Define domain-specific data quality rules using DQDL. For more information, see the AWS DQDL documentation.
- Choose to output the data quality results. Optionally, store outcomes in Amazon S3 or publish to Amazon CloudWatch with alert notifications.
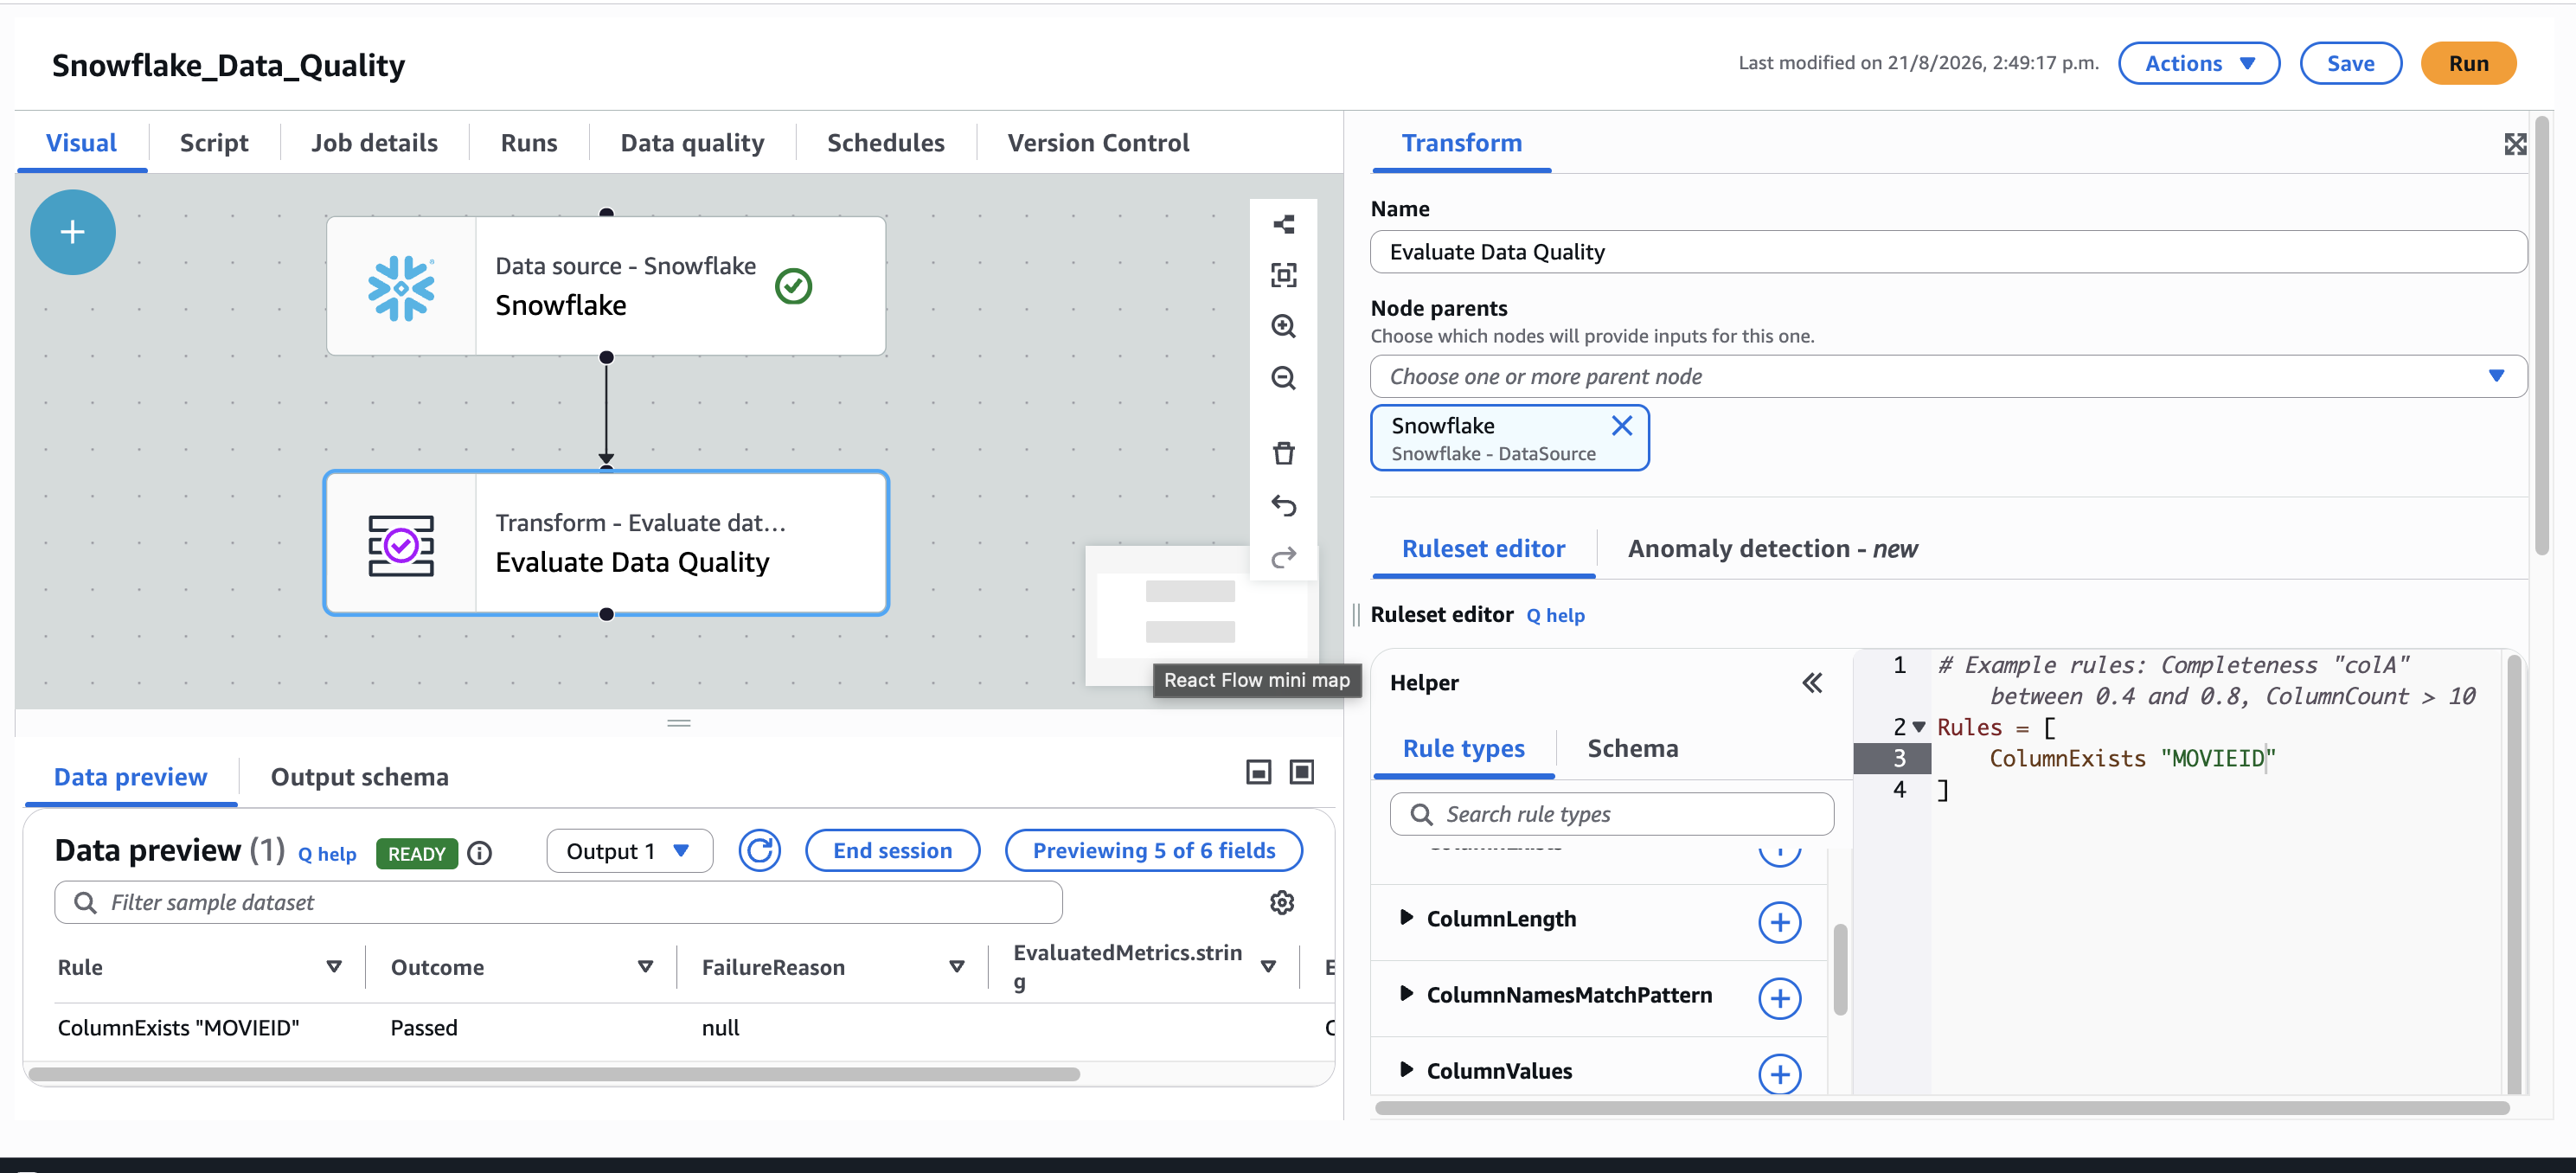
The preview of the data quality results from the ruleOutcomes node shows the outcomes of each rule.

Post the data quality results to Amazon SageMaker Catalog
To configure the custom transform:
- Add the Datazone DQ Result Sink transform to your job.
- Connect the ruleOutcomes node output to this transform.
- Complete the parameters:
- Role to assume (Optional): Only needed for associated accounts.
- Domain ID: Your Amazon SageMaker Unified Studio domain ID (found in the Amazon SageMaker Unified Studio portal).
- Table name and Schema name: Same values used when creating the Snowflake source transform.
- Data quality ruleset name: The name you want to give to the ruleset in Amazon SageMaker Catalog.
- Max results: Maximum number of assets to return in case of multiple matches.
The following image shows the complete job graph with the Datazone DQ Result Sink transform configured.
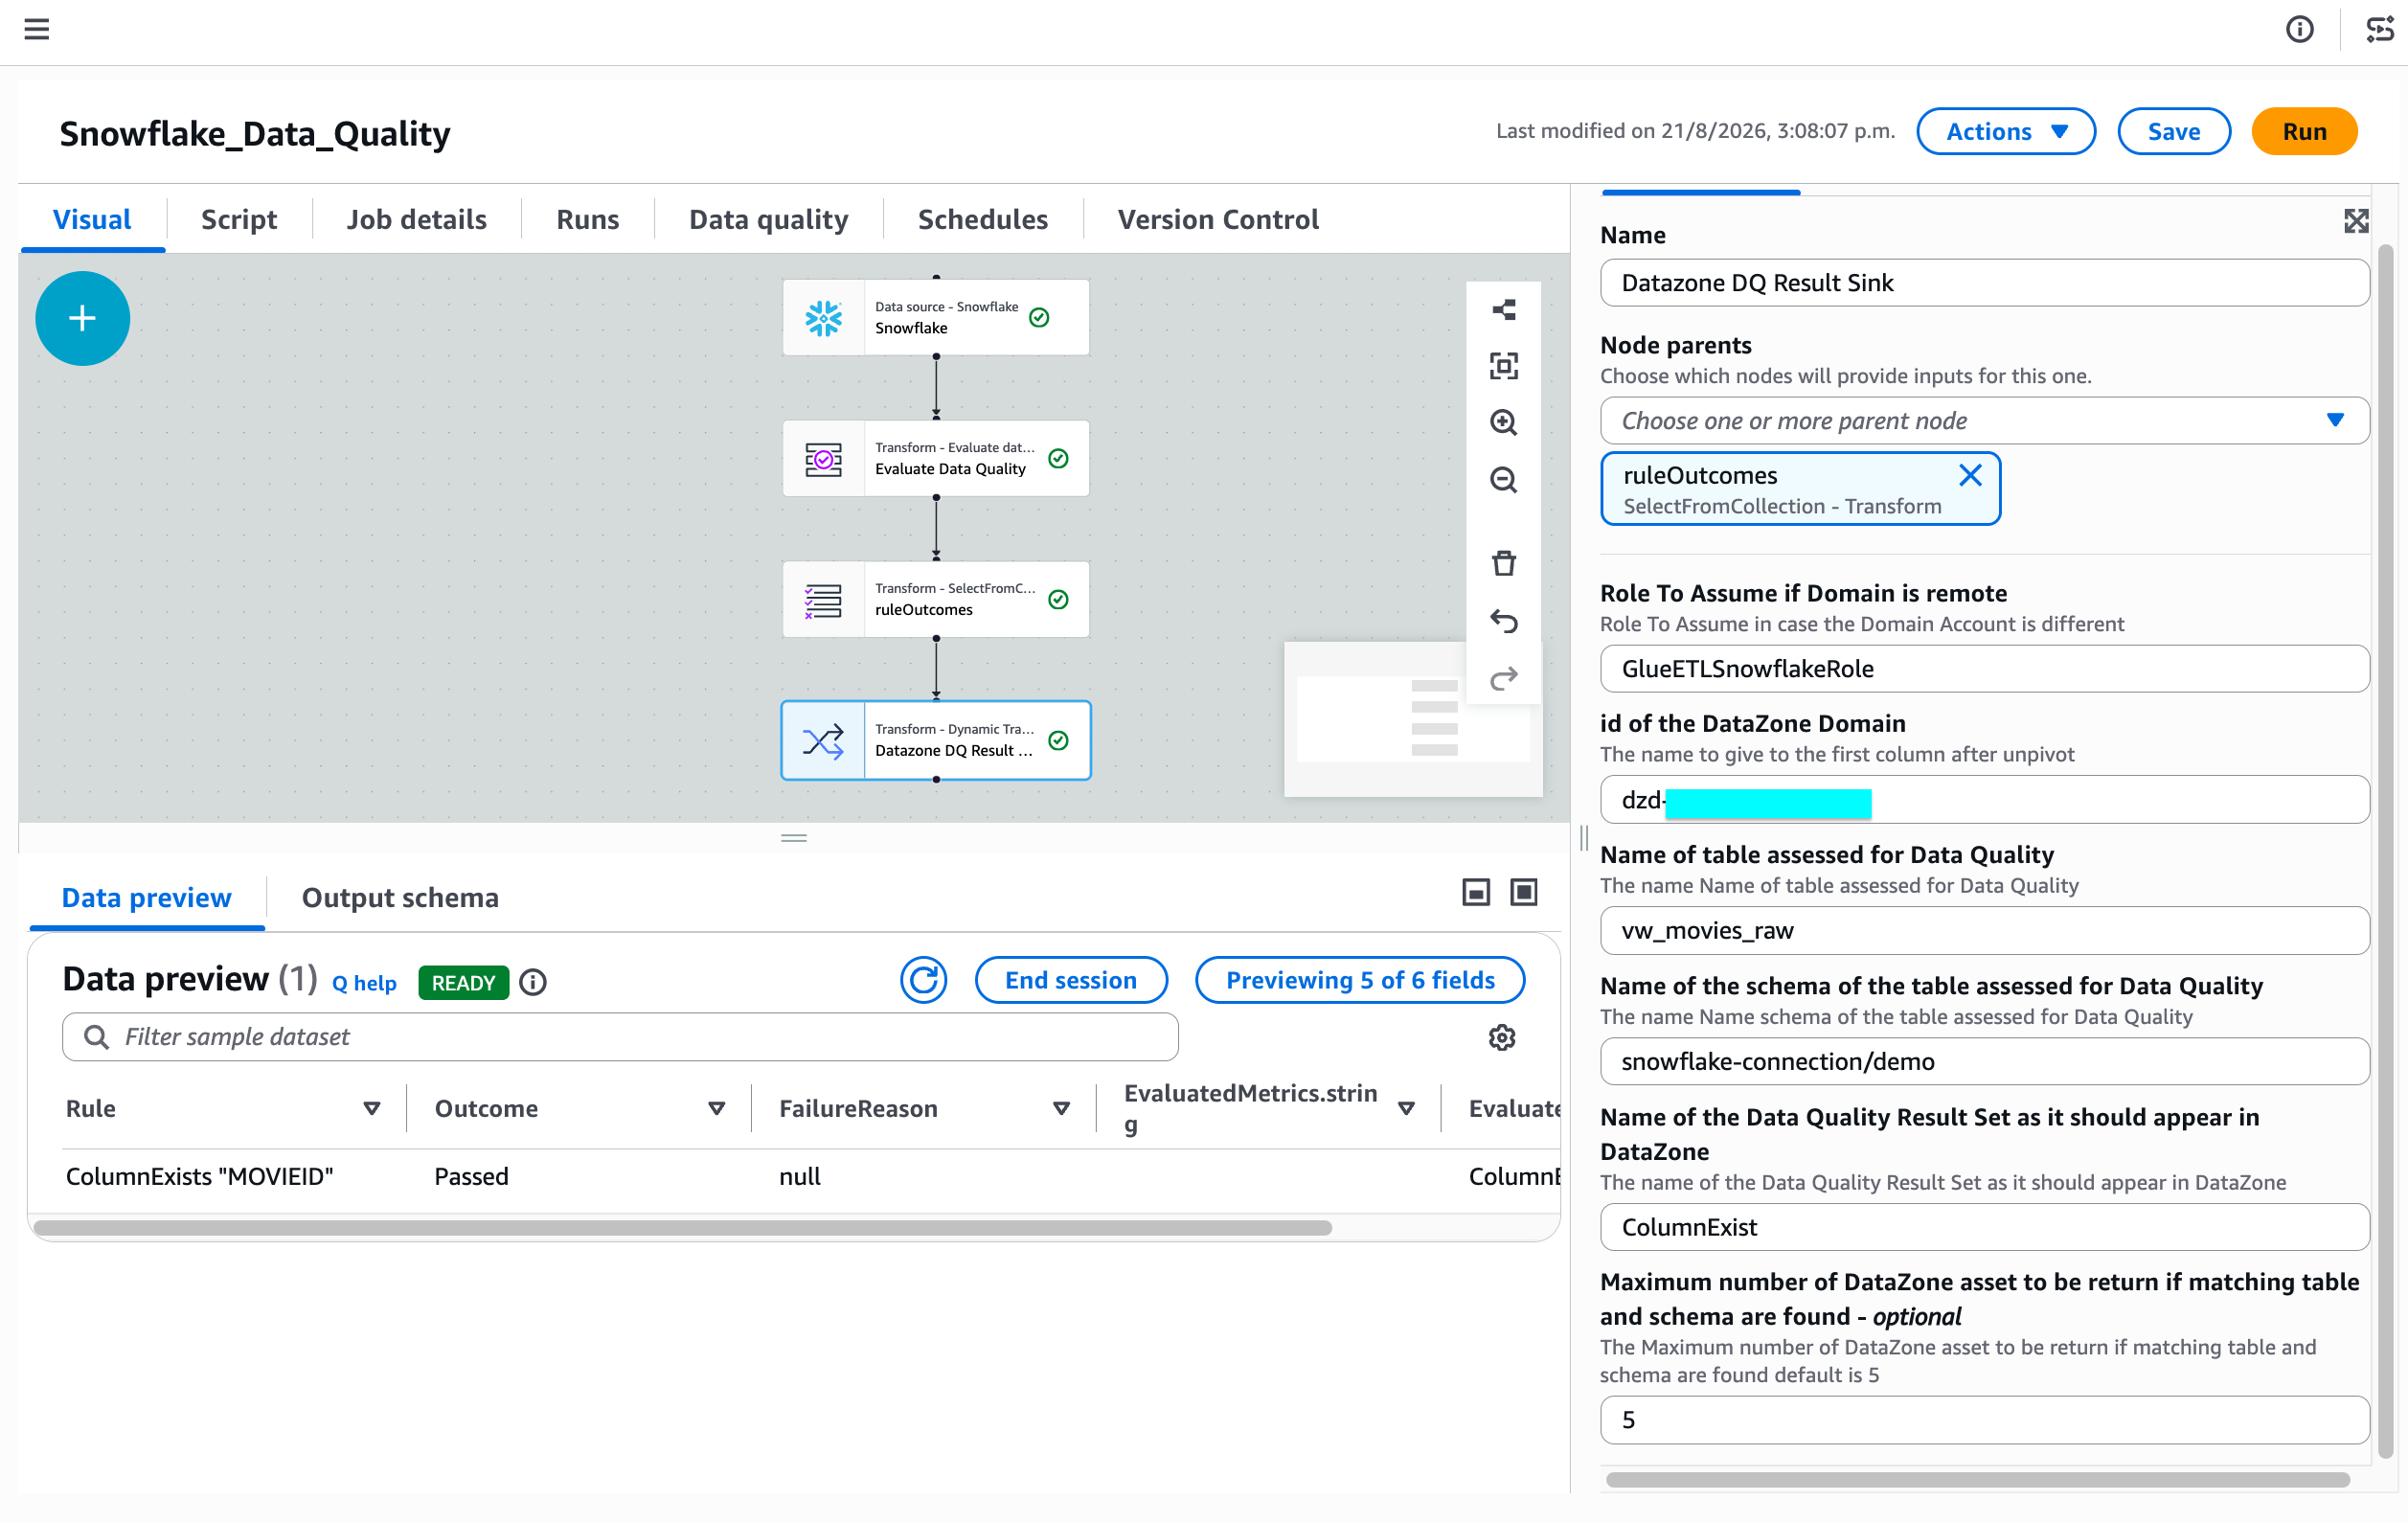
The visual editor displays four nodes connected sequentially: the Snowflake data source, the Evaluate Data Quality transform, the ruleOutcomes SelectFromCollection transform, and the Datazone DQ Result Sink transform.
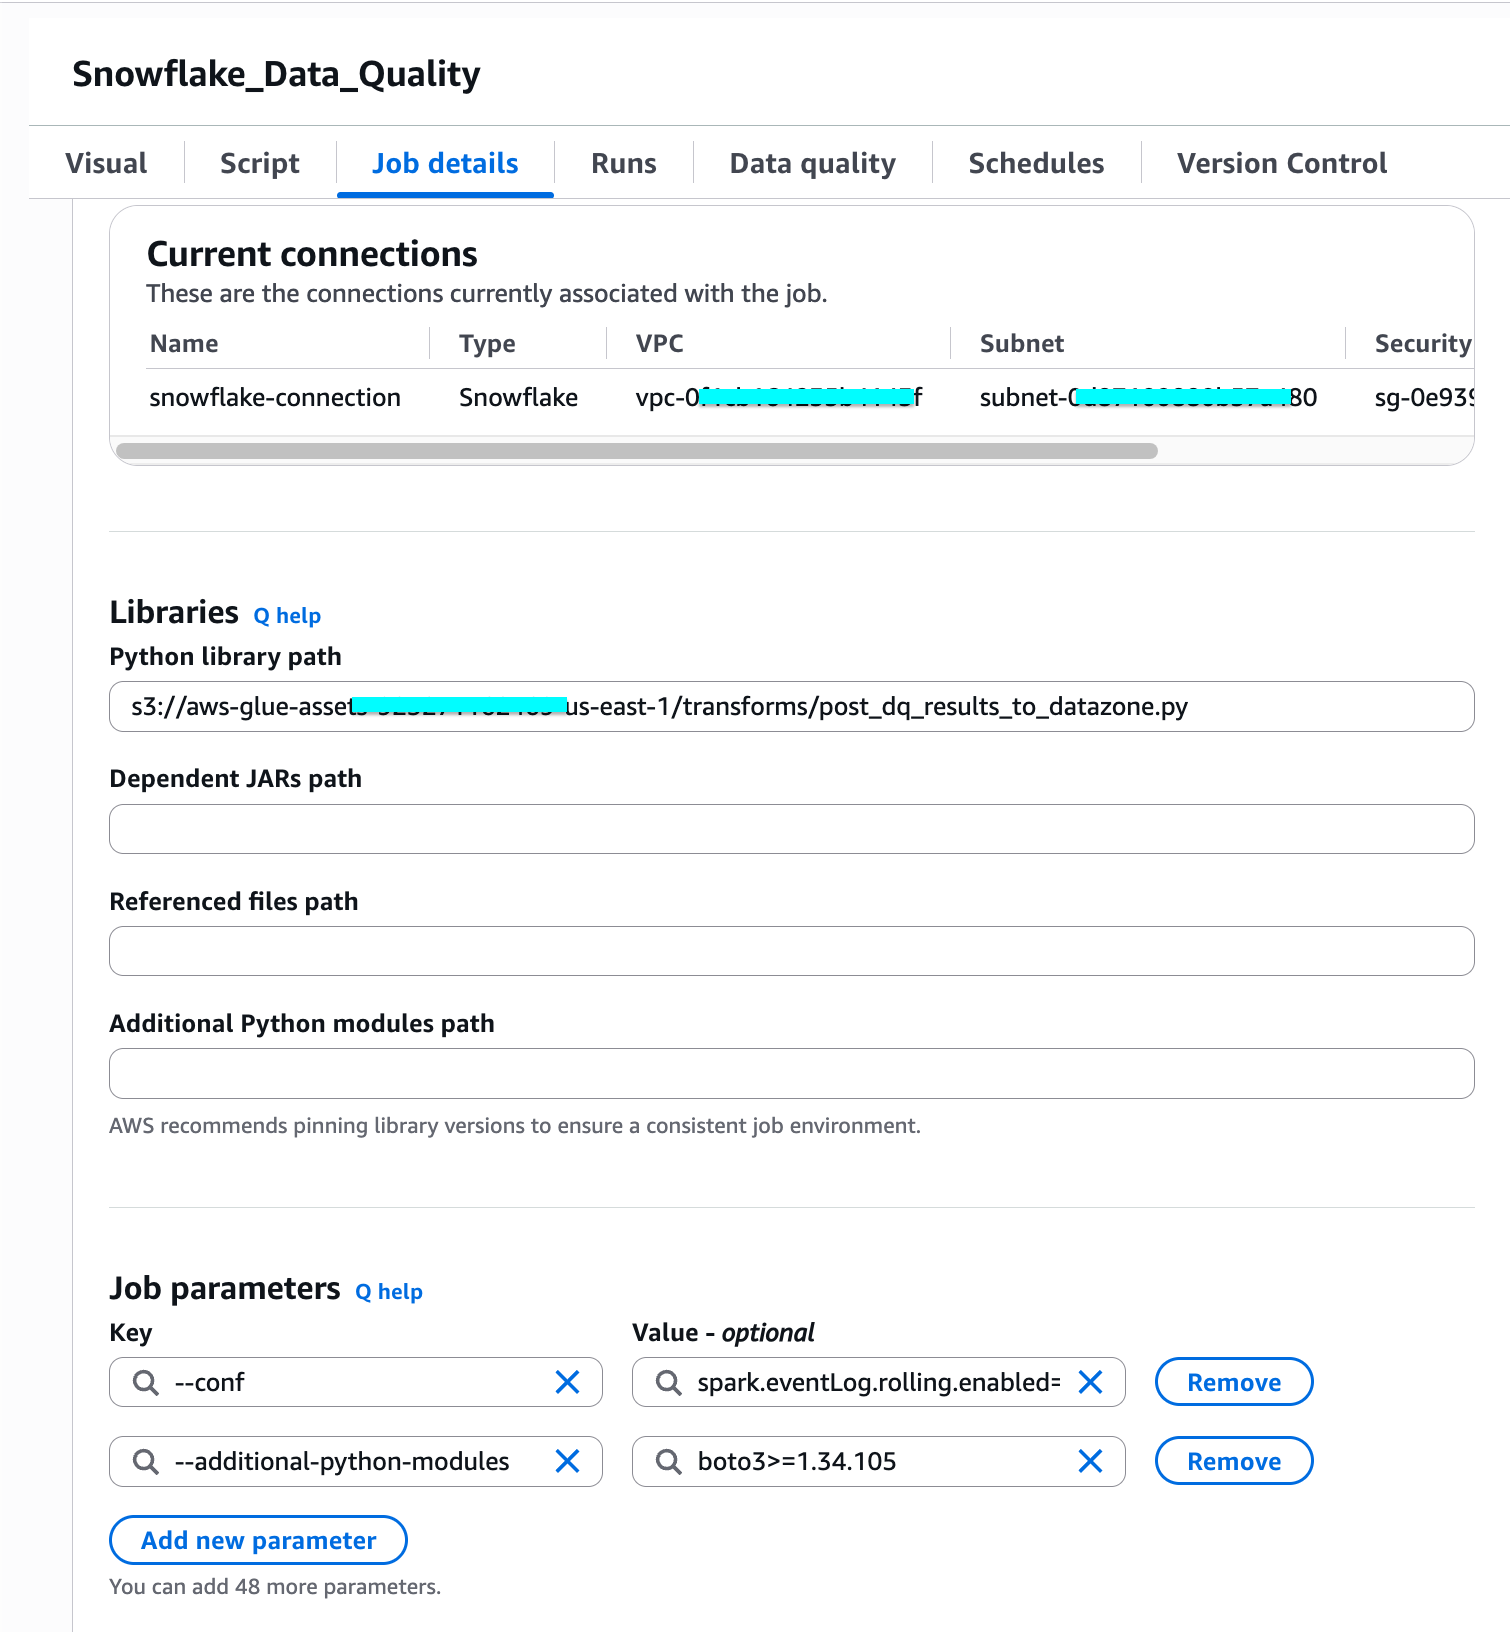
To configure job parameters:
- Choose Job details.
- In Job parameters, add the following key-value pair:
--additional-python-modulesboto3>=1.34.105
- Save and run the job.
Visualizing data quality results in the SageMaker Catalog
After the AWS Glue ETL job completes, you can view the data quality information directly in Amazon SageMaker Catalog. This is the key outcome of running data quality on a federated source: the asset gains quality scores and metadata without ever leaving Snowflake. This makes it trustworthy and ready for other teams across your organization to use. Data consumers can now discover this asset in Amazon SageMaker Catalog and evaluate its quality before subscribing, without needing direct access to Snowflake or running their own validation.
To view data quality results:
- Open the Amazon SageMaker Unified Studio console.
- Navigate to your project.
- Go to Assets.
- Choose the Snowflake data asset.
- View the data quality information displayed on the asset page.
The following image shows the asset page in Amazon SageMaker Catalog with the data quality score populated.
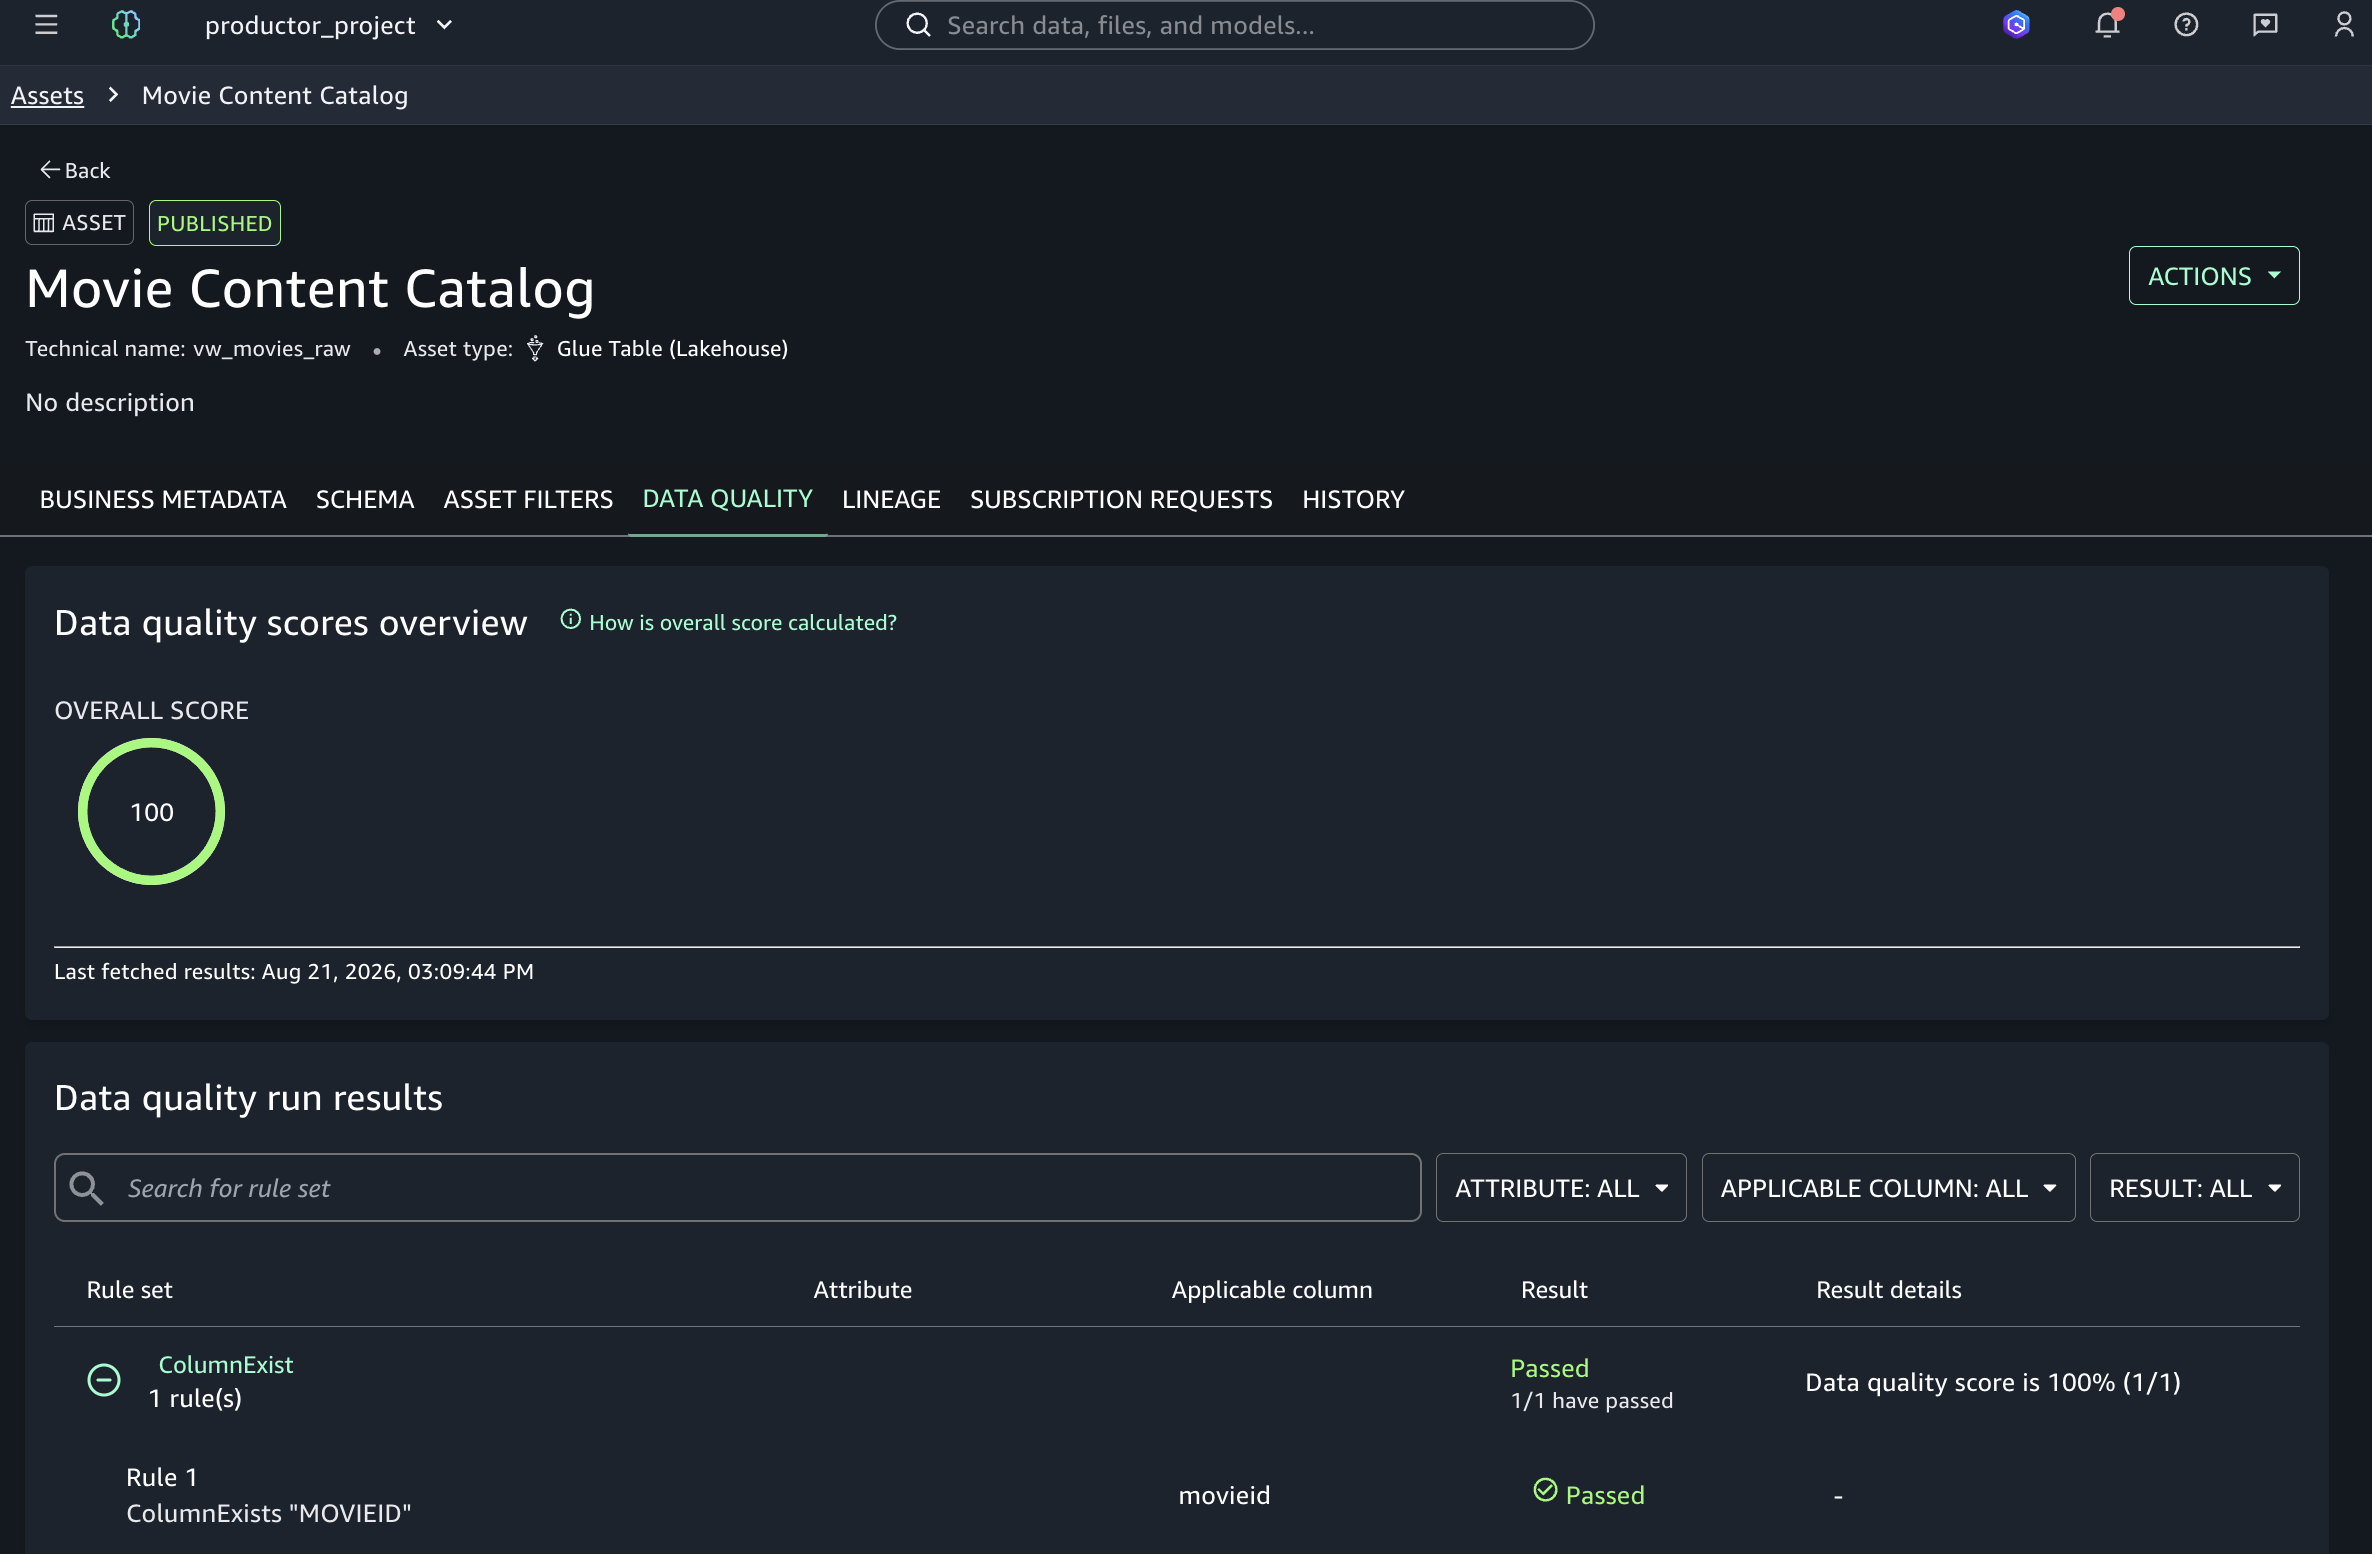
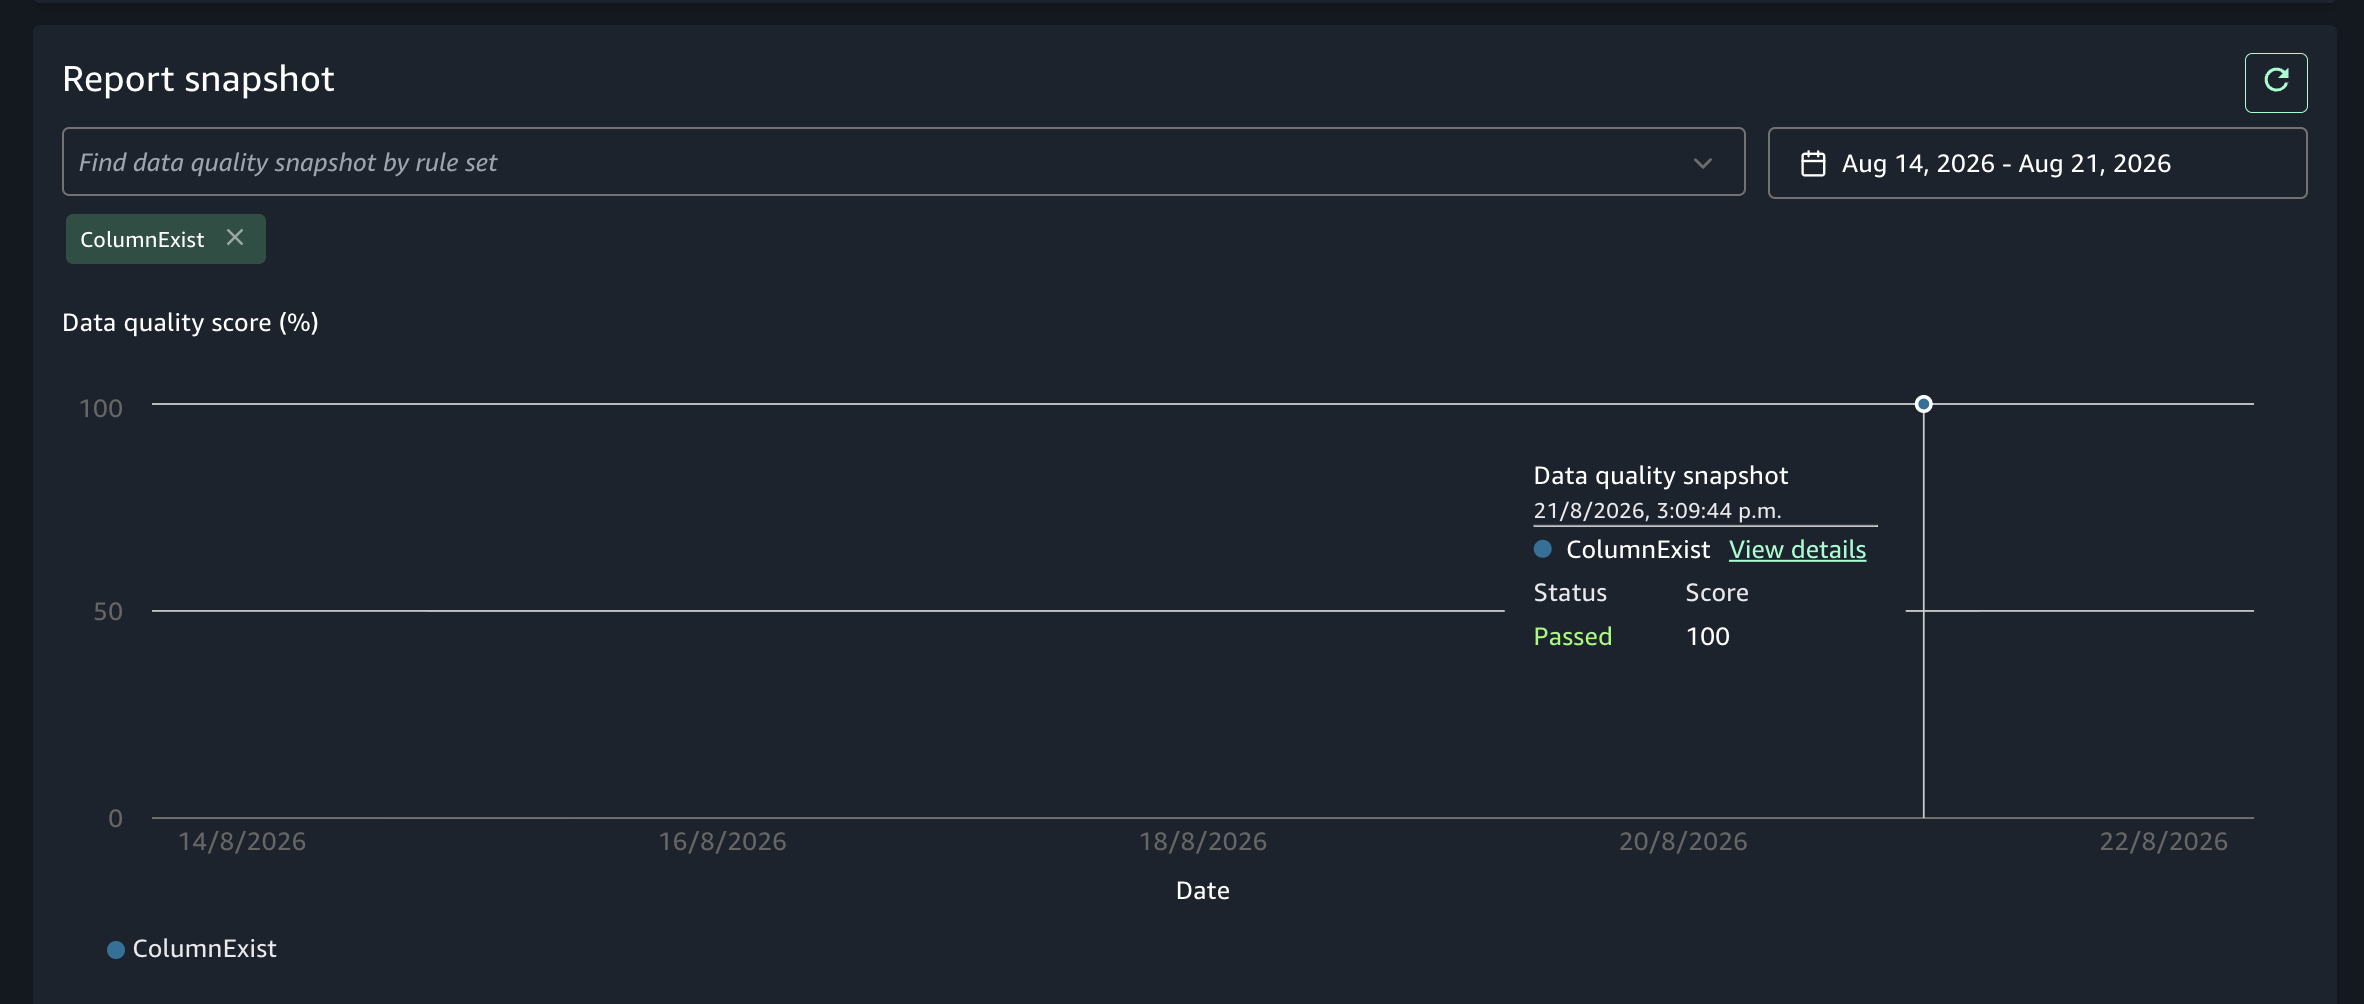
The Data Quality tab shows an overall score of 100 and lists the rule set movies with a Passed result (1/1). This confirms that the data quality checks from AWS Glue posted successfully to Amazon SageMaker Catalog.
Clean up
To avoid ongoing charges, remove the resources you created during this walkthrough:
- Delete the AWS Glue ETL job — Open the AWS Glue console, choose ETL jobs, select your job, and then choose Delete.
- Remove the AWS Glue connection — In the AWS Glue console, go to Connections, select the Snowflake connection, and then choose Delete.
- Delete the data source in SageMaker Catalog — In your Amazon SageMaker Unified Studio project, go to Data Sources, select the data source you created, and then choose Delete.
- Remove S3 assets — Delete the custom transform files from your
s3://aws-glue-assets-<account-id>-<region>/transforms/bucket. - Remove IAM policies — Detach and delete the IAM policies you attached to the AWS Glue job execution role. Remove the role as a domain user and project member.
Conclusion
In this post, we showed you how to connect Snowflake to Amazon SageMaker Unified Studio for centralized data cataloging and quality validation. This approach maintains consistent governance without replicating data. Key benefits include:
- Query without data movement: Access Snowflake data directly from Amazon SageMaker Unified Studio through federated queries, using the interoperable data architecture of AWS and eliminating time-consuming data replication.
- Centralized governance: Maintain a single source of truth for data discovery, quality metrics, and governance policies across your distributed data estate.
- Automated quality validation: Apply consistent data quality rules using AWS Glue Data Quality and visualize results directly in Amazon SageMaker Catalog.
- Unified collaboration: Support data discovery and sharing across your organization through the publishing capabilities of Amazon SageMaker Catalog.
To get started, open the Amazon SageMaker Unified Studio console. To learn more about related topics, see Cross-account lakehouse governance with Amazon S3 Tables and SageMaker Catalog and Get started with AWS Glue Data Quality dynamic rules for ETL pipelines.
About the authors