This post is co-written with Oscar Mapfumo Sibanda from Picnic.
Picnic is an Amsterdam-based tech scale-up that reinvents how people buy food. It isn’t a supermarket with a digital layer but a tech company that happens to deliver groceries. Picnic is engineered in-house: the customer app, the fulfillment platform, the supply chain, and the routing technology that guides a fleet of thousands of electric vehicles through the Netherlands, Germany, and France. Software doesn’t merely support business. Software is a business.
At the center of this system, RabbitMQ is the core component. It’s the communication backbone connecting hundreds of microservices across the entire business lifecycle, from ordering and logistics to delivery and finance. At peak, Picnic’s platform processes close to one million messages per second. At this scale, messaging is no longer only background infrastructure. It becomes part of the company’s operational nervous system. To keep that system highly available, scalable, and resilient as Picnic grows, the company decided to use Amazon MQ as a managed service.
The next challenge was identity. Picnic’s authentication strategy clearly distinguishes between people and services. Operators sign in through Keycloak, the company’s single sign-on provider, while Picnic’s Amazon Elastic Kubernetes Service (Amazon EKS) workloads are adopting AWS Identity and Access Management (IAM) authentication to eliminate static credentials. A single broker therefore must trust two identity providers at once. The Amazon MQ documentation covers configuring OAuth 2.0 with a single provider. This post extends that guidance to a multi-provider setup on the same broker.
In this post, we show how Picnic solved that problem. You will learn how to configure an Amazon MQ for RabbitMQ broker to accept tokens from multiple OAuth 2.0 identity providers, using Keycloak and IAM as the working example. You will also see how to map each provider’s scopes to RabbitMQ permissions and how to roll the change out on a running broker without disrupting connected users.
Background and prerequisites
Amazon MQ for RabbitMQ supports OAuth 2.0 authentication and authorization, where broker users and their permissions are managed by an external identity provider. User authentication and resource permissions for vhosts, exchanges, queues, and topics are centralized through the OAuth 2.0 provider’s scope system.
RabbitMQ’s OAuth 2.0 plugin supports multiple resource servers and audiences, allowing different OAuth 2.0 providers to issue tokens that a single broker can validate. This capability is essential if you operate in multiple environments or have teams registered with separate identity providers.
Prerequisites
To follow along with this post, you need:
- An active AWS account.
- An Amazon MQ for RabbitMQ broker with OAuth 2.0 configured for at least one identity provider (see Using OAuth 2.0 authentication and authorization for Amazon MQ for RabbitMQ).
- A second OAuth 2.0 identity provider configured and operational.
- Outbound web identity federation enabled for your AWS account (if using IAM as a provider).
- Basic familiarity with RabbitMQ configuration and OAuth 2.0 concepts.
- AWS Command Line Interface (AWS CLI) version 2.27 or later (required for the
get-web-identity-tokencommand used in the testing section).
Note: The information in this post reflects Amazon MQ for RabbitMQ features and behavior at the time of publication. We recommend checking the Amazon MQ documentation, release notes and best practices before implementation.
Solution architecture
The design rests on a single idea: a RabbitMQ broker can trust more than one identity provider at the same time, and it decides which one to apply per token rather than per broker. RabbitMQ does this by reading the aud (audience) claim of each incoming token and matching it against a configured resource server. Each resource server is bound to one OAuth 2.0 provider, so the audience determines both which signing keys validate the token and which permission rules apply.
Architecture diagram
The following two diagrams show how services and operators authenticate the broker through their respective identity providers.
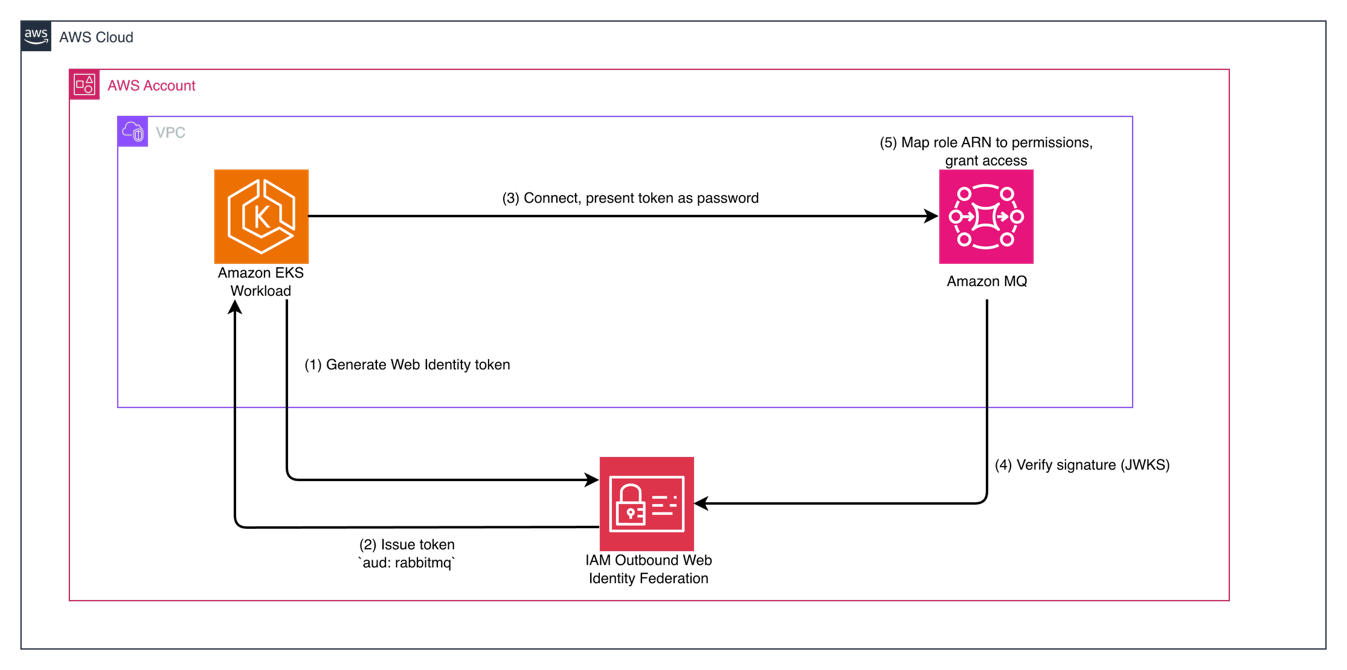
Figure 1: Services (IAM) flow
Services authenticate through IAM. An Amazon EKS workload assumes an IAM role and generates a web identity token (1), which AWS Security Token Service (AWS STS) issues with an audience of rabbitmq-iam (2). The workload presents that token as its password when it connects to the broker over Advanced Message Queuing Protocol (AMQPS) on port 5671 (3). The broker selects the matching resource server, verifies the token’s signature against the AWS STS signing keys (4), and maps the role’s Amazon Resource Name (ARN) to the permissions the workload needs (5).
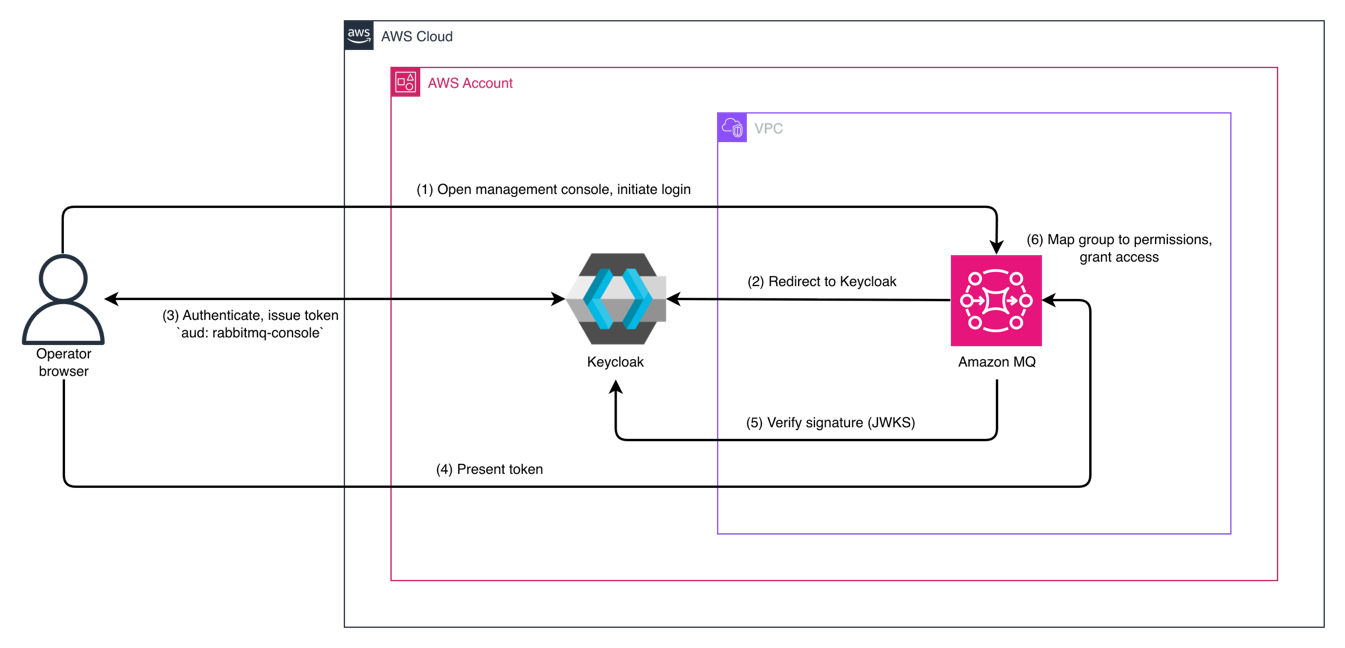
Figure 2: Operators (Keycloak) flow
Operators authenticate through Keycloak. An operator opens the RabbitMQ management console and initiates login (1), and the console redirects the browser to Keycloak (2). Keycloak authenticates the operator and issues a token whose audience targets the console resource server, rabbitmq-keycloak (3). The browser presents that token to the broker (4), which verifies the signature against Keycloak’s signing keys (5). The broker then reads the operator’s group membership and grants access (6): the Operator group receives read-only permissions, while the Administrator group receives full control.
Two constraints follow this design. First, audience verification is a single broker-wide setting that applies to every provider at once, so each provider must issue tokens carrying the exact audience its resource server expects. Second, the broker is private, deployed inside an Amazon Virtual Private Cloud (Amazon VPC) with no public exposure. Both providers’ endpoints must be resolvable, either through publicly addressable JSON Web Key Set (JWKS) endpoints or through private networking, because the broker fetches signing keys from those endpoints.
Implementation walkthrough
This walkthrough configures one Amazon MQ for RabbitMQ broker to trust two identity providers: Keycloak for operators and AWS IAM for services. The steps assume you already have a running broker, a Keycloak realm, and outbound web identity federation enabled for your AWS account. All configurations are applied through a RabbitMQ configuration revision using the AWS Command Line Interface (AWS CLI).
Enable OAuth 2.0 on the broker
The first block activates the OAuth 2.0 backend and keeps the internal backend in place. Internal authentication remains active deliberately: Amazon MQ creates an administrator user when the broker is provisioned, and that user is needed for break-glass access.
Setting verify_aud = true tells RabbitMQ to reject any token whose aud claim does not match a configured resource server. This single broker-wide setting governs every provider you add.
Add the first identity provider (Keycloak)
A resource server binds an audience value to a provider and a set of permission rules. The Keycloak resource server uses the id rabbitmq-keycloak, which is the audience the realm must place in its tokens. RabbitMQ reads the operator’s group membership from the group_membership claim and resolves it through scope aliases.
The Operator group is read-only: it can read any resource and view the management UI through the monitoring tag. The Administrator group receives full permissions plus the administrator tag. This role is least privilege by design.
The provider is configured with its issuer and JWKS endpoint:
To let operators sign in from the management console, expose Keycloak as a management resource:
Add the second identity provider (AWS IAM)
Adding a second provider means adding a second resource server and a second entry under oauth_providers. The IAM resource server uses the id rabbitmq-iam because the audience is set when minting the token.
The IAM workload receives the policymaker tag. It can publish, consume, and manage policies but does not receive the administrator tag.
Apply the configuration and restart the broker:
Note: The base64 command syntax differs between Linux and macOS. The preceding command (cat file | base64 | tr -d '\n') is portable on both operating systems. If running exclusively on Linux, you can also use base64 --wrap=0 rabbitmq.conf. On macOS, the equivalent command is base64 -i rabbitmq.conf.
Testing and validation
Validate each provider independently. For IAM, assume the role and request a token from AWS STS, then present it as the AMQP password:
Note: The get-web-identity-token API requires outbound web identity federation to be enabled on your AWS account and AWS CLI version 2.27 or later.
A successful response confirms the IAM resource server accepted the token. For Keycloak, open the management console, choose Keycloak SSO, and sign in as an operator.
When a login fails, decode the JSON Web Token (JWT) and check two claims. The aud claim must exactly match a resource server id. With verify_aud = true, a missing or mismatched audience is the most common cause of rejection. If the audience is correct but permissions are missing, verify the scope_prefix is set correctly.
Operational considerations
A few points deserve attention before you run this pattern in production.
- Key rotation: When rotating signing keys at a provider, publish the new key in the JWKS endpoint before revoking the old one. The broker caches keys, so overlapping both during the transition window prevents authentication failures while the cache refreshes.
- Audience validation: Audience remains the linchpin. With
verify_audenabled, every provider must issue tokens carrying the audience its resource server expects, so confirm this whenever you onboard a new one. Don’t disable audience validation in production. The RabbitMQ OAuth 2.0 plugin does not perform token revocation checks, which makes audience binding a critical control that prevents tokens issued for other services from granting access. - Scope prefix:
scope_prefixvalues are optional. They’re needed only if the tokens don’t follow the default format. RabbitMQ only reads scopes carrying the expected prefix, so a token can authenticate yet grant nothing if the prefix is missing. Map each provider to the least privilege its principals need. For example, prefer narrow scopes likeread:ordersover blanketread:allto limit the scope of impact if a single provider’s credentials are compromised. - Token lifetime: Because the plugin does not support token revocation, token lifetime is your primary control over leaked credentials. Issue short-lived access tokens and have your client applications refresh them proactively at approximately 75 percent of the token’s lifetime to avoid connection disruptions when a token expires mid-session.
- Monitoring: Authentication failures and refused tokens are recorded in the broker’s connection log group in Amazon CloudWatch, which can be reached through the Amazon CloudWatch Logs link on the broker’s page in the Amazon MQ console. Beyond logs, set up CloudWatch alarms on
RabbitMQMemUsed,RabbitMQDiskFree, andConnectionCount. An unexpected spike in failed connections is often the first sign of a token or audience misconfiguration. For unaggregated, per-node visibility, consider enabling the Prometheus metrics endpoint: metrics such asrabbitmq_auth_attempts_failed_totalsurface OAuth rejections faster than the CloudWatch one-minute polling interval. - Network controls: Enforce defense in depth by restricting broker access using security groups so that only authorized VPCs and IP ranges can reach the AMQPS and management endpoints. This matters especially in an OAuth setup because, once a token has been issued, the broker cannot revoke it before it expires.
Cleanup
To avoid incurring future costs, delete the resources created during this walkthrough if you no longer need them:
- Delete Amazon MQ broker and configurations.
- Remove test OAuth application registrations from your identity providers.
- Delete any IAM roles created for testing.
Conclusion
In this post, we demonstrated how Picnic configured an Amazon MQ for RabbitMQ broker to authenticate tokens from two OAuth 2.0 identity providers: Keycloak for human operators and AWS IAM for machine-to-machine services on a single broker instance. The key mechanism is RabbitMQ’s support for multiple resource servers, where the audience claim in each token determines which provider’s signing keys and permission rules apply.
With this approach, the Picnic team was able to cleanly separate human and machine authentication without the operational overhead of running separate brokers, while retaining fine-grained access control for both token issuers.
This pattern works with any combination of OAuth 2.0 providers and is particularly valuable for organizations looking to consolidate messaging infrastructure while maintaining distinct identity boundaries.
To learn more about Amazon MQ for RabbitMQ and OAuth 2.0 authentication, see Authentication and authorization for Amazon MQ. For a hands-on walkthrough of configuring OAuth 2.0 with Amazon MQ for RabbitMQ, see Using OAuth 2.0 authentication and authorization for Amazon MQ for RabbitMQ. The configuration examples in this post are broker-level settings applied through the Amazon MQ API. No standalone code repository is required.
About the authors