")

This was the review you didn’t know you needed. But then again, neither did I till I saw a Lego set that identically matched my road bike. Thus, I did what all rational cyclists did: Buy more cycling-related things I probably didn’t need.
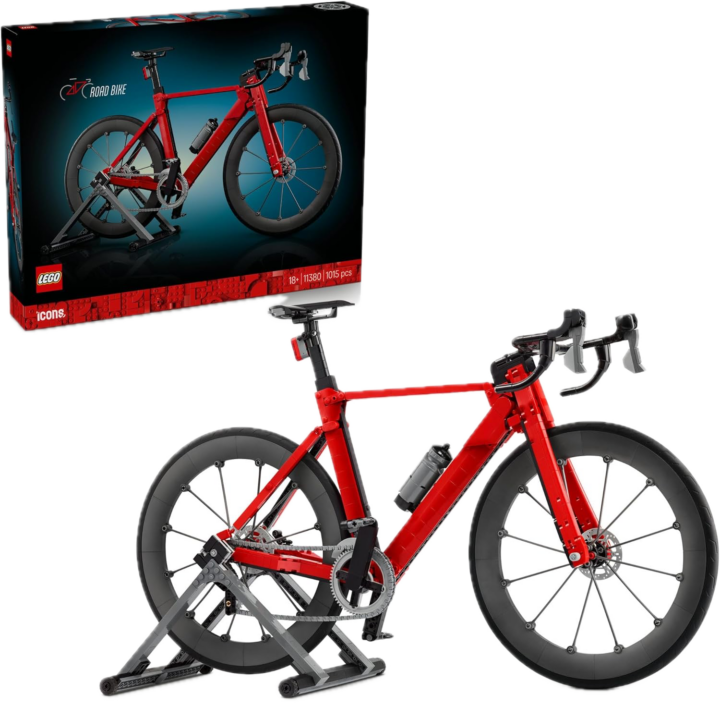
The Lego Icons Road Bike set officially started shipping about a week ago, though I ordered it about a month ago. It’s priced at $129USD/119EUR, which is sorta in the lower-mid range of some of Lego’s fancier ‘Icons’ sets, that are targeted more at adults than kids. Or more specifically, adults with expendable income…just like most fancy cycling gear.
What’s notable here, though, is that unlike many of Lego’s other Icons sets, there isn’t a brand partnership associated with this one. Unlike sets with Land Rover, Ferrari, or Star Wars. This isn’t a Canyon-branded bike, or a Trek one, or a Specialized one. Instead, it just a red road bike. Despite having a Canyon red road bike, I kinda appreciate the generic aspect here. Had it been a model of a specific other brand of bike that I didn’t own, I probably wouldn’t have bought it. And given the somewhat geographic attachment that many cyclists have to a certain bike brands (e.g. Europeans often to European branded bikes, Americans often to American bike brands, etc…sometimes simply because of availability/support), their decision here has some rational.
In any case, let’s get into things!
In The Box:

Inside the box, there are 8 bags of parts, with many of the bags having secondary, smaller bags (of smaller parts) inside them. In addition, there are two tires floating in the box, plus the manual:

In total, Lego says there are 1,015 pieces in there. Obviously, I’m not about to count them – so we’ll just take their word for it. Likewise, unlike a typical unboxing photo, I’m not going to perfectly line up each and every one of the 1,015 parts for a components shot. Else, this review would never get done.
Building It:

In my case, I didn’t take photos along the way during the build itself, but rather, videoed it from a bunch of different angles for the video at the top of the page. I then consolidated this into various tidbits that I thought were interesting during the video.
Overall, this took me a little under 3 hours to build, but as usual with most things that I film/shoot, it’s going to take me a bit longer to ensure camera angles are correct/etc. I also stopped for lunch briefly within that, and was watching some YouTube off to the side. Point being, a focused builder could probably knock this out under 2 hours.
Essentially, you build the bike from rear to front, in this order:
1) Rear trainer/stand
2) Rear wheel
3) Chainstay/Seatpost region
4) Downtube & Toptube
5) Front Fork/Headset
6) Front wheel
7) Handlebar Assembly
8) Water bottle & Rear Light
I think by far the most impressive part to build was actually the wheels. It uses a carbon-looking wheel segment piece that is rotated 180* each segment you build, which then ensures when you attach the spokes, they form a separated/split pattern such that they go to the outer rims of the wheel/rim, rather than aligned on the center. It’s super clever.


The first few pieces you do of the wheel might feel a bit confusing (and error-prone), but once you get cooking, it all works out. Plus, it’s kinda impossible to do wrong, because you’ll run out of pieces if you do it wrong (flipped order). In fact, I’d say the only portion of the entire 227-page build manual that’s a bit wonky is attaching the spokes to the wheel hub. Specifically, the way you position a very small plate in the center, has to be done a certain way, else some number of steps later it’ll all fail. The manual does show a correct/incorrect pop-out box, but even then, the nuances of that is mostly impossible to tell (until you fail later). I just sorta got lucky the first time, and then realized what it was trying to say the second wheel.
In any case, overall, the entire build was pretty straightforward. I didn’t have any “oh fudge, I need to totally rebuild everything” moments due to misunderstanding some piece 30 steps prior.

The manual also highlighted a number of both new-to-Lego pieces (such as the crankset), as well as old-to-Lego recycling (such as the handlebar drops are actually dragon horns from many years ago). As one who has primarily built smaller sets with my sub-10 year old kids, they don’t seem to include these details. One of these days I’m gonna buy the Concorde set, as an Avgeek, in honor of the couple of Concorde flights I took many years ago.
Oh, and once built? I used a real bike scale to weigh in, coming in at 620g:
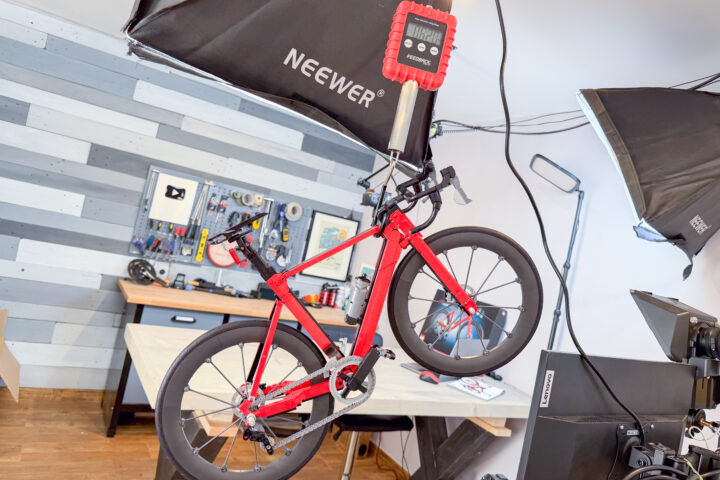
This is, of course, well under the UCI limit for road bikes, but it doesn’t seem like they are very good at measuring that anyway.
Comparison to a Real Bike:

So, let’s take a look at things, part by part, in terms of realism…as well as how they compare to my actual bike.
First up is the non-bike thing, the trainer/stand. Technically speaking, the manual describes it as a “Training Stand”, which is apparently what you call it when you can’t decide which one it should be. This ‘trainer’ lacks any wheel or hub resistance unit, though, so it doesn’t provide any training resistance. However, that does mean you can pedal it within the stand, and it’ll roll for a surprisingly long time.

I appreciate that it even has a little dual-lock mechanism (one per side) so that you can keep it locked in the stand itself. This locks over the world’s most incorrect thru-axle length (actually, it kinda reminds me of the axle on this GoPro mount I reviewed many years ago, sadly, nothing like that for thru-axle these days that I know of).

Next, we’ve got the rear free hub, cassette, and rear derailleur (I’ll cover both wheels later). The bike features a rear derailleur, but it doesn’t move or have any extra gears. Instead, the RD acts as a chain tensioner, albeit an immovable one. But the real magic here is the free hub, which enables for forward pedaling operation, but also allows for the chain to spin backwards as if you were backpedaling (without interrupting the wheel). In other words, this isn’t a fixie bike.

Here’s a side-by-side comparison to my bike (where a spider has made a web over the last few days):


Moving forward, we’ve got the chain. This chain has 72 individual links in it (which you get the pleasure of building). Surprisingly, it didn’t take as long as I thought it would; it comes together at about 2 seconds per chain link.

That said, as-built, the chain was WAAAY too loose and hung down all sad. So I removed 3 links, it was perfect. I put those in the ‘leftovers’ pile, in case I need them someday.
Meanwhile, up front we’ve got the 1x chainring. This is, of course unusual for a road bike, which typically have 2x (small and big chaining), but if Lego had included a 2x system, it’d have been far more complex (and would have required shifting). That said, I do appreciate the minor touches here, such as the fake/implied front derailleur just above the chainring coming off the frame.


Meanwhile, the crankset and pedals are great here. Even building the crankset is exactly like real life, in that you build the drive-side (with chainring) first, and then push it through the bottom bracket to the other wide, where you attach the non-drive-side crank arm, then attach the pedals afterwards.

The pedal essentially mirrors a road bike pedal, and you can decide whether that’s Look or Shimano (or, with a bit of a stretched imagination, Time). It’s definitely not SpeedPlay, however.

From there, we’ve got the frame of the bike itself, which is super realistic and well done. The dimensions on the top-tube and down-tube are nailed, as is the tapering on the downtime. Very clean and smooth.

Of course, there’s also that water bottle too, which if you crack it open, you’ll find water inside:

Of course, I’ll have to figure out how to make some DCR-branded water bottles for it:

Meanwhile, back up on the seat post is the saddle and rear light. The lights actually look a lot more like a Garmin Varia Radar than it does most bike lights. What’s cool here though is that the light does rotate/adjust up/down a bit, to find the right position. Further, the underside of the saddle actually has saddle rails.

My only (minor) complaint here is that the nose of the saddle feels a *touch* bit long. Like 10-15% long, versus most saddle noses, though you wouldn’t really notice it from far away. Maybe it’s just because the skinny portion happens a bit earlier than most saddles.


Up front, we’ve got the headset area, where things get a bit wobbly. There’s a lot of flux here (forward and side to side), but it does allow a slight bit of rotation (as if turning). One person commented that I might be missing a single piece somewhere behind the front fork, so I’ll double-check that. It’s not a huge deal if not, but could use some firming up.

As for the handlebars, I do feel like some bar tape would go a long way here, but obviously, that’s not quite the style. Still, it ends up looking great nonetheless. The shifters/brakes don’t work per se, but do have a little bit of play in them, so it kinda feels like your shifting if you move them slightly (but they make no click or such).


Still, there’s no denying the color scheme on the edge of the shifters is absolutely nailed here. Notably, the bottom portion of the hoods is apparently part of a dragon horn many years ago.

Getting up to the front wheel, it attaches via a quick-release system of sorts. The axle is effectively built in, but you can remove the bottom few pieces do separate pretty easily to remove the front wheel for whatever reason you might need to remove it for.

And of course, you probably noticed those disc brakes on both the front and rear wheels.
Meanwhile, the tires are my favorite part of the entire build. These snap on, and feel super realistic. There’s no tube inside, and they are effectively hookless wheels, but feel firm and spot-on.

Almost lastly, up front, there’s no front light up front. I think this actually makes sense. The vast majority of road/race bikes I see don’t have front lights on them (though many people have radars/rear lights), so I’m actually OK with this decision. That said, I’m a touch bit surprised there wasn’t a front bike brand name plate on the upper fork.

However, before we wrap-up, I do have to note one moderate omission: There’s no cycling computer on it.

You’d be hard-pressed to find this bike in the wild riding without a cycling computer of some sorts. I’d love to see someone make a 3D printed out-front mount and scale-appropriate bike GPS for it. That’d be amazing. Please?
Wrap-Up:

Ultimately, I’m super impressed with this set. Obviously, it’s not the cheapest Lego thing out there, but equally, it’s also not as expensive as many others. Priced at $129USD, it seems like a better deal than many of the higher-end kid-targeted sets that Lego sells in the barely sub-$100 price point. And likewise, many of the other Lego Icons series sets are priced far higher (e.g. Space Shuttle + Boeing 747 Carrier, Land Rover, Star Trek USS Enterprise, etc…). While as a kid I was a huge Lego builder, as an adult I haven’t really gotten into collecting fancy Lego sets (or building them). Of course, I build tons of smaller sets with my daughters, and we build lots of our own creations too with bulk sets of bricks and pieces of other sets.
In terms of the cycling side of things, I’m impressed with how well this was executed overall. In particular, the drivetrain is super well done, and the deeper rimmed wheels are spot-on (including the tires). The same goes for the frame of the bike, which really nails the road-bike aesthetic (and in particular, my Canyon bike).
There are a few companies that are already selling stickers for the side of the Lego Road Bike, for example, I saw one company selling my exact Canyon road bike. My Instagram ads have been abuzz with it since I mistakenly clicked on one of them. Perhaps I’ll buy it, perhaps not. Kinda undecided.
But I have decided this was a solid purchase! With that – thanks for reading!
Found This Post Useful? Support The Site!
Hopefully you found this review/post useful. At the end of the day, I’m an athlete just like you looking for the most detail possible on a new purchase – so my review is written from the standpoint of how I used the device. The reviews generally take a lot of hours to put together, so it’s a fair bit of work (and labor of love). As you probably noticed by looking below, I also take time to answer all the questions posted in the comments – and there’s quite a bit of detail in there as well.
If you’re shopping for the LEGO Icons Road Bike Set or any other accessory items, please consider using the affiliate links below! As an Amazon Associate I earn from qualifying purchases. It doesn’t cost you anything extra, but your purchases help support this website a lot.
And of course – you can always sign-up to be a DCR Supporter! That gets you an ad-free DCR, access to the DCR Shed Talkin’ video series packed with behind the scenes tidbits…and it also makes you awesome. And being awesome is what it’s all about!
Thanks for reading! And as always, feel free to post comments or questions in the comments section below, I’ll be happy to try and answer them as quickly as possible. And lastly, if you felt this review was useful – I always appreciate feedback in the comments below. Thanks!
