Amazon SageMaker Unified Studio is a single data and AI development environment that brings together data preparation, analytics, and machine learning (ML) development in one place. By unifying these workflows, it saves teams from managing multiple tools and makes it straightforward for data scientists, analysts, and developers to build, train, and deploy ML models while collaborating. In Amazon SageMaker Unified Studio, a domain is the organizing entity for connecting your assets, users, and their projects. With Amazon SageMaker unified domains, you have the flexibility to reflect the data and analytics needs of your organizational structure. You can create a single unified domain for your enterprise or multiple domains for different business units.
Some enterprises, especially those in regulated industries, might require limiting access to trusted networks (such as VPN CIDRs) or to managed devices that meet compliance standards through device attestation.
In this post, we demonstrate how to integrate SageMaker Unified Studio as a custom SAML application and apply conditional access policies for enforcing device compliance, IP-based restrictions, or multi-factor authentication (MFA). For this post, we use Okta as the identity provider (IdP).
Solution overview
This solution demonstrates how to integrate Amazon SageMaker Unified Studio (SMUS) with external SAML identity providers such as Okta. The integration enforces enterprise security controls, including trusted network access, device compliance, and multi-factor authentication. With this integration, organizations in regulated industries can maintain strict access controls while providing single sign-on for their data science and AI development teams. By using SAML 2.0 federation with conditional access policies, you can help make sure that only authenticated users on compliant devices from trusted networks gain access. This access applies to your SageMaker Unified Studio domains and the associated data and AI workloads.
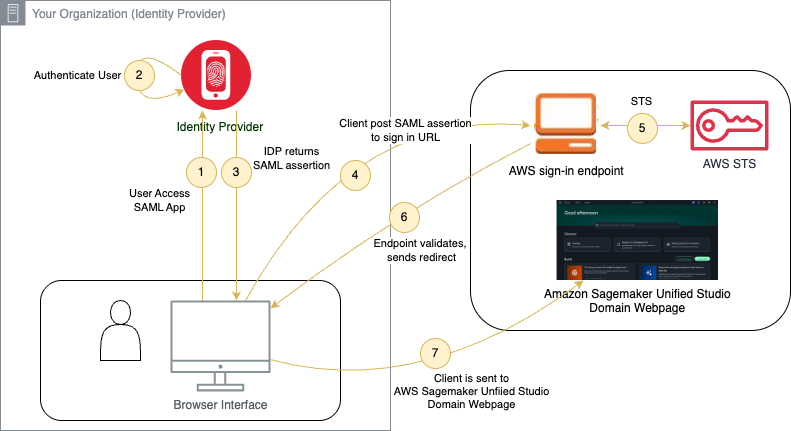
Authentication flow for accessing SageMaker Unified Studio through SAML
The architecture diagram illustrates the secure authentication flow for accessing SageMaker Unified Studio through SAML integration:
- Users typically initiate access from corporate-managed devices through VPN or trusted network connections.
- The IdP authenticates the user and evaluates conditional access policies defined by your organization. Based on these policies, it checks for trusted devices, approved source IP ranges, and MFA completion. If any policy fails, the login is rejected. Otherwise, authentication proceeds.
- Upon successful authentication and policy validation, the IdP generates a digitally signed SAML assertion containing user attributes and group memberships, securely delivering it to the user’s browser through HTTP POST binding.
- The client browser automatically posts the SAML assertion to the AWS Security Token Service (AWS STS) sign-in endpoint. There, the AWS IAM Identity Provider validates the trust relationship with your corporate IdP through pre-configured SAML federation settings.
- AWS STS validates the SAML assertion signature and authenticity. It then maps the user attributes to a specifically configured IAM role with SageMaker Unified Studio permissions, including the
datazone:GetIamPortalLoginUrlpermission required for domain access. - AWS STS confirms successful role assumption and generates temporary AWS credentials with a defined session duration. It then issues an HTTP redirect that returns the browser to the SageMaker Unified Studio domain with authenticated session tokens.
- Users gain access to the unified environment for data preparation, analytics, and machine learning development. All activities are governed by the assumed IAM role permissions and logged for comprehensive audit trails.
Walkthrough
In this walkthrough, you create a SAML application in Okta, connect it to AWS, and configure a SageMaker Unified Studio domain to use it for authentication.
Prerequisites
Before you get started, make sure you have the following:
- Familiarity with Amazon SageMaker Unified Studio.
- A basic understanding of SAML 2.0.
- AWS Identity and Access Management (IAM) permissions to create a domain in Amazon SageMaker Unified Studio.
- Access to your SAML IdP (such as Okta or Entra ID) to create and configure a SAML application.
Step 1: Create an application in Okta
The first step is to set up a new SAML application in Okta that manages authentication for SMUS.
- In Okta, go to Applications → Create App Integration, and choose SAML 2.0.
- Provide an App name.
- Set the Single sign-on URL to
https://signin.aws.amazon.com/saml. - Set Name ID format to Persistent.
- Set the Audience URI (SP Entity ID) to
https://signin.aws.amazon.com/saml. - Choose Next, and finish creating the application.
- Once created, copy the Metadata URL and Sign On URL. You need these in later steps.
Step 2: Create an identity provider in IAM
Now, let’s connect Okta to AWS by creating an IAM identity provider. This allows AWS to trust authentication responses from Okta.
- Open the IAM console.
- Go to Identity providers → Add provider.
- Select SAML as the provider type.
- Provide a Provider name.
- In Okta, go to your application’s Sign On tab, choose Identity Provider metadata, and save the XML file. Upload it here.
- Choose Add provider.
- Copy the ARN of this provider. You need it when you create the role.
Step 3: Create an IAM role for Okta
Next, create an IAM role that Okta can assume. This role defines what access users have when they sign in through Okta.
- In IAM, go to Roles → Create role.
- Use the following trust policy (replace both instances of “{Replace with Identity provider ARN}” with the ARN you copied in Step 2):
- Attach a permission policy. For example:
Replace <REGION>, <ACCOUNT-ID>, and <DOMAIN-ID> with the corresponding values from your SageMaker Unified Studio domain ARN (arn:aws:sagemaker:<REGION>:<ACCOUNT-ID>:domain/<DOMAIN-ID>). You can find the domain ARN in the SageMaker console under Domains.
Step 4: Configure SAML assertions
To make sure AWS understands who is signing in, configure the SAML assertions in Okta.
- Open your application in Okta.
- Go to General → SAML Settings → Edit.
- Choose Next until you reach Attribute Statements.
- Add the following mappings:
https://aws.amazon.com/SAML/Attributes/PrincipalTag:Email→user.email.https://aws.amazon.com/SAML/Attributes/Role→{IAMROLEARN,IdentityProviderARN}.https://aws.amazon.com/SAML/Attributes/RoleSessionName→user.email.
Step 5: Create an SMUS domain
Finally, let’s set up the SMUS domain and tie it all together.
Note: Creating a SageMaker Unified Studio domain incurs charges. For pricing details, see the Amazon SageMaker pricing page.
- Open the Amazon SageMaker console.
- Choose Create domain.
- Choose Manual setup (this allows for SAML integration).
- Enter a domain name, then choose Create.
- In Configure SSO user access, select SAML, then choose Next.
- Set the IdP SSO URL to the Sign On URL from Step 1.
- Select Do not require assignments. (Access is instead managed by your IdP team through Okta or Entra.)
- Choose Next, then choose Save.
To verify the integration works, open your SMUS domain and choose Sign in with SSO. You are redirected to Okta, and conditional access policies such as VPN, device attestation, or MFA apply automatically.
- Open your SMUS domain URL in a browser.
- Choose Sign in with SSO.
- Confirm that you are redirected to Okta for authentication.
- Sign in with your Okta credentials.
- Verify that you are redirected back to the SMUS domain with access to your projects.
Step 6: Assign users to the Okta application
Before users can authenticate through Okta to access SMUS, you must assign them to the application.
- In Okta, navigate to your SAML application.
- Go to the Assignments tab.
- Choose Assign, and select Assign to People or Assign to Groups.
- Select the users or groups who need access to SMUS.
- Choose Save and Go Back, then choose Done.
Step 7: Apply conditional access policies
Up to Step 5, we configured SMUS with an external SAML IdP. At this point, anyone assigned to the new application in your IdP can sign in and access the SMUS domain.
This is where conditional access policies come into play. Based on your organization’s governance model, you can add policies in your IdP to further control how and when users gain access. For example:
- Restricting access to specific corporate IP address ranges (for example, only through VPN).
- Enforcing device compliance so that only managed or secure devices can connect.
- Adding MFA requirements for sensitive actions.
- Applying device attestation to help assess whether the endpoint conforms to security baselines.
Most major IdPs, including Okta and Entra ID, support conditional access. You can find more details in their documentation:
These policies allow you to enforce the right level of protection, from something as simple as requiring users to connect through corporate networks to something as advanced as verifying device attestation across your fleet.
Clean up
To avoid incurring ongoing charges, delete the resources you created during this walkthrough:
- Delete the Amazon SageMaker Unified Studio domain from the SageMaker console.
- Delete the IAM role you created for Okta.
- Delete the IAM identity provider.
- Delete the SAML application in Okta.
Important: Deleting the SMUS domain permanently removes all projects, assets, and data within it. Back up any important work before proceeding.
Conclusion
By integrating SMUS with an external IdP through SAML, you can help enforce modern access controls based on your organization’s security requirements. This post walked through how to configure SMUS with a custom SAML application and pointed you toward resources for setting up conditional access policies.
With conditional access in place, you can decide, based on your organization’s needs, whether access should be limited to trusted users on trusted networks, trusted devices, or both. This approach can help provide a more secure and compliant login experience that aligns SMUS access with your company’s broader identity and security strategy.
About the authors