
Xcode 27 is probably Apple’s most significant IDE update in years, and it’s not just about a fresh coat of paint. This release introduces agentic coding, a unified Device Hub, and a redesigned workspace that fundamentally changes how you build apps. Whether you’re prototyping a new feature, debugging a performance issue, or localizing your app for global audiences, Xcode 27 has something that will speed up your workflow.
In this tutorial, we’ll walk through every major feature in Xcode 27 and show you how to take advantage of them in your own projects. Let’s dive in.
Prerequisites
To follow along, make sure you have the following:
- Xcode 27 (Currently in beta, available from Apple Developer portal)
- macOS Golden Gate or later
- An Apple Silicon Mac (Xcode 27 is Apple Silicon-only)
A Redesigned Workspace
The first thing you’ll notice when you launch Xcode 27 is a refreshed toolbar. Apple has reorganized the workspace controls to give you more room for what matters most: your code.
The history navigation and editor controls that used to live in the jump bar have been moved into the toolbar. Build activity now appears beneath the window title, and the branch picker has been relocated to the bottom bar, making long branch names much easier to read at a glance.
Customizing the Toolbar
Unlike previous versions, the toolbar in Xcode 27 is fully customizable. You can add, remove, and reorder items to suit your workflow. To customize it, right-click on the toolbar and select Customize Toolbar. The right side of the toolbar includes controls for tabs, editor panes, editor settings, and a three-way mode chooser for canvas previews, Assistant Editor, and source control review.
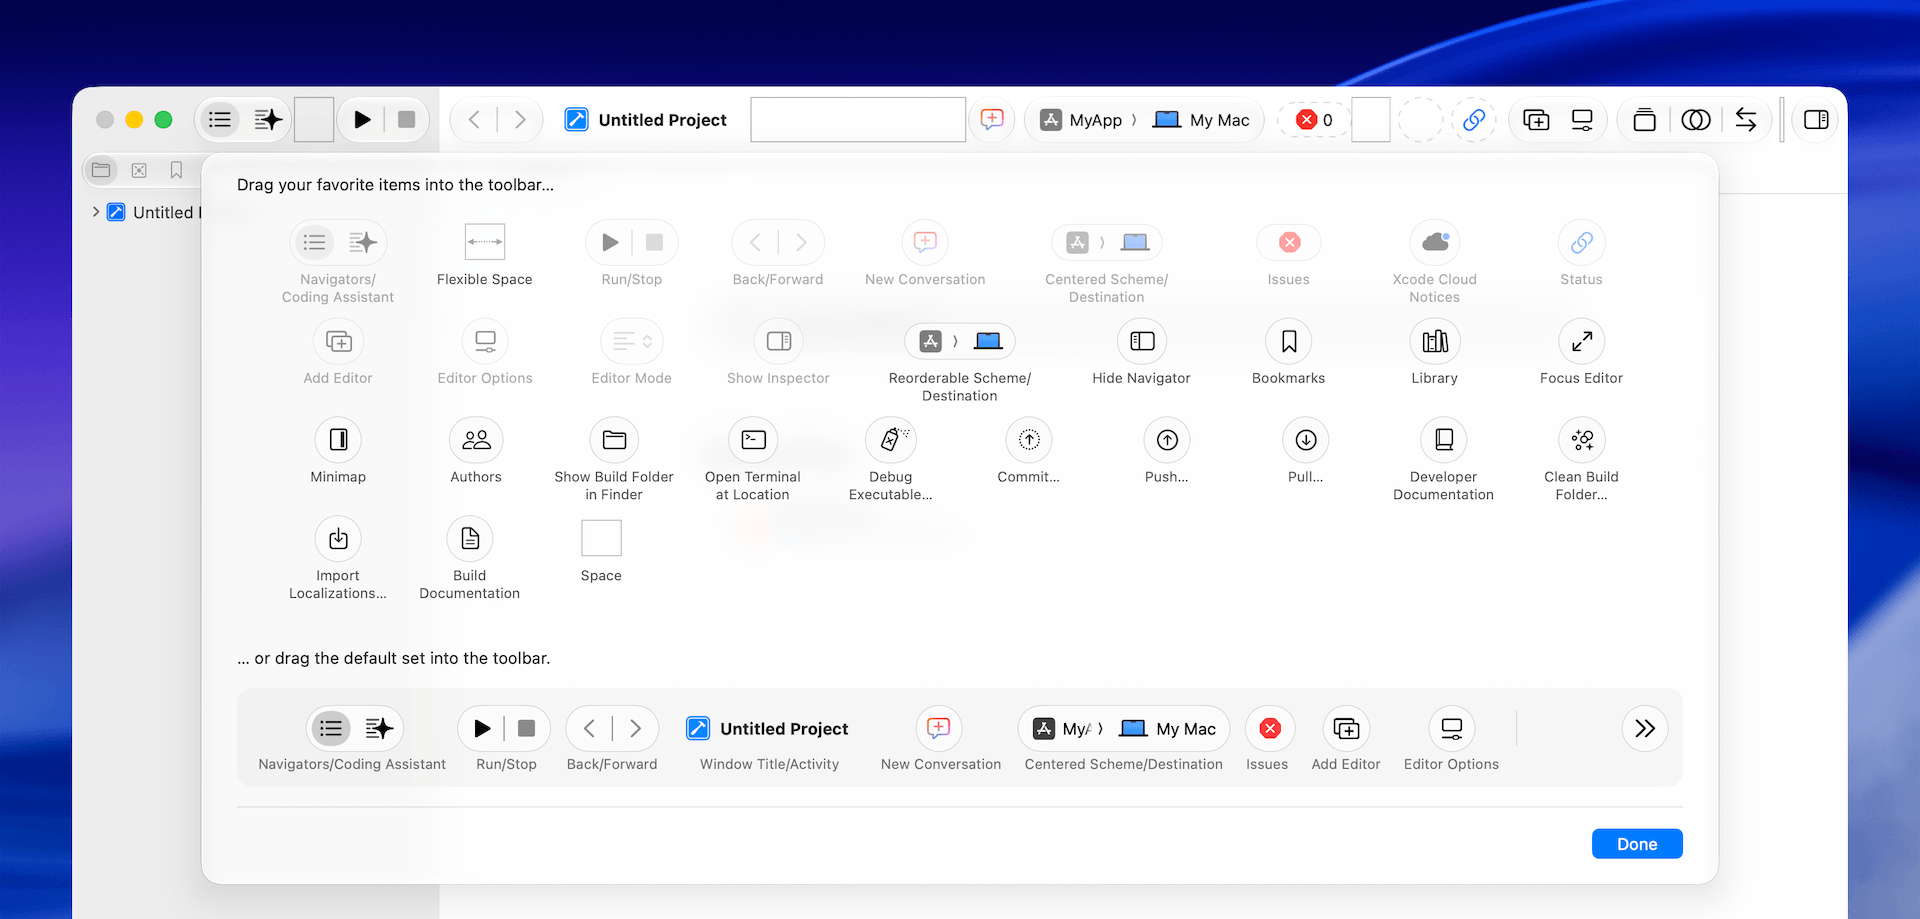
This might seem like a small change, but if you’ve ever wished you could rearrange Xcode’s interface to match how you actually work, this is a welcome improvement.
Workspace Themes
Xcode 27 introduces a new Appearance panel that goes well beyond the old font and color settings. You can now choose from built-in theme presets like Emerald, Neon Noir, and Coral Reef, or create your own by adjusting text color intensity and background intensity with palette sliders.
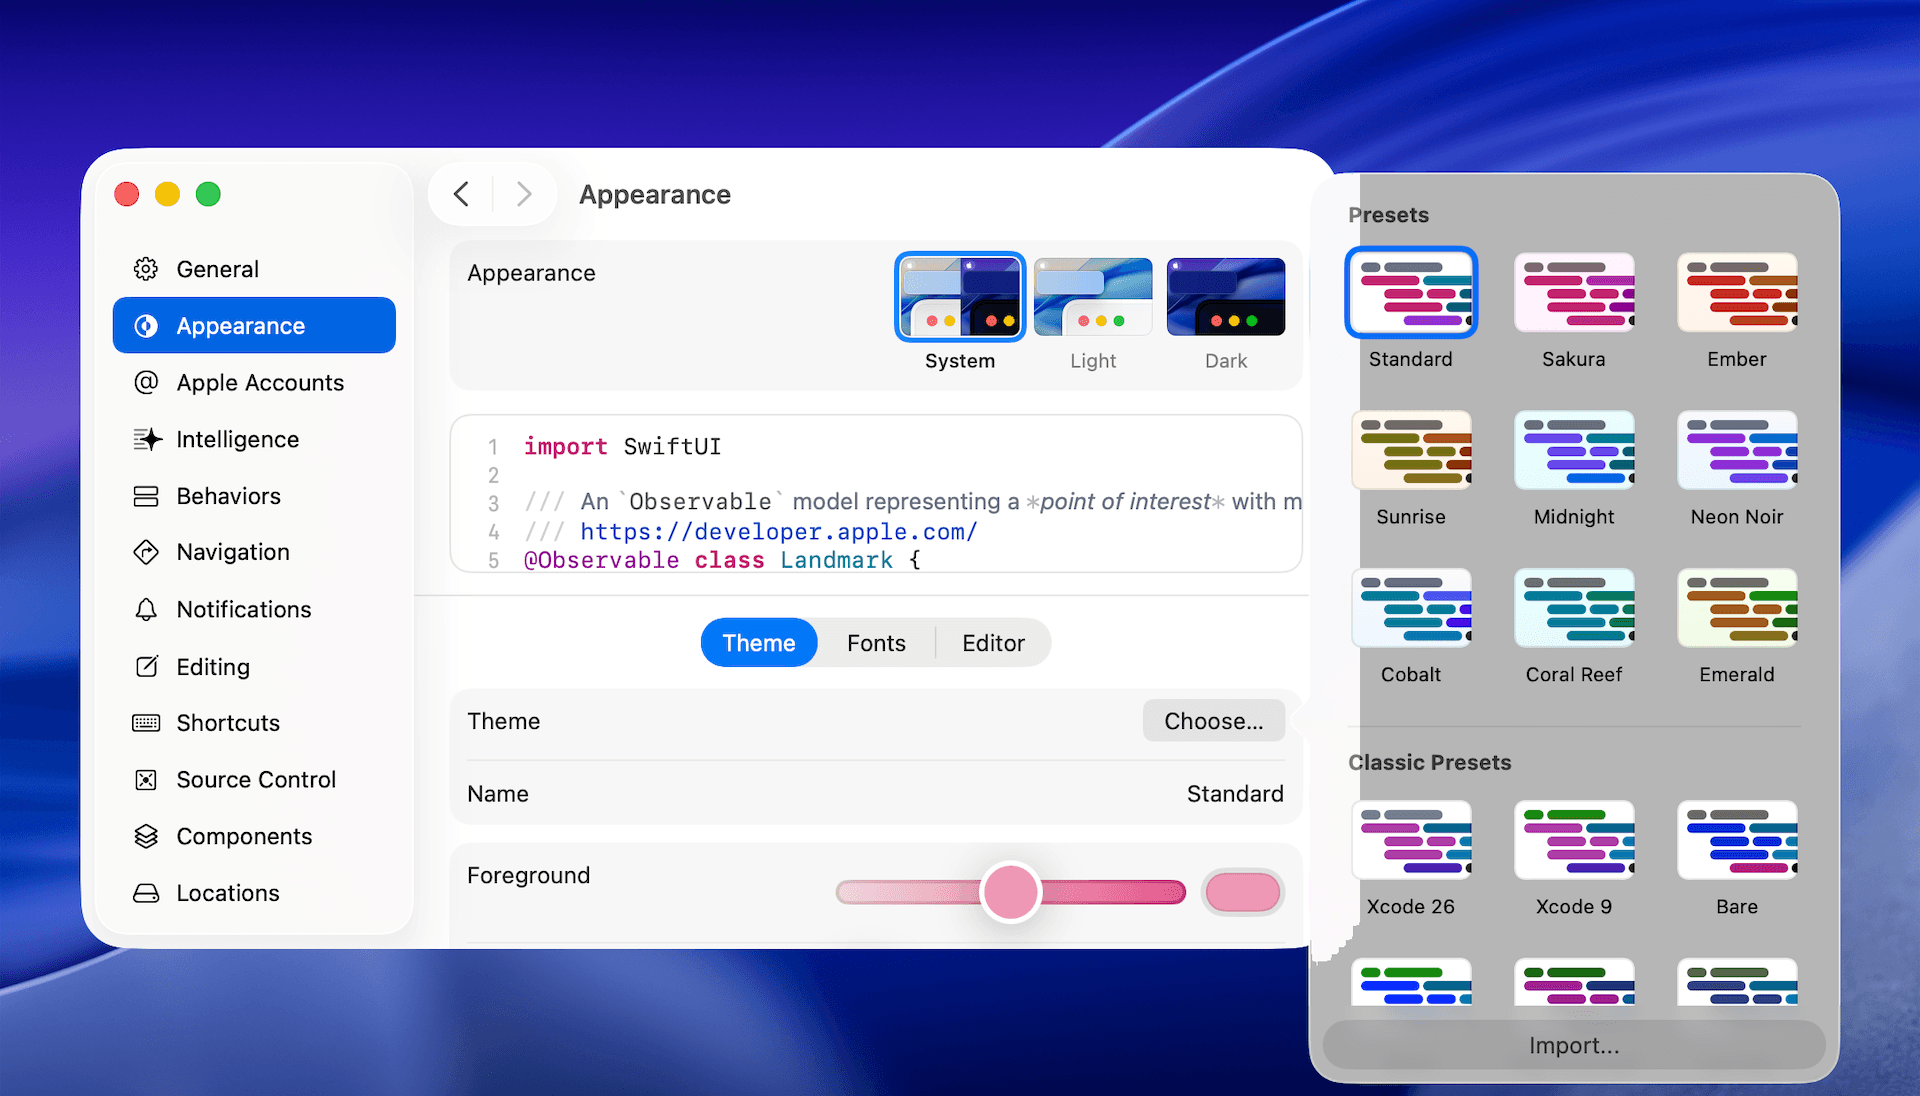
Here’s what makes this really useful: you can assign different themes to different workspaces. If you’re working on two projects side by side, giving each one a distinct visual identity makes context switching much easier. Your font settings are saved separately from your theme, so you can swap visual themes without changing your preferred typography.
Predictive Live Issues
As you type, Xcode 27 now shows predictive issues with a subtle, theme-aware background highlight. These are potential problems that Xcode detects before you even build. Once you trigger a build, unresolved predictions become full-intensity warnings or errors, while predictions that turn out to be false positives simply disappear.
This reduces the feedback loop between writing code and catching mistakes. You no longer have to wait for a full build to know something is off.
Faster Prototyping with Untitled Projects
Prior to Xcode 27, you always had to create a full project with a name, bundle ID, and save location before you could write a single line of code. What if you just want to test a quick idea without all that ceremony? Xcode 27 solves this with untitled projects.
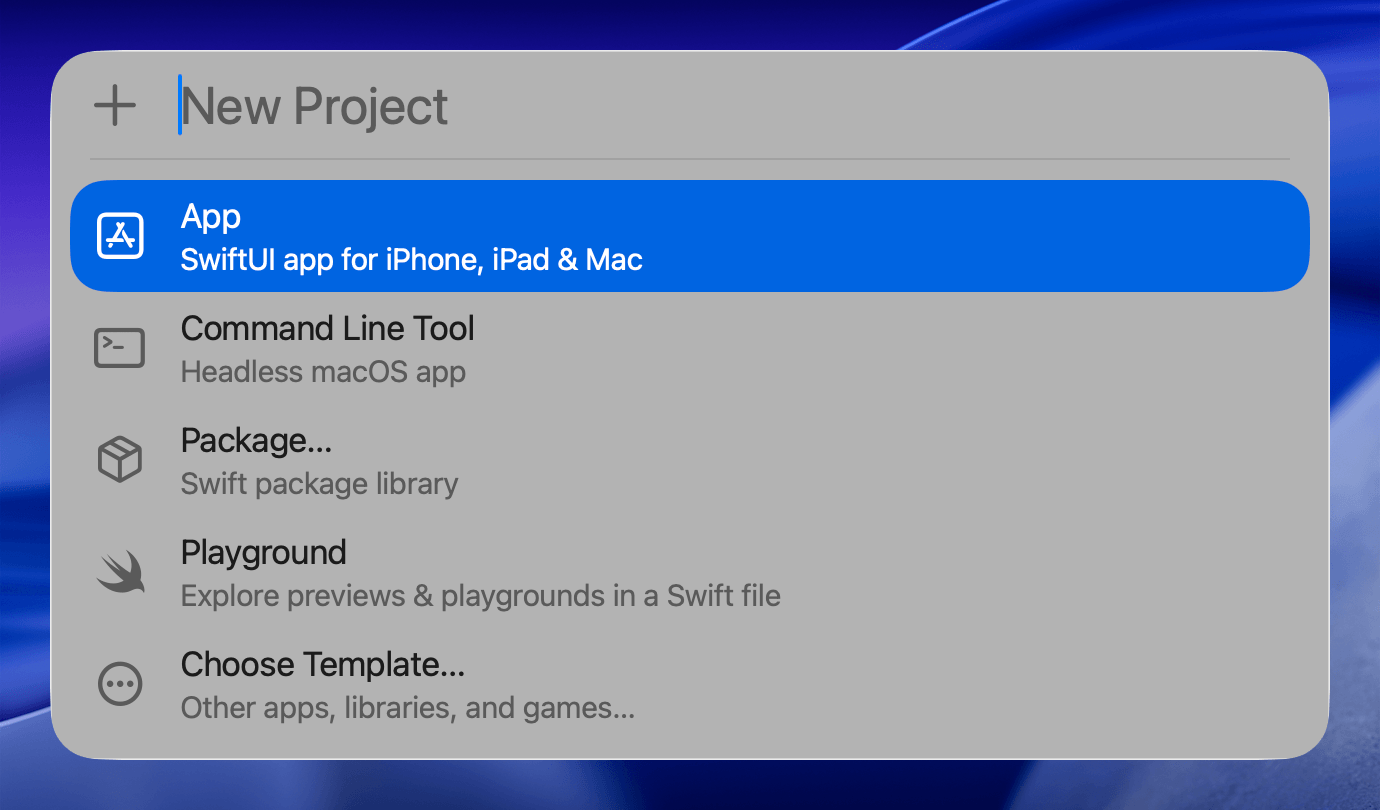
When you create a new project from the File menu, Xcode can now immediately open a blank project without asking you to name it or choose a save location first. You can explore your idea, and if it works out, save and name the project later. If it doesn’t, just close the window and move on.
The available templates include:
- SwiftUI App — a full app project
- macOS Command Line Tool — for scripts and utilities
- Swift Package — for reusable libraries
- Playground — a standalone Swift file with the Playground macro
Even better, Xcode 27 can now open a standalone Swift file in a workspace window and still show playground results and SwiftUI canvas previews. This means you can create a single .swift file, add a SwiftUI view, and immediately see it rendered in the canvas without setting up a project at all.
Let’s try this out. Highlight the following code and right click to select copy:
import SwiftUI
import Playgrounds

#Playground {
    struct CafeCard: View {
        let name: String
        let neighborhood: String
        let rating: Double

        var body: some View {
            VStack(alignment: .leading, spacing: 8) {
                Text(name)
                    .font(.headline)
                Text(neighborhood)
                    .font(.subheadline)
                    .foregroundStyle(.secondary)
                HStack(spacing: 4) {
                    Image(systemName: "star.fill")
                        .foregroundStyle(.orange)
                    Text(String(format: "%.1f", rating))
                        .font(.caption)
                        .bold()
                }
            }
            .padding()
            .background(.ultraThinMaterial, in: RoundedRectangle(cornerRadius: 12))
        }
    }

    CafeCard(name: "Onibus Coffee", neighborhood: "Nakameguro", rating: 4.3)
}
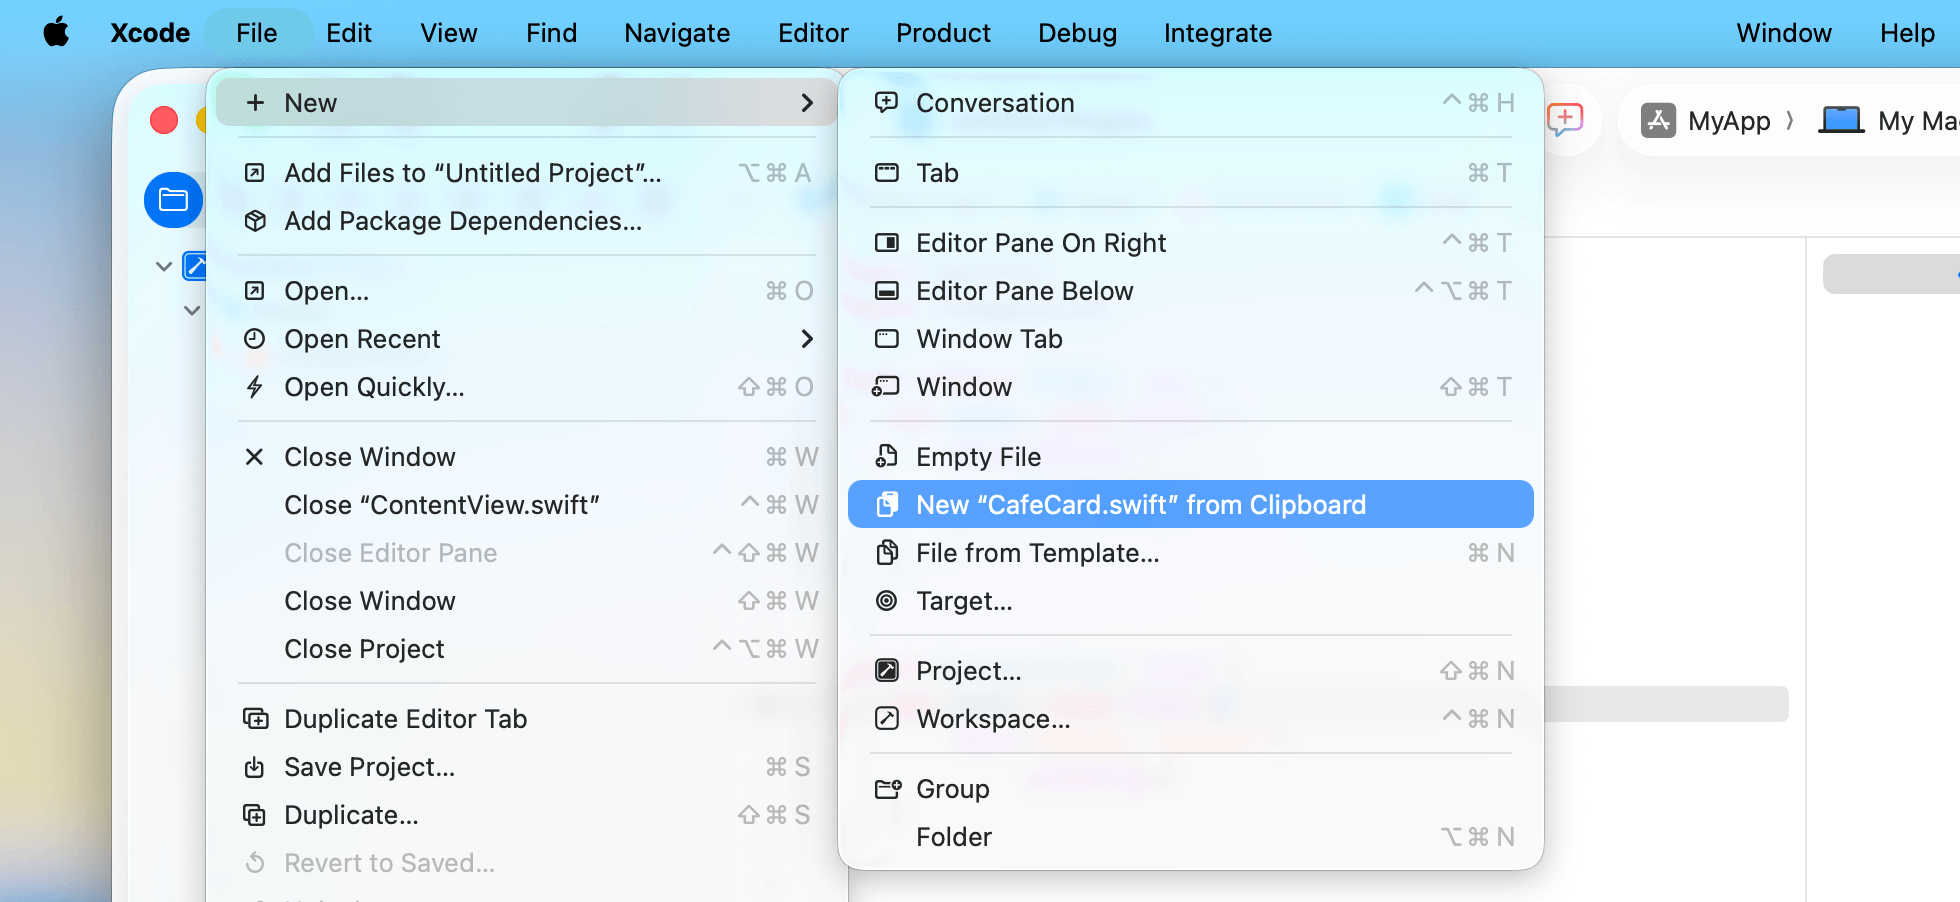
In Xcode 27, go up to the menu and choose File > New > New “CafeCard.swift” from Clipboard. This is very convenient and you’ll see the preview render in the canvas immediately, no project setup required. This is perfect for quickly sketching out UI components before integrating them into your main codebase.
Coding Agents in the Editor
This is the headline feature of Xcode 27. Apple has integrated AI coding agents directly into the editor, and they work differently from the code completion you might be used to.
Agent conversations now live in editor tabs. You can open an agent conversation alongside your source code, arrange them in split panes, and manage multiple conversations just like you manage open files. The coding assistant sidebar shows all your active conversations, including which ones have unread messages or need your input.
The /plan Workflow
The most powerful way to use Xcode’s coding agents is with the /plan command. Instead of jumping straight into code generation, /plan asks the agent to inspect your project context, analyze relevant files, and propose an approach before making any changes.
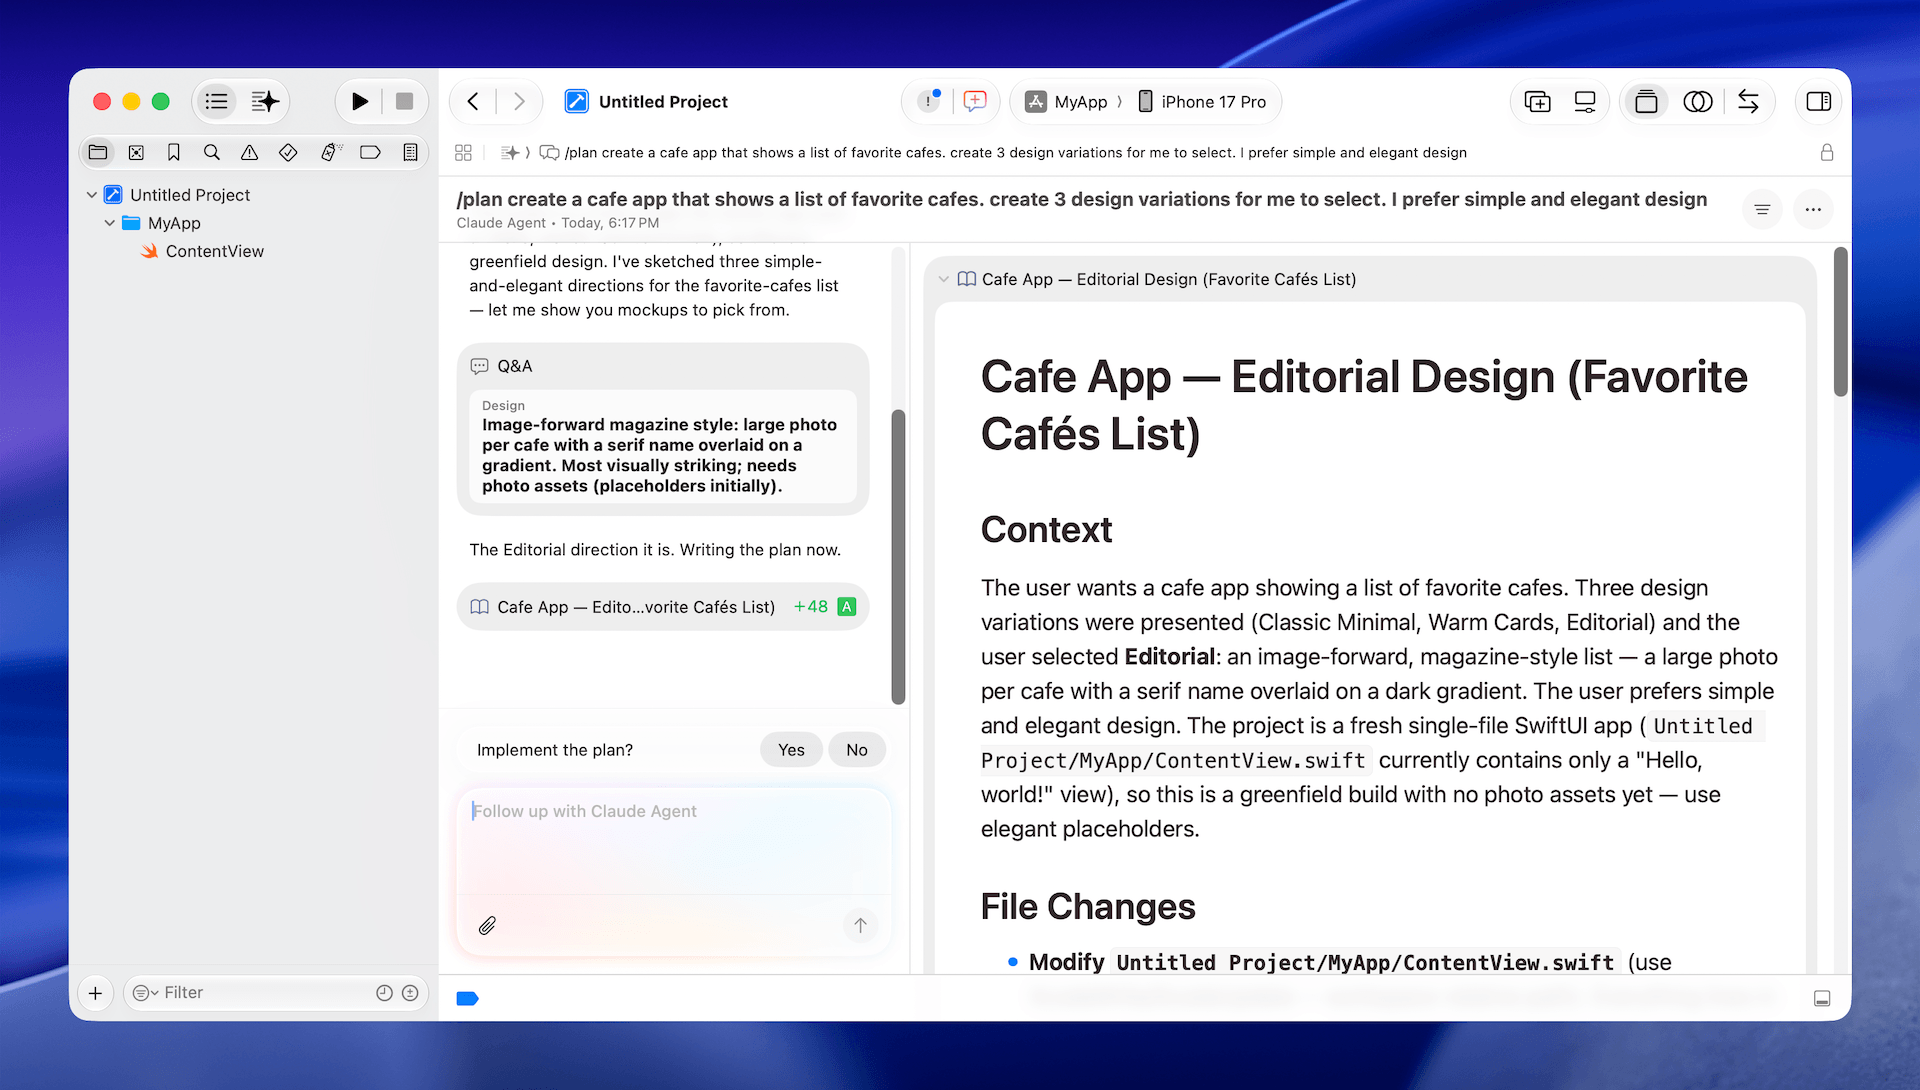
Here’s how it works. Open a new agent conversation from the toolbar and type:
/plan Add a favorites filter to the cafe list view. Consider the existing
data model, how saved state is managed, and current SwiftUI view structure
before making changes.
The agent will then:
- Scan your project for relevant files and data models
- Propose a plan with specific file changes and implementation steps
- Wait for your review before writing any code
You can refine the plan with inline feedback, ask the agent to consider edge cases it missed, or approve the plan to start implementation. This approach gives you architectural control while letting the agent handle the mechanical work.
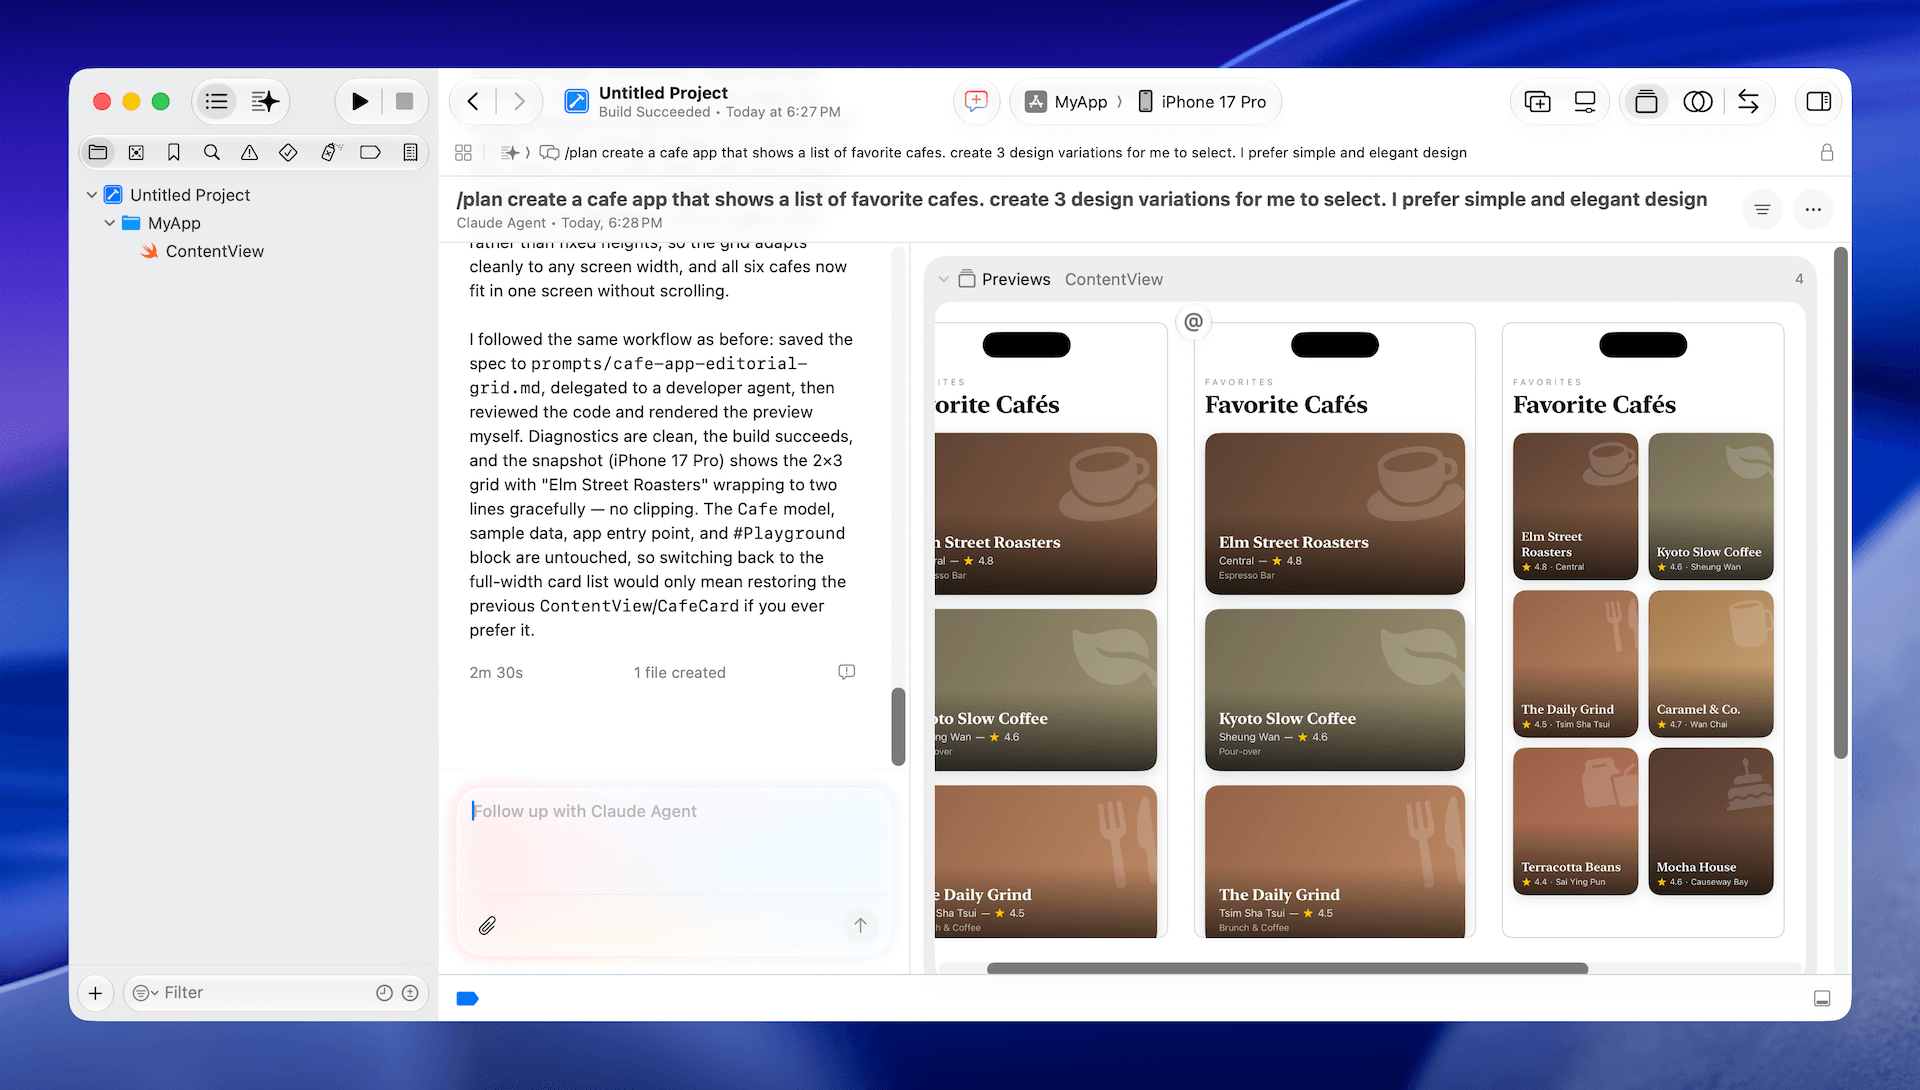
Running Multiple Agents in Parallel
Xcode 27 lets you run several agent conversations at the same time, and the coding assistant sidebar is where you keep track of them.
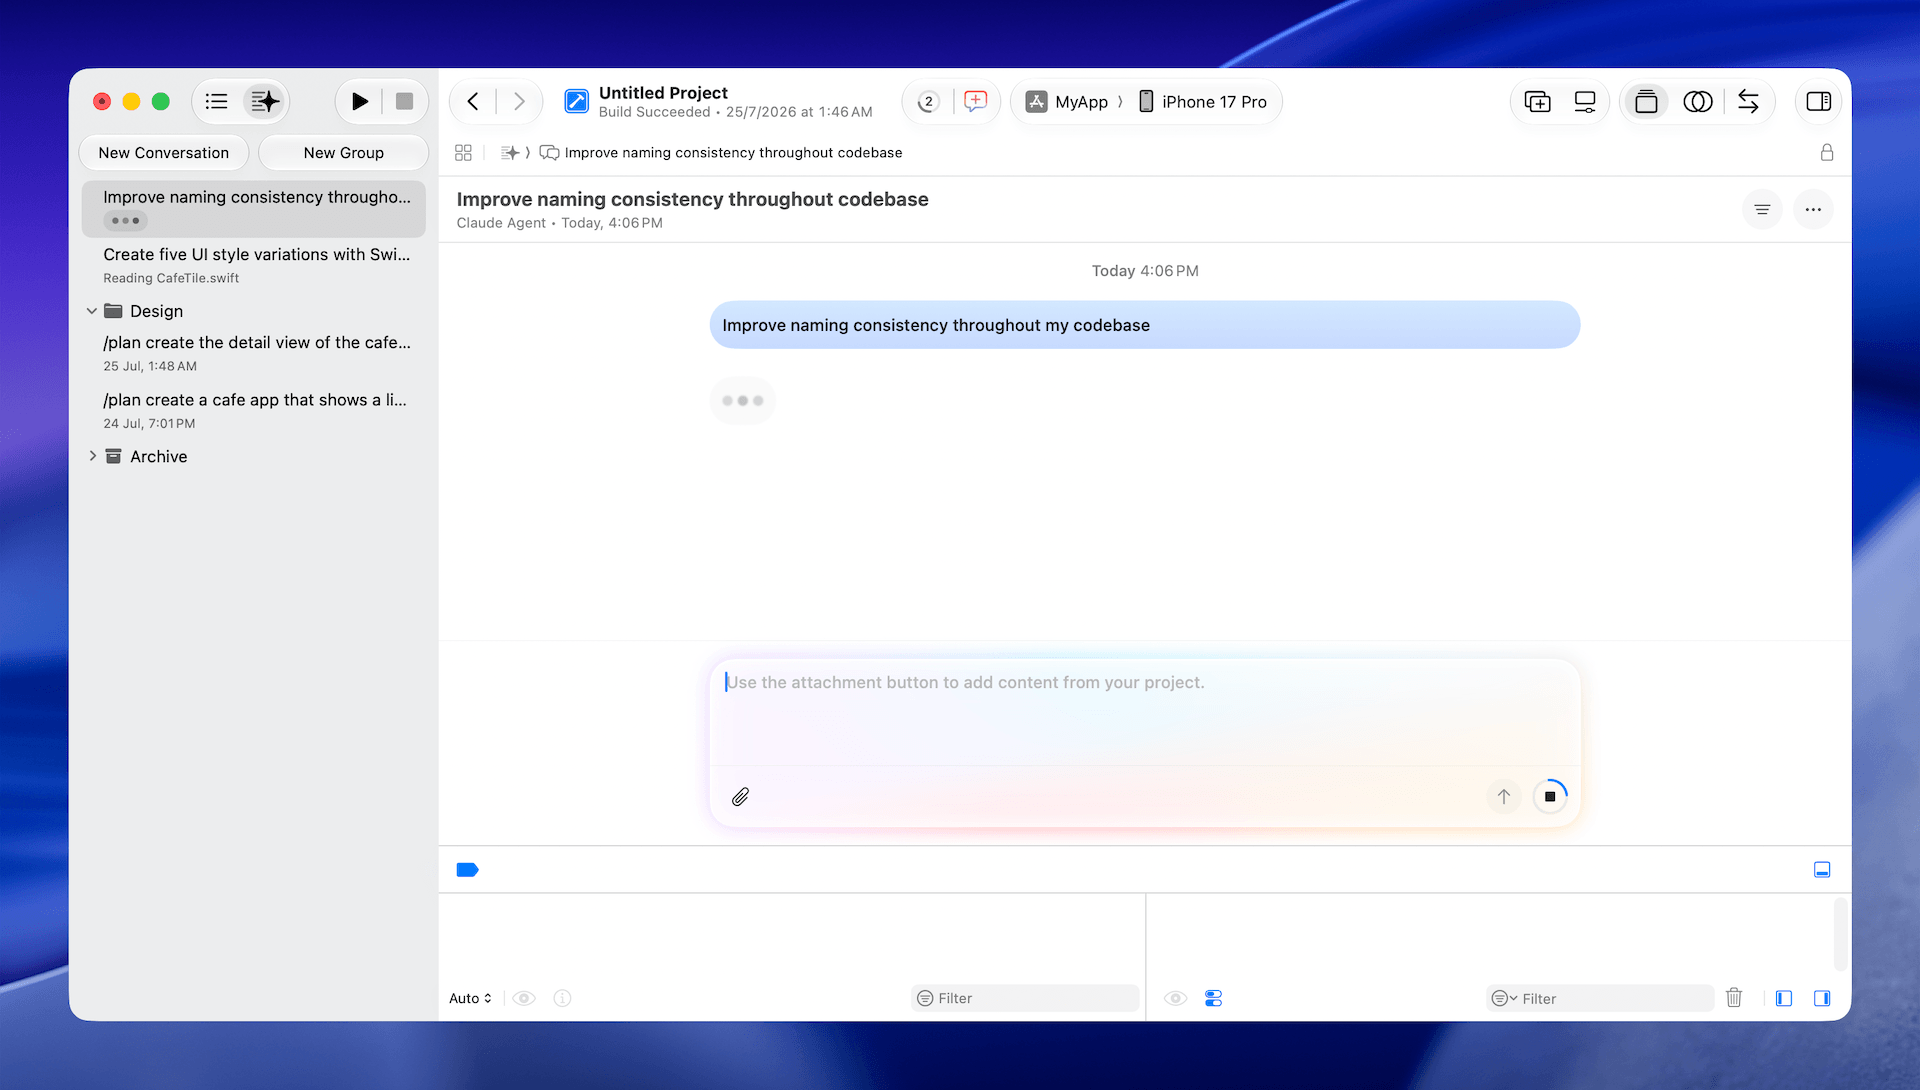
Each conversation carries its own context and its own transcript. The sidebar shows what every conversation is doing at that moment. In the screenshot above, one conversation is generating UI style variations while another works through a naming-consistency refactor.
One thing to know before you lean on this: parallel conversations don’t share context and they don’t coordinate their edits. Point two of them at the same file and you’ll get conflicting changes. Splitting work along file boundaries is what makes running conversations in parallel safe.
There’s a second kind of parallelism in Xcode 27, and it’s easy to confuse with the first. While working through a task, an agent can hand parts of the job to sub-agents that run concurrently and report their results back. You don’t create sub-agents yourself. Xcode decides when a task is worth splitting up. Translation is the clearest example. When you localize an app, the agent reads your String Catalogs, splits the entries into batches, and gives each batch to a sub-agent.
Device Hub: The End of Simulator
Device Hub replaces the standalone Simulator app in Xcode 27, and it’s a significant upgrade. When you run your app on a simulator, it now opens in a compact Device Hub window with quick actions for Home, screenshots, and rotation.
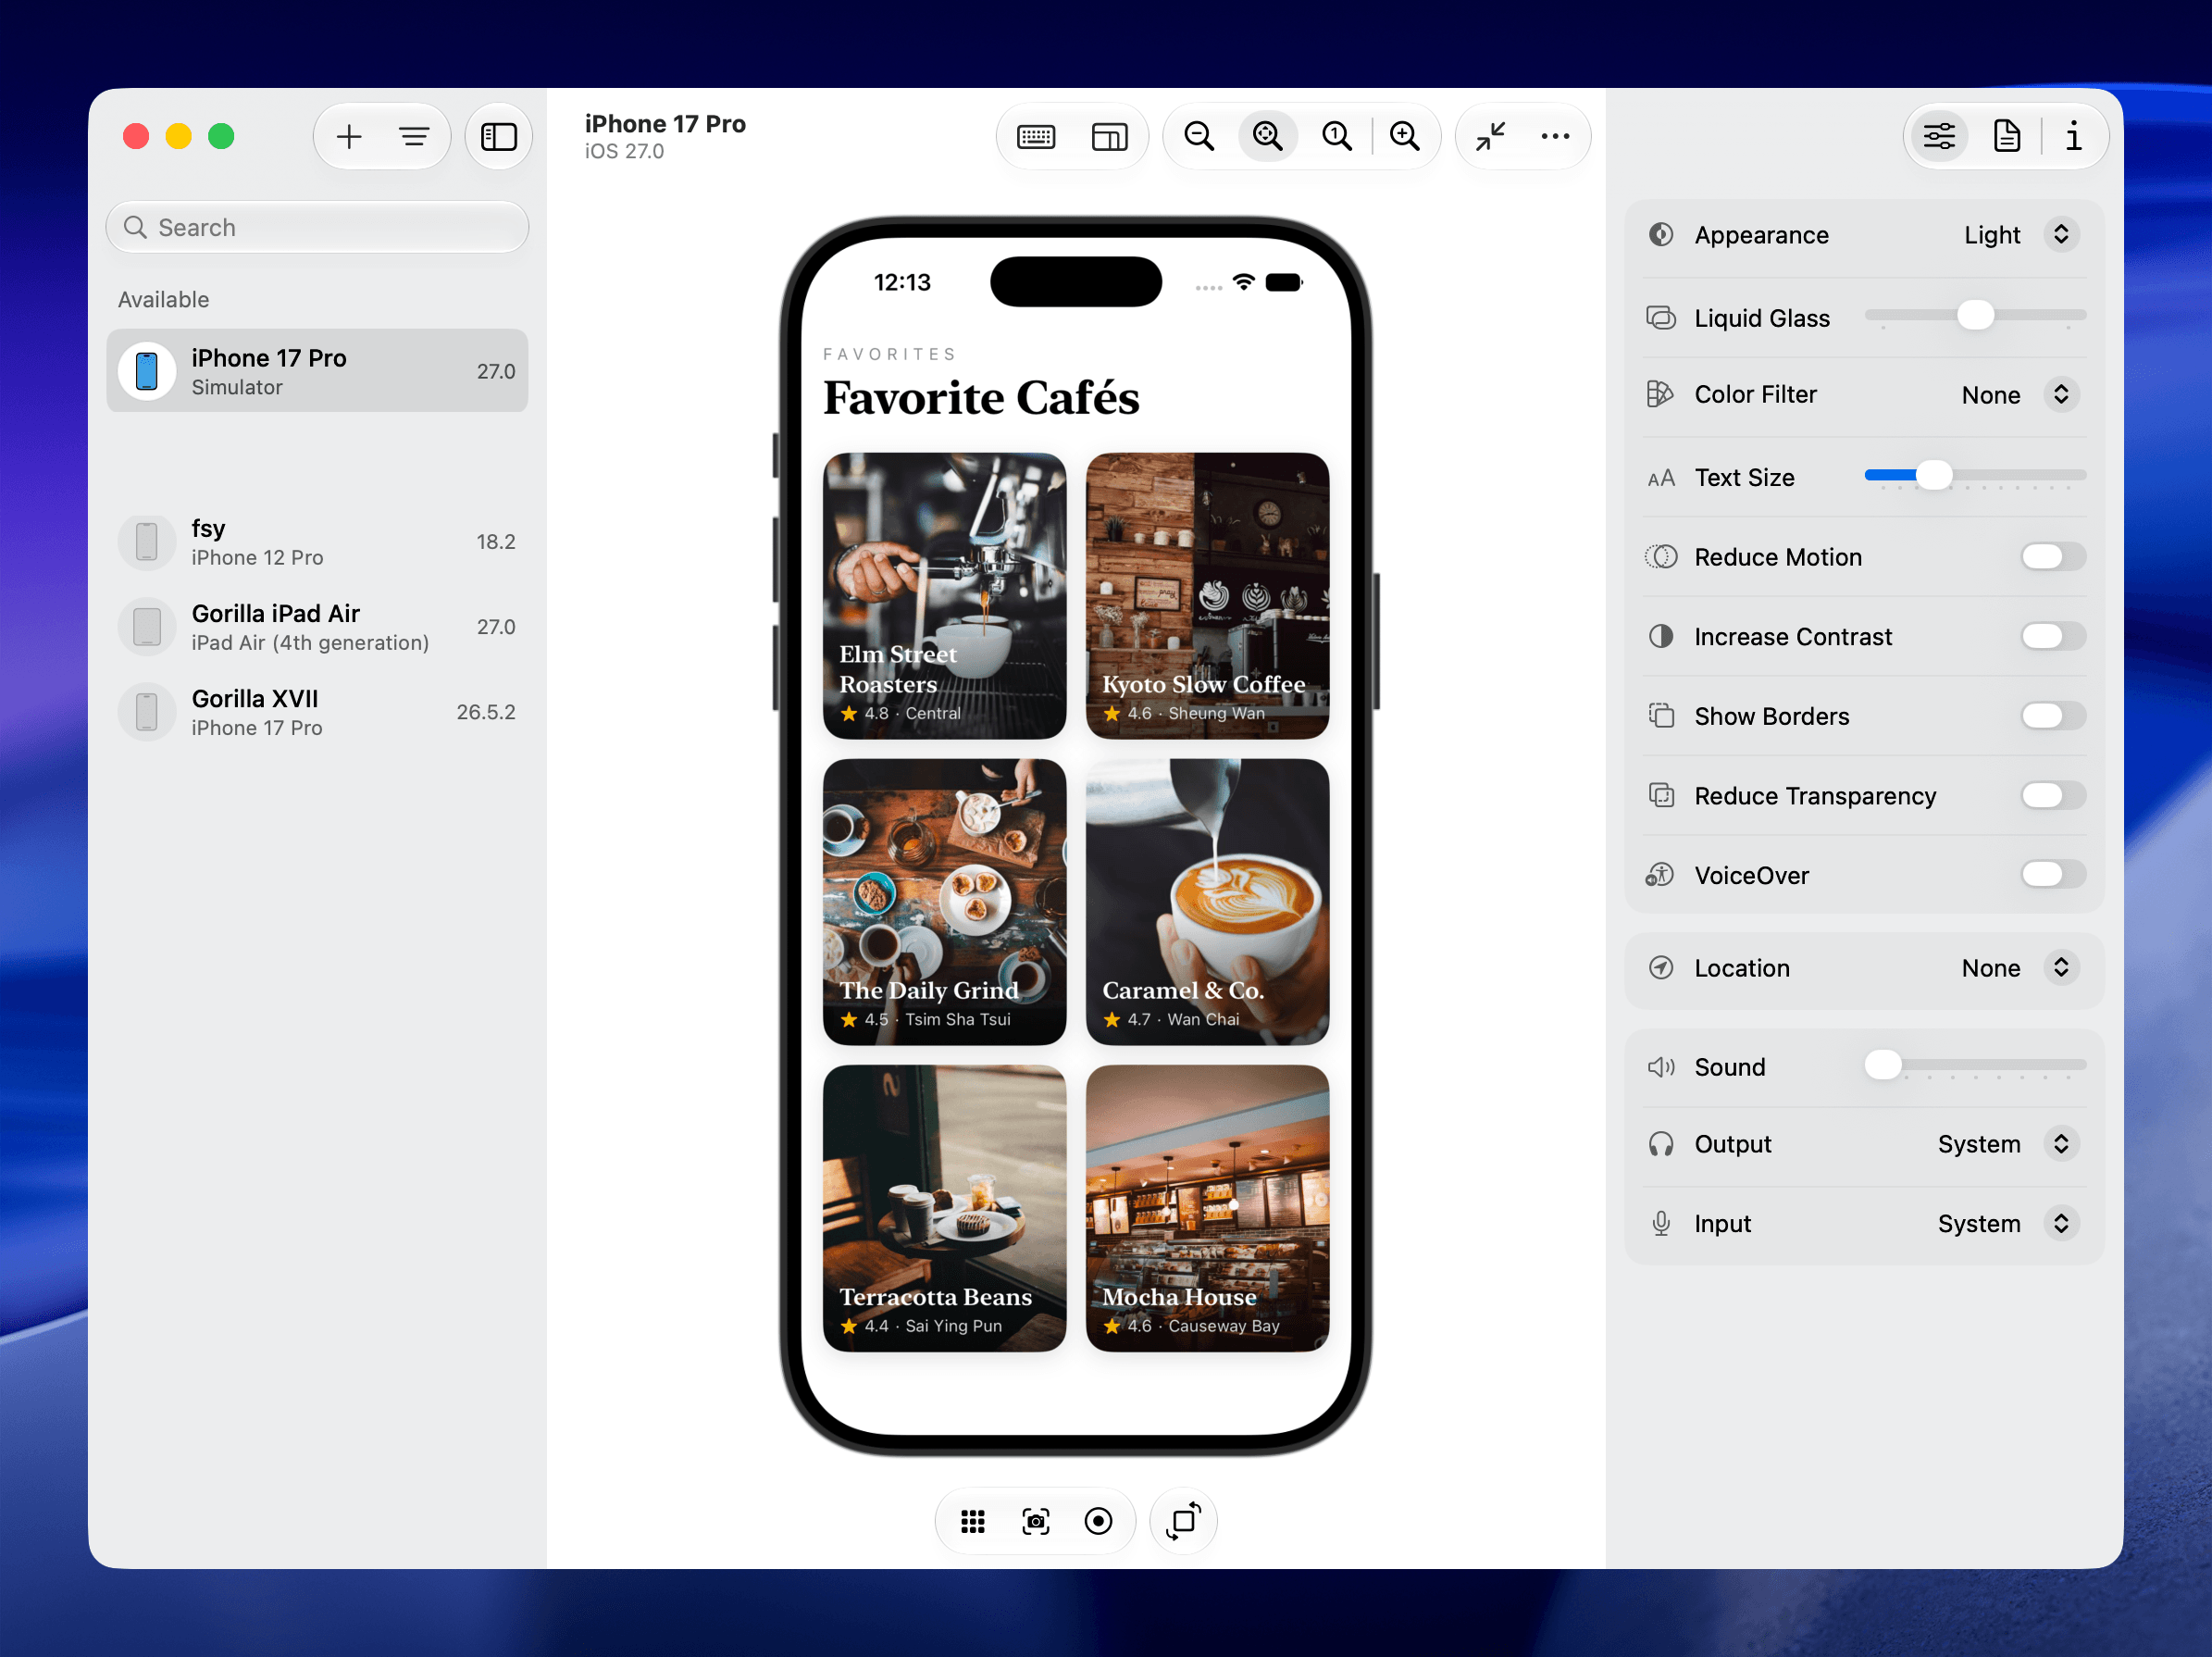
Expand the Device Hub window and you’ll find an Inspector that supports real-time testing of accessibility settings. You can toggle increased contrast, adjust Dynamic Type sizes, and switch between light and dark appearance without leaving your development flow.
Device Hub isn’t limited to simulators. Its sidebar shows a combined list of simulators and paired physical devices. If your app is running on a connected iPhone, you can view and interact with it from the Mac through Device Hub.
iPhone Mirroring Resize Mode
On macOS Golden Gate, iPhone Mirroring now supports a resize mode that you can access through Device Hub. This lets you test how your app’s layout adapts to different aspect ratios and content sizes, which is especially useful if your app needs to work well in the new resizable iPhone window feature.
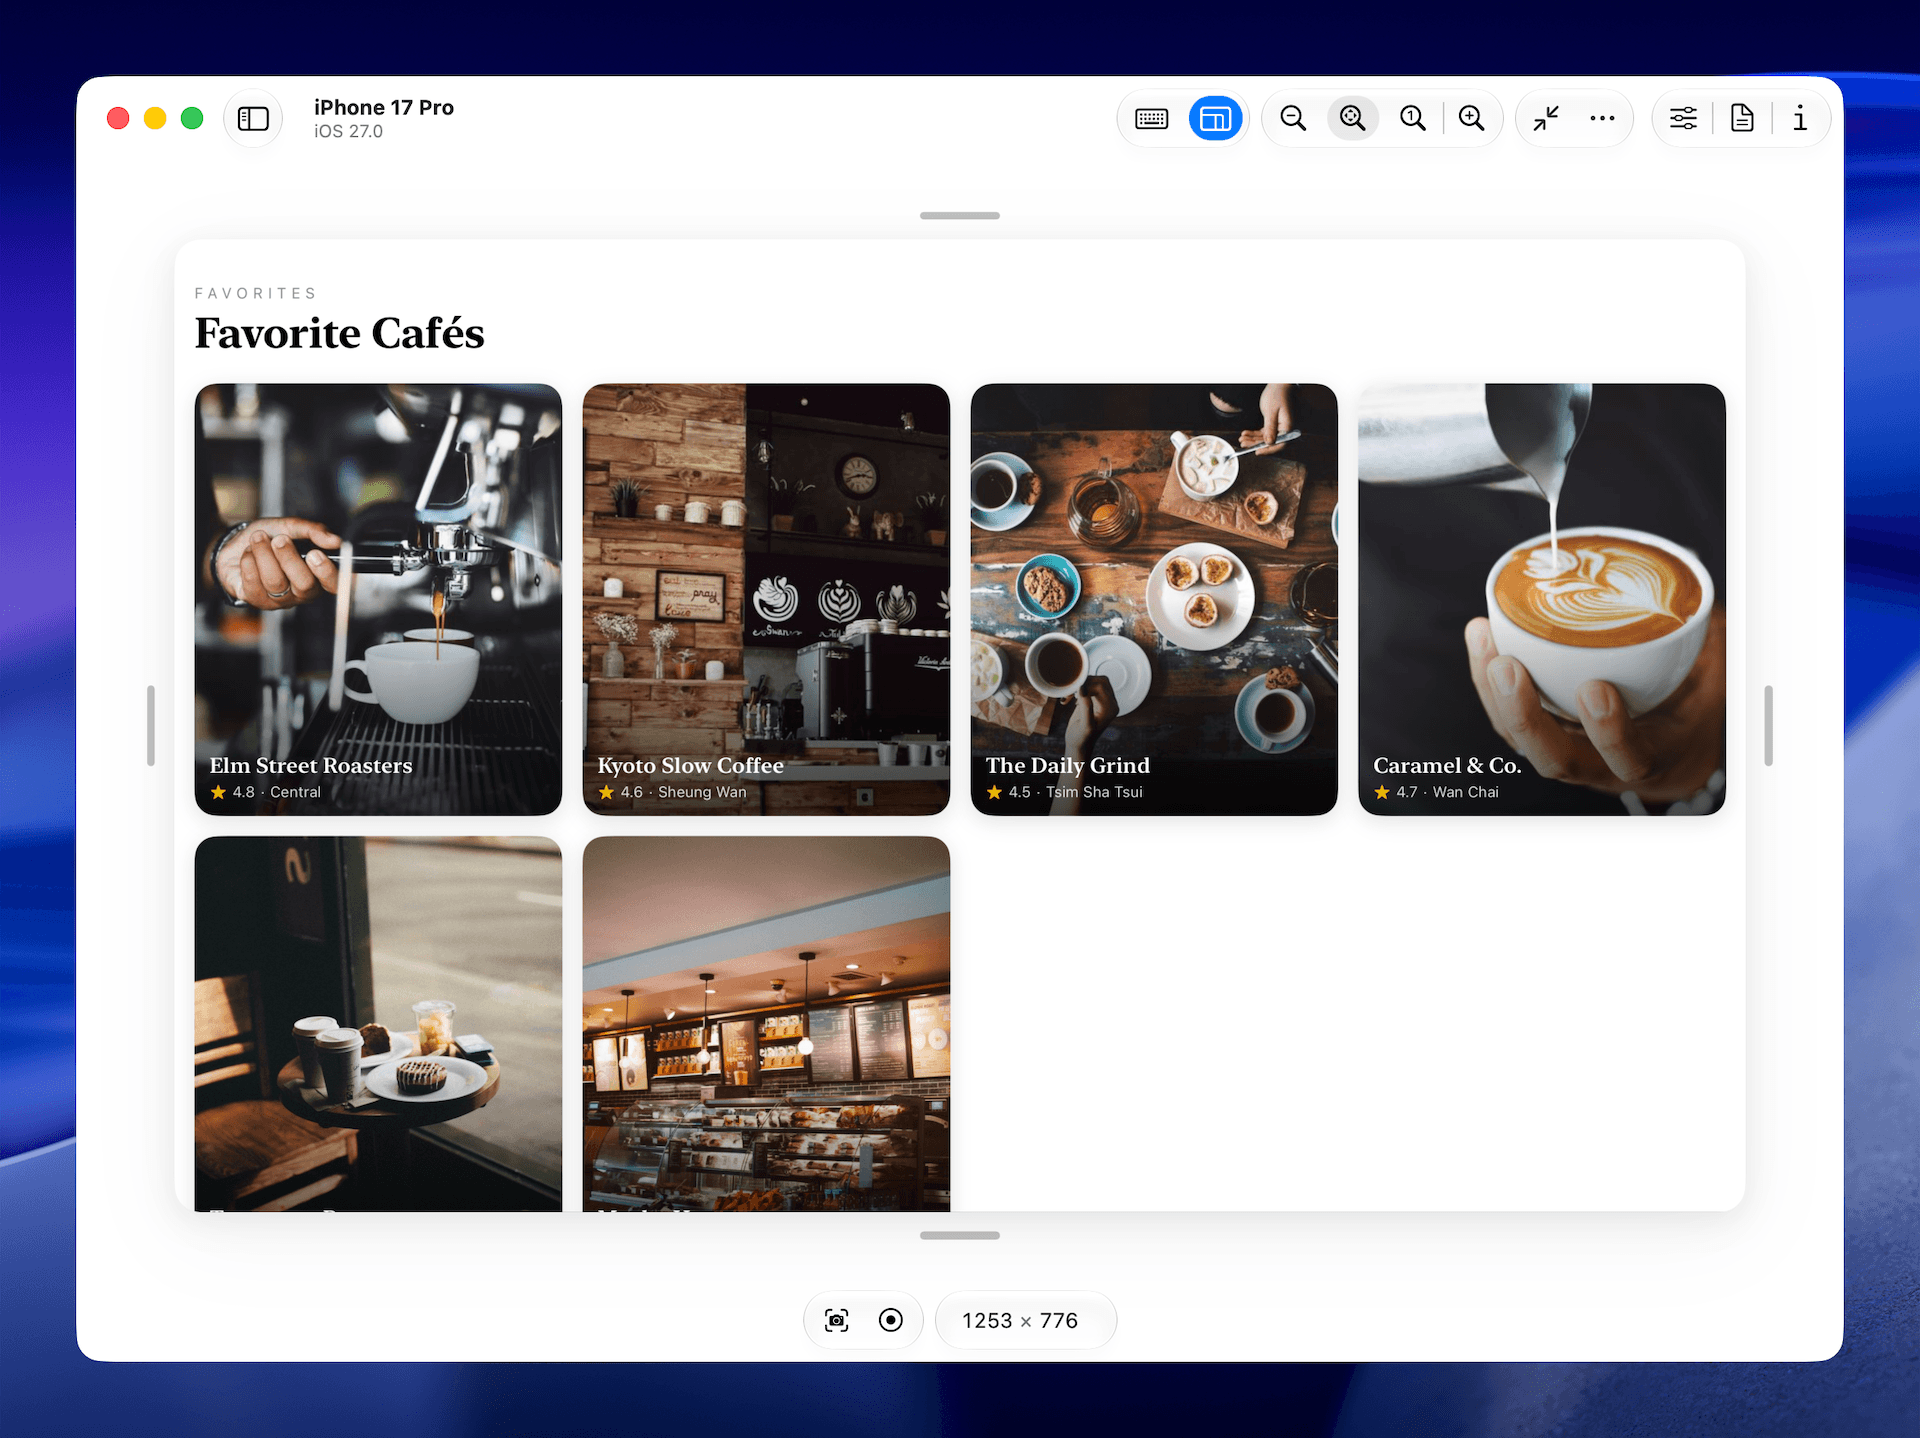
If your SwiftUI views already support adaptive layouts for iPad and Mac, they should behave well in these resize scenarios too. Here’s an example of a layout that adapts gracefully:
struct AdaptiveCafeListView: View {
    let cafes: [Cafe]
    @Environment(\.horizontalSizeClass) private var sizeClass

    var body: some View {
        Group {
            if sizeClass == .compact {
                List(cafes) { cafe in
                    CafeRowView(cafe: cafe)
                }
            } else {
                ScrollView {
                    LazyVGrid(
                        columns: [GridItem(.adaptive(minimum: 280))],
                        spacing: 16
                    ) {
                        ForEach(cafes) { cafe in
                            CafeCardView(cafe: cafe)
                        }
                    }
                    .padding()
                }
            }
        }
    }
}
This pattern of checking horizontalSizeClass ensures your layout works whether the user is on a compact iPhone screen, a resized iPhone Mirroring window, or a full iPad display.
Localization with Coding Agents
Localization has traditionally been one of the more tedious parts of app development. Xcode 27 makes it significantly easier by letting coding agents handle much of the work.
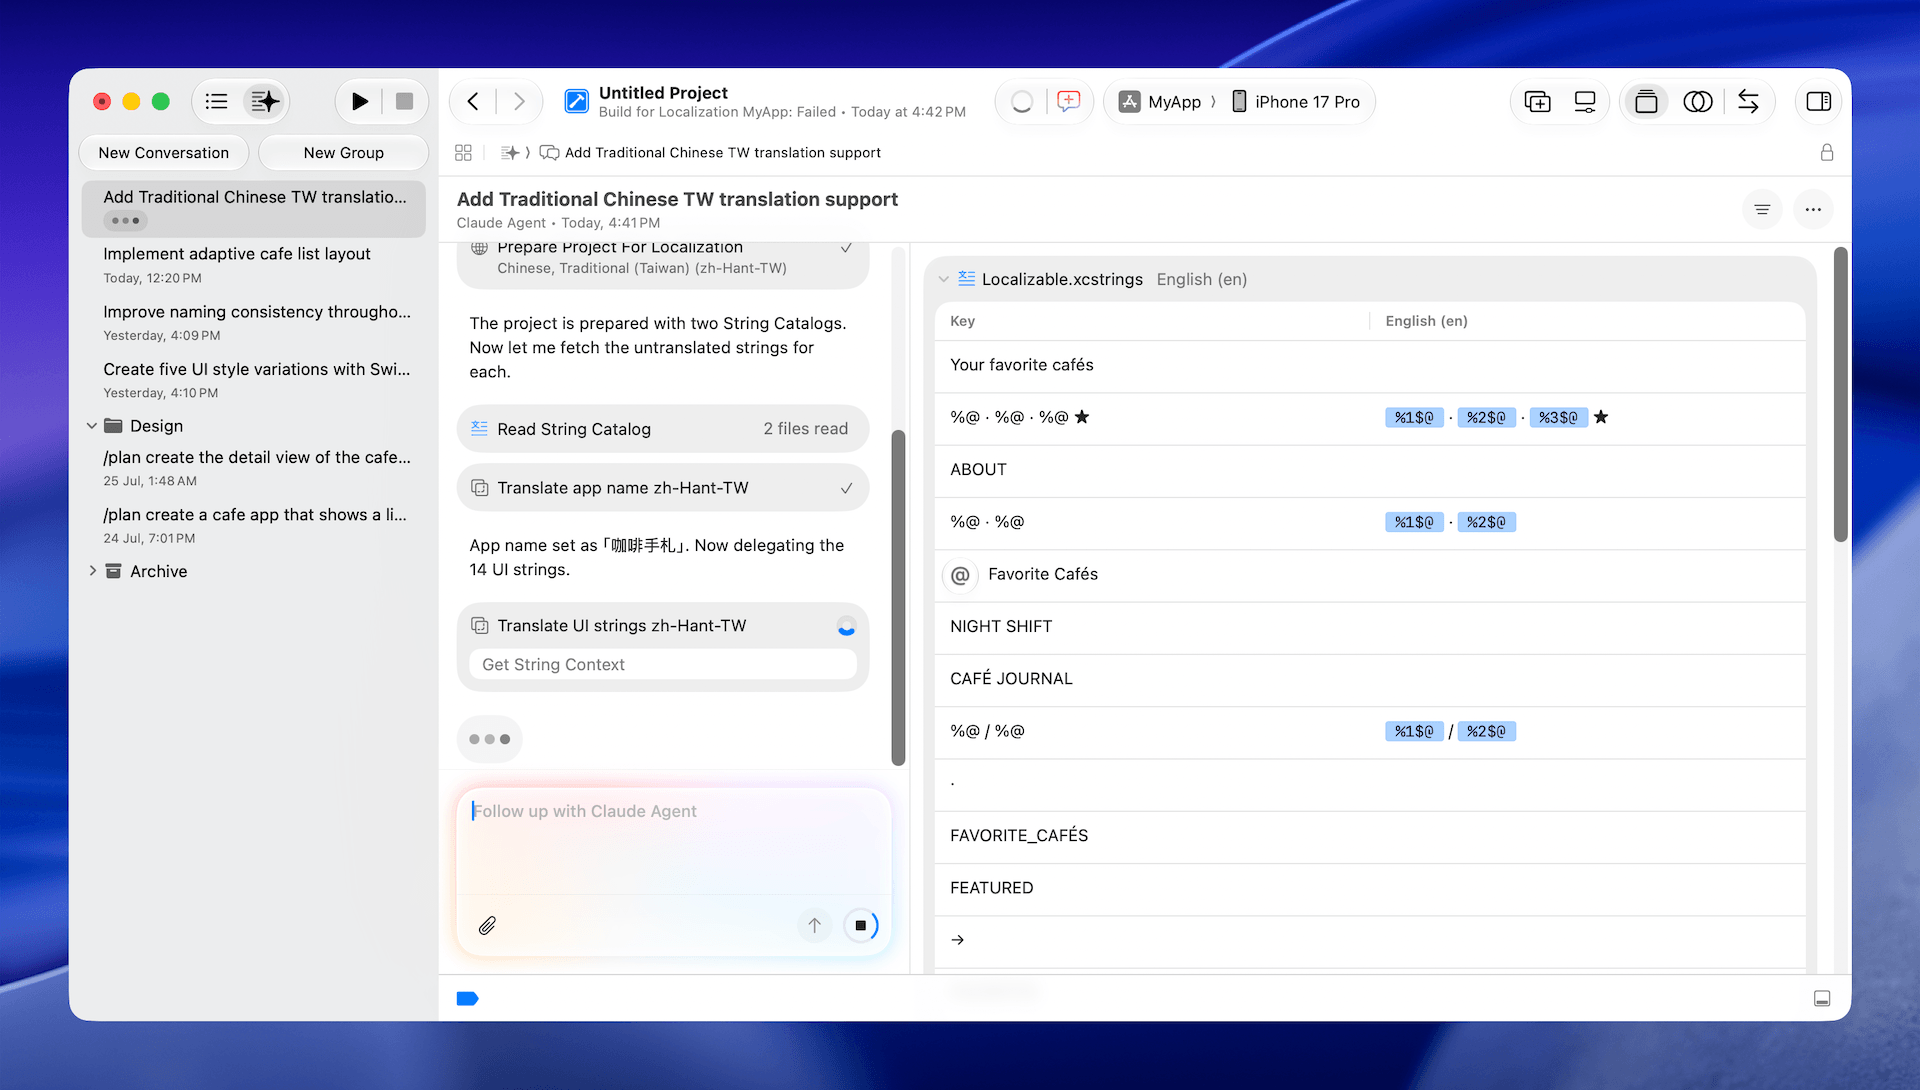
To work with localization, you simply ask the agent to prepare your app for localization. It then reads your source code, identifies string literals that should be localizable, creates a String Catalog, and can even translate the strings into your target languages. The agent works in the background, and you can check progress either in the conversation or by watching entries appear in the String Catalog.
Using Generate Translations
String Catalogs in Xcode 27 include a new “Generate Translations” button. Simply add a target language to your String Catalog, select it, and hit the button. The AI agent will translate your strings automatically, taking into account how each one appears in your UI.
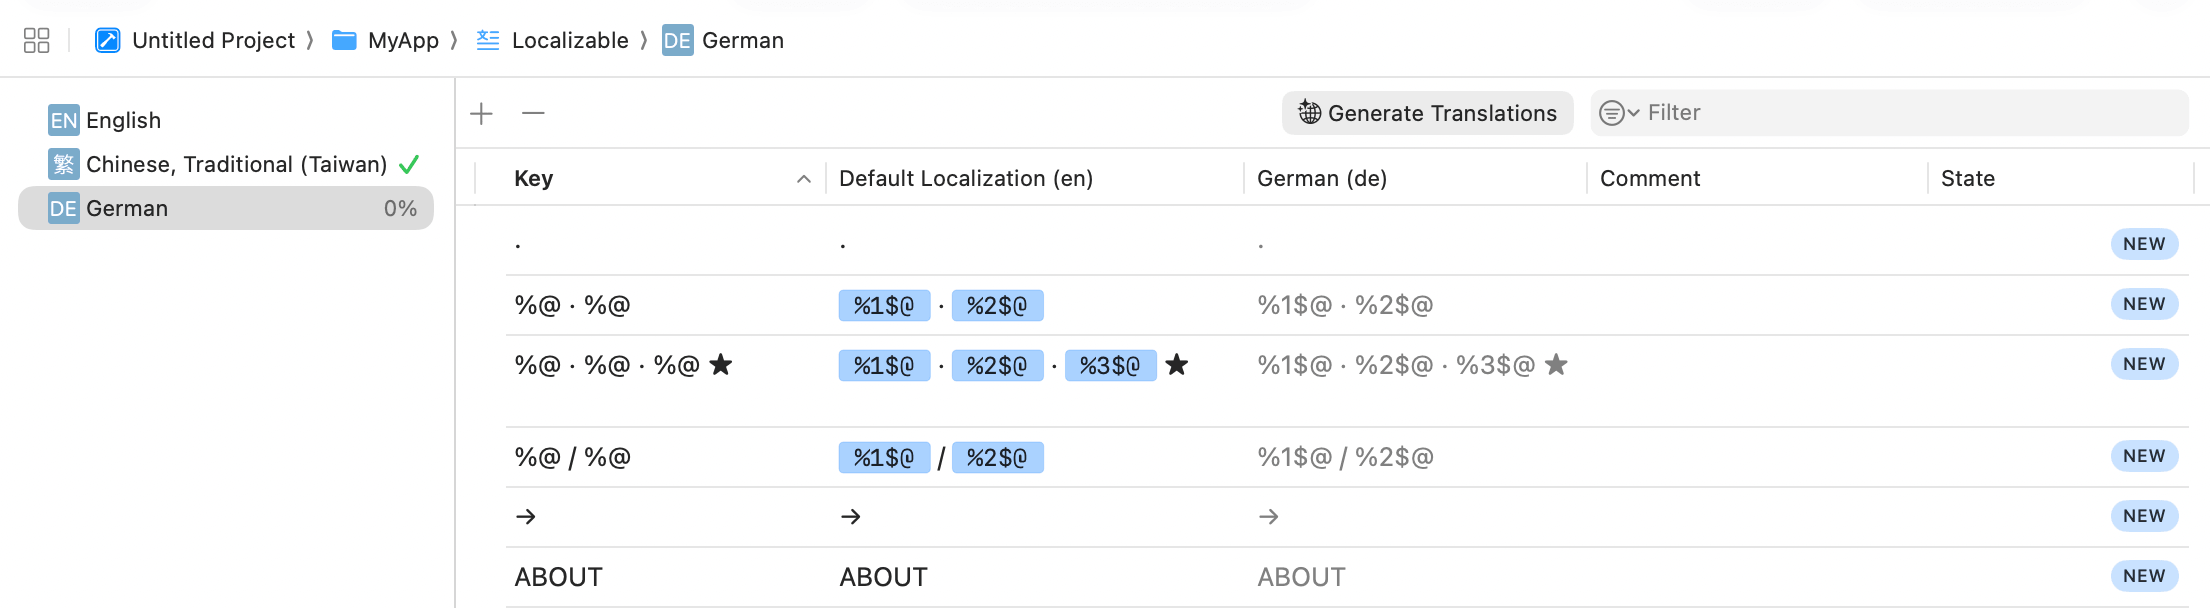
With this new localization feature, there’s no excuse not to make your app support multiple languages. You’ll still want a professional translator to review the results, but this feature handles most of the heavy lifting for you.
Summary
Xcode 27 is a substantial release that touches nearly every part of the development workflow. Here’s a quick recap of what we covered:
- Workspace customization — a fully customizable toolbar, expressive themes with per-workspace assignment, and predictive live issues that catch errors before you build
- Faster prototyping — untitled projects and standalone Swift files let you test ideas without ceremony
- Coding agents — AI assistants that live in editor tabs, support
/planworkflows for architectural review, and can work in parallel - Device Hub — a unified interface for simulators and physical devices, with accessibility testing and resize mode
- Localization — agents that can prepare, create, and translate String Catalogs with contextual awareness
Xcode 27 ships a few more changes we didn’t get to here: a redesigned Organizer that surfaces high-impact issues first with metric goals and expanded hitch tracking, a Top Functions view in Instruments for pinpointing expensive code paths, and an Xcode Cloud that’s simpler to set up and considerably faster to build.
In future tutorials, we’ll dive deeper into specific Xcode 27 features, including those we skipped above, how to get the most out of Device Hub, and how to extend Xcode with custom plugins and MCP tools. Stay tuned!