
77.4K
ExpressLRS is an open-source RC system that has gained popularity due to its affordability, ultra-low latency, and long-range capabilities. However, setting up ExpressLRS can be quite a daunting task for beginners. In this tutorial, I will guide you through the process of flashing and setting up ExpressLRS on your transmitter on any EdgeTX radio, and bind it to the receiver.


Some of the links on this page are affiliate links. I receive a commission (at no extra cost to you) if you make a purchase after clicking on one of these affiliate links. This helps support the free content for the community on this website. Please read our Affiliate Link Policy for more information.
Still on the fence whether you should use ExpressLRS? This article explains the advantages of ExpressLRS over other radio control systems: https://oscarliang.com/expresslrs/
ExpressLRS 2.4GHz Hardware Selection
All transmitters and receivers with ExpressLRS firmware are compatible regardless the brand.
Radios with Built-in ELRS
Getting a radio with ExpressLRS built-in means you can enjoy this great radio control link without the need for an additional module. It simplifies the setup process and reduces the cost of upgrading your radio system.
Here are some of my recommendations.
Transmitter Module
If you have a radio without built-in ExpressLRS, you can purchase an external ExpressLRS transmitter module.

Choosing a transmitter module might seem daunting due to the abundance of options available. However, most of them are based on the same open source design by ExpressLRS. The main differences lie in the build quality, features such as screen, maximum output power, and cooling. Opt for one of the reputable brand featured below.
The transmitter module fits into the external JR module bay. Smaller radios might have lite module bay, you will need to get the right size module.
Other full size module options:
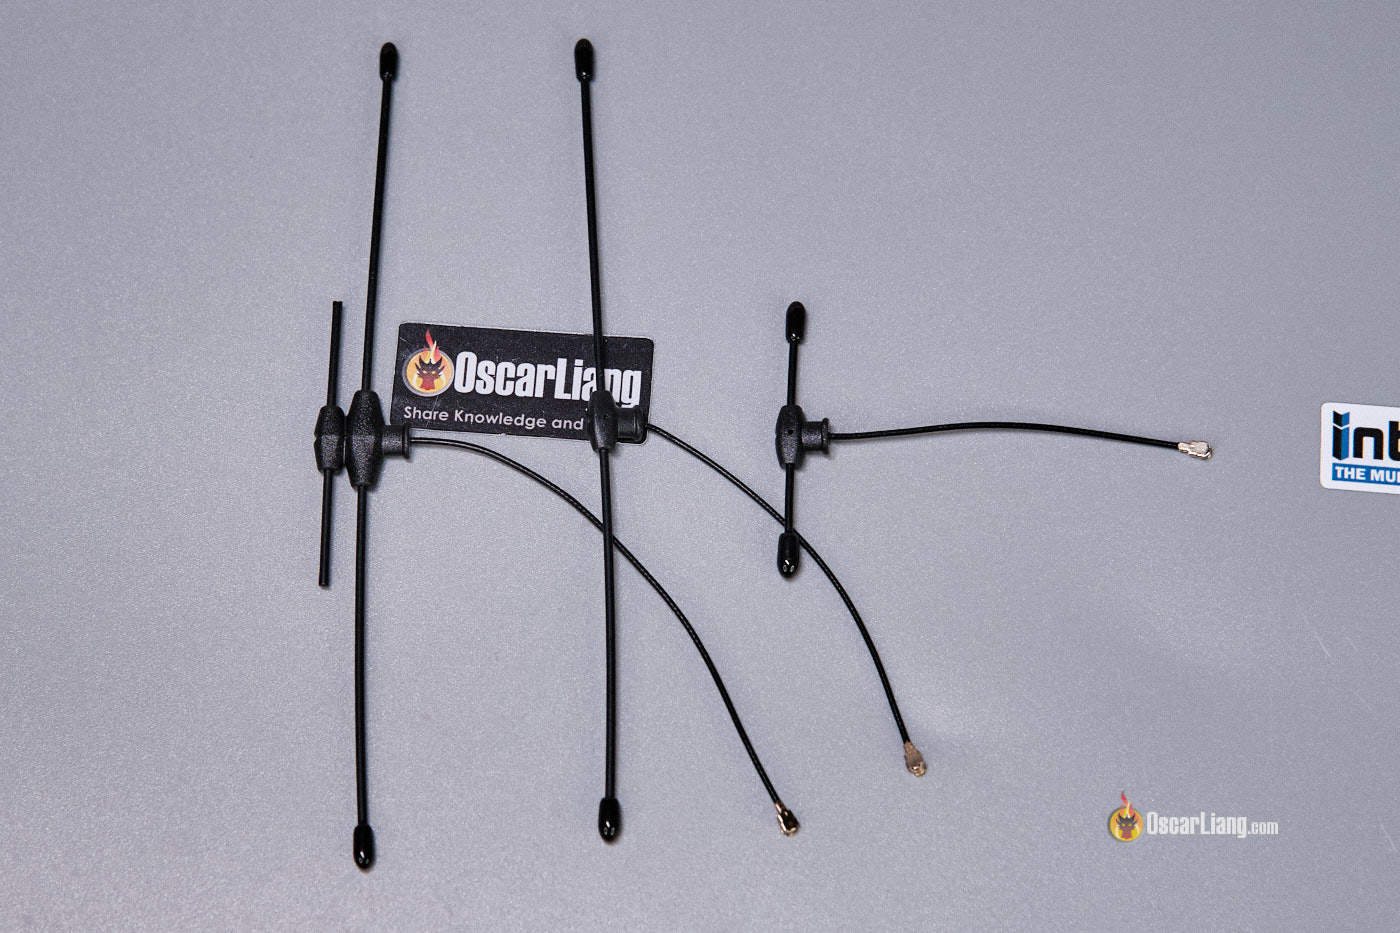
TX Antenna Upgrades
Stock antennas often have lower gains as they are designed for general use, and their build quality is not always the best. To increase your range, consider upgrading to an aftermarket antenna with better quality and higher gain. With a wide range of sizes and shapes, you can find one that suits your needs and environment.
Receivers (Single Antenna)
All ExpressLRS receivers and transmitter modules are cross-compatible, regardless of brand, since they are based on the same open source design. However there are many considerations such as frequency, antenna modes and hardware. Check out my ELRS receiver buyer’s guide to learn more: https://oscarliang.com/expresslrs-receivers/
Diversity Receivers
PWM Receivers for planes
Other receiver options:
RX Antenna Replacement
Is It Necessary to Update Firmware?
No, you don’t have to update ExpressLRS if everything is working fine.
However, with each update, the open-source project provides bug fixes, performance enhancements, and new features. So make sure to check out the release logs to find out if any of the new changes interest you.
ELRS firmware version uses a three-part number system: A.B.C
- A: major version number
- B: minor version number
- C: patch number
Only releases with the same major version number are cross-compatible. For instance, 3.0 will work with 3.1, 3.2, 3.5 etc, but hardware on 3.x firmware won’t work with 2.x or 4.x.
The latest ELRS version is V4, I covered the new features here: https://oscarliang.com/expresslrs-4/
This guide is written for ExpressLRS 4.0. If you have an older version, some of the information on this page might still apply, but if you decide to follow this guide I’d recommend updating your hardware to ELRS V4 first.
Step 0: Check that your hardware supports ExpressLRS 4.0
Before flashing anything, confirm your exact hardware model and band.
This matters because ExpressLRS 4.x supports many current devices, but some older STM32-based products are explicitly unsupported in 4.x. For examples, these platforms are no longer supported in V4:
- Happymodel PP, ES915
- NamimnoRC Flash/Voyager (early version)
- FrSky R9
- SIYI
- ImmersionRC hardware
If your gear is supported, continue.
Step 1: Update EdgeTX

EdgeTX and ExpressLRS are two different firmware:
- EdgeTX runs on the radio, like the operating system
- ExpressLRS (ELRS) runs on the transmitter module that manages the radio link specifically
While ELRS 4.0 may function on older EdgeTX versions, upgrading EdgeTX (ideally v2.10 or later) ensures compatibility with the new 4.0 LUA script and improves overall system stability.
It normally only takes a few minutes to update EdgeTX once you are familiar with the process. I have a tutorial on how to do it: https://oscarliang.com/flash-edgetx/
Step 2: Install ExpressLRS Configurator
The ExpressLRS Configurator is used for flashing firmware to your transmitter and receivers.
Download and install it here: https://github.com/ExpressLRS/ExpressLRS-Configurator/releases/latest
For Windows, click the link with this name: ExpressLRS-Configurator-Setup-X.X.X.exe


Pro tips:
- Your computer must be connected to the internet while using the Configurator.
- There’s an online flasher which you don’t need to download/install: https://expresslrs.github.io/web-flasher/, but the desktop app is more robust and recommended.
Step 3: Identify Hardware and Firmware Version
Each transmitter/receiver may require a different firmware target. You have to know the exact brand and model of your hardware in order to select the correct firmware target. Flashing the wrong firmware may fail the flashing process, it may even brick your device.
The easy way to check is by going to the WiFi WebUI, here’s how to do it.
Firstly, enable WiFi on your device by going to the ExpressLRS LUA script, select WiFi Connectivity.

Then select “Enable WiFi”, this will turn on the WiFi network in your transmitter.

For receivers, you can either select “Enable Rx WiFi” in the LUA script (while it’s powered on and connected to the transmitter), or you can just wait 60 seconds without turning on your transmitter – without connection to the transmitter your receiver will go into WiFi mode automatically.
On your laptop/tablet/phone, you should see a WiFi network called ExpressLRS TX (or ExpressLRS RX). Connect to this network, the default password is expresslrs.

Open your browser, and enter 10.0.0.1 in the address bar, it will open up a webpage which will tell you the firmware target, as well as the firmware version.

If you previously setup the device to automatically join your home WiFi network, then you won’t see this ExpressLRS TX WiFi network. Instead, stay connected to your home WiFi, and enter http://elrs_rx.local/ or http://elrs_tx.local/ in the browser address bar.
For ELRS transmitter modules, you may also find hints of the maker, model and firmware version in the LUA script (at the top and bottom of the screen). For receivers, go to “Other Devices” in the LUA script, and click on the receiver, firmware version should be displayed there (only works in V3 and later).

Step 4: Pick the correct firmware target
Open ExpressLRS Configurator.
Under Releases, choose the latest version.
Under Target, in Device Category, select the brand/frequency , and in Device, select the exact model. In this example, I have the RadioMaster Ranger 2.4GHz Transmitter module, so the Target Device selections would be:
- Device Category: RadioMaster 2.4GHz
- Device: RadioMaster Ranger 2.4GHz TX
For radios like the RadioMaster TX15 and TX16S MK3, you’d choose RadioMaster Dual Band as the Device Category.
This step is the most important one. If you choose the wrong target, the flash may fail or the device may boot but not function properly.

Step 5: Enter your binding phrase
While it is optional, I strongly recommend using a binding phrase.
Binding phrase is like the key to your car, be creative and make a unique phrase, so people you fly with don’t accidentally use the same phrase and cause problems. Note that other people CAN control your drone if they use the same binding phrase. However do try to keep it short and simple so you don’t forget it.

A binding phrase is also the easiest way to bind ELRS gear. You enter the same phrase when flashing firmware for both the transmitter and the receiver, and they will bind automatically after flashing.
You can set the binding phrase in Configurator before flashing, and you can also change it later in the WebUI on devices that support WiFi.
Step 6: Other Firmware Build Options
Regulatory Domains:
- EU → 2.4GHz LBT (Listen Before Talk)
- Rest of the world (FCC) → 2.4GHz ISM (Standard)
What’s FCC and LBT and how does it affect performance?
FCC (Federal Communications Commission) and LBT (Listen Before Talk) are regulatory standards for radio systems. The choice depends on where you plan to use your radio. FCC is globally accepted, while LBT is specific to European Union and UK, which requires a radio to check for other transmissions before transmitting itself. While FCC generally allows for consistent power output, LBT may reduce output power due to its “listen” requirement, potentially lowering performance.
Network: WiFi Startup Delay – how many seconds it turns on WiFi mode if no radio link is established. To exit WiFi mode, you just need to unplug LiPo and plug it back in again.
Network: WiFi Name/Password – You can enter your home WiFi name and key so your ELRS joins the network automatically. See “Adding Home WiFi Network” section for more detail.
Step 7: Flash your transmitter
There are 2 ways to flash TX firmware, UART (serial) or Wi-Fi. Personally, I found Wi-Fi to be the easier method. But if your computer doesn’t have WiFi, you can use the UART (Serial) method. I will explain both methods here.
Flash TX Firmware via WiFI
Select WiFi under Flashing method.

Scroll down to the bottom, and click the BUILD button (not FLASH) to compile the firmware. It can take a couple of minutes to build and download the firmware.

When it’s done, a windows should pop up containing the firmware file, named “firmware.bin“.

Before proceeding, you have to get your radio talking to the ExpressLRS TX module, go to Model setup:
- If you have an internal ELRS module, scroll down to “Internal RF” and select “CRSF” in Mode. Leave External RF OFF.
- If you have an external module, scroll down to “External RF” and and select “CRSF” in Mode. Leave Internal RF OFF.
No need to change any of the options.
 |
 |
If you have a brand new radio and you’ve never setup a model profile before, check out this guide: https://oscarliang.com/create-new-model-profile-edgetx/
Open the LUA script by pressing the SYS button, under Apps, select ExpressLRS.

Select “WiFi Connectivity“.
Select “Enable WiFi” and leave the radio powered on.
Go to your computer’s WiFi, you should find a new network called “ExpressLRS TX Module“. The WiFi password is: expresslrs
Open browser and go to 10.0.0.1

Click “Choose File” and select “firmware.bin” generated from the ExpressLRS Configurator earlier.
Click Update. That’s it!
Flash TX Firmware via UART Serial
You can use the USB port on the TX module to flash firmware.
You might need to install CP210x Driver (Download: https://www.silabs.com/developers/usb-to-uart-bridge-vcp-drivers). I tried standard windows driver as it comes with an installer, version 6.7.6 seems to work fine.
This process will work for almost any ExpressLRS transmit module. On some newer modules, you can just plug in the USB cable and it will flash straight away. However some older modules have dip switches, you need to put them in the right position in order to flash. Consult the manual if you see those switches. For example the BetaFPV Micro TX module has those dip switches.

Plug in the USB cable to the TX module, a new COM port should appear on your computer.
In the ExpressLRS Configurator, under Flashing method, select UART. When you are ready, click the FLASH button (not BUILD). The flashing will take a couple of minutes.
Step 8: Install LUA Script on the radio
The ExpressLRS LUA script allows you to configure the system, such as changing radio link settings, activating binding mode, enabling WiFi etc. You can find the LUA script by pressing the SYS button, and select “ExpressLRS”.

You can download the latest ELRS Lua script in the ExpressLRS Configurator: select the latest release version and any target, and the “Download LUA Script” button will appear.
The downloaded file is called “elrs.lua“, put that file in this directory on your radio’s SD card: \SCRIPTS\TOOLS\

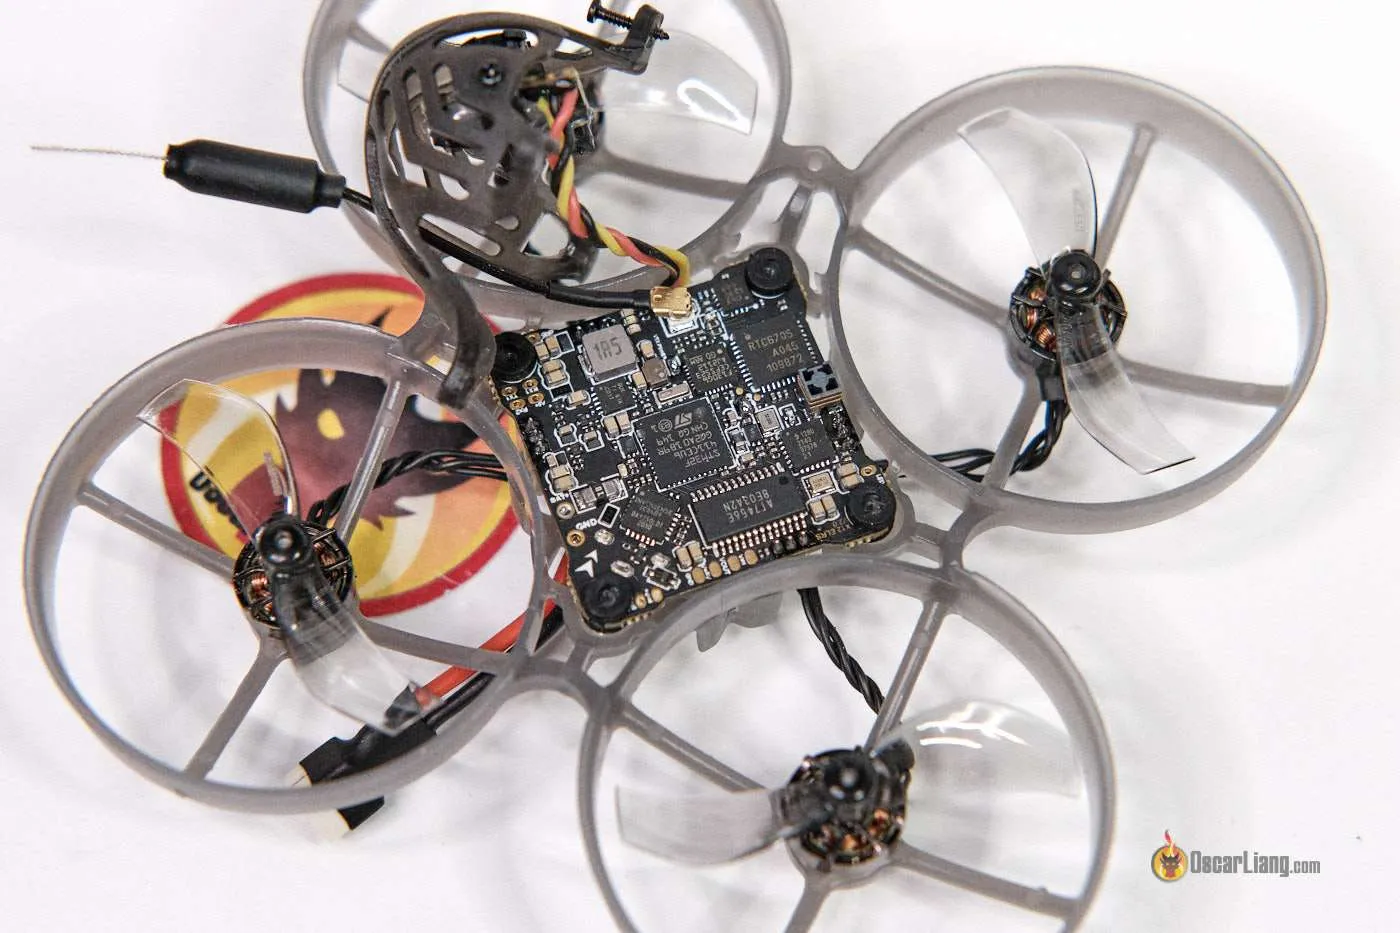
Step 9: Connect ELRS Receiver to FC
If your receiver is already wired correctly to the flight controller, you can skip this step.
Here’s the pin-out of most ELRS receivers and they follow the same wiring rules:
- 5V to 5V
- GND to GND
- TX to RX
- RX to TX
Connect TX and RX pins to any spare UART on your flight controller. DO NOT use soft-serial because it’s too slow.

Step 10: Betaflight Setup for ExpressLRS Receiver
If your receiver is already setup in Betaflight, you can skip this step.
It’s crucial to setup Betaflight because it allows you to flash the receiver via Betaflight Passthrough, which is the easiest flashing method for receivers.
Go to the “Ports” tab in the Betaflight configurator, and enable “Serial RX” for the UART you’ve connected the ELRS receiver to. Click “Save”.
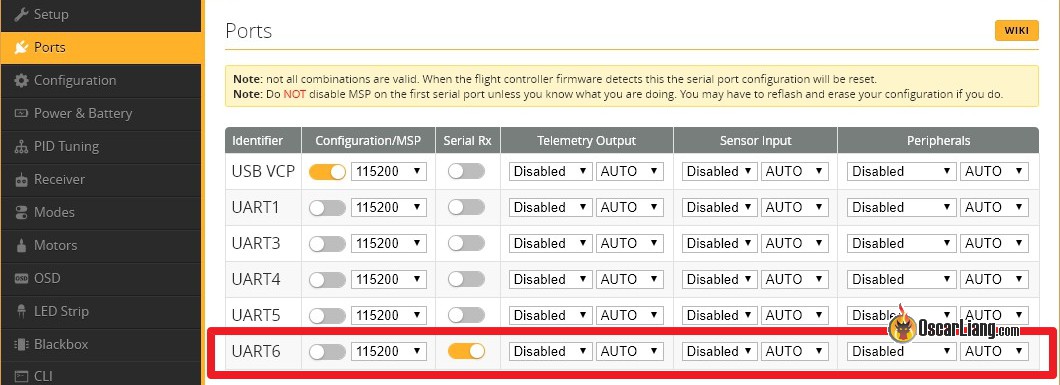
In the Receiver tab, under the “Receiver” Section, select “Serial (via UART)“ as the Receiver Mode, and select “CRSF” in Serial Receiver Provider. Enable “Telemetry”, and click the “Save” button.

Your RX should be working now.
To verify, go back to the “Receiver” tab, you should see response from stick movement.

Step 11: Flash your receiver
Flashing receiver is similar to flashing transmitter:
- Open ExpressLRS Configurator
- Choose the firmware version, and the correct device and target
- Enter the same binding phrase – without it, you’d have to bind it manually as described here.
- Select build options you want
- Performance Options – ensure that “LOCK_ON_FIRST_CONNECTION” is checked.

For receivers with WiFi built-in, you can flash firmware via WiFi, just like flashing the TX. But personally I found using Betaflight Passthrough easier for flashing receivers, and I will explain the steps here.
Flash RX Firmware via Betaflight Passthrough
This method only works after you’ve setup the receiver in Betaflight.
In the Configurator, under Flashing Method, select Betaflight Passthrough.
Now connect the USB cable to your flight controller, the RX should power on.
In ExpressLRS Configurator, choose the COM port of the FC (if not sure, check the COM port in Betaflight Configurator, but remember to disconnect/close Betaflight afterwards).
Hit FLASH. It will take a few minutes.

If it fails, try to disconnect anything that’s also connected to the flight controller UART, such as GPS, and try again.
Flash RX Firmware via WiFi
The steps of flashing RX via WiFi, are the same as flashing the TX modules. Some receivers don’t have WiFi capability, so make sure you check before proceeding.
In the ExpressLRS Configurator, under Flashing Method, select Wi-Fi.
Hit the BUILD button to compile the firmware.bin file.
By default, if you power the receiver without turning on the radio, after 60 seconds it will enter WiFi mode (LED will be flashing rapidly to indicate that). The RX’s WiFi signal can be very weak sometimes, so place the drone very close to your computer.
Connect to the WiFi network “ExpressLRS RX“. The WiFi password is: expresslrs
Go to 10.0.0.1 in your browser, and upload the firmware file.
Flash RX Firmware via UART (Serial)
In the rare event, if neither of the above methods work, you can try UART flashing as described here.
This method can also rescue your RX if it’s bricked (which could happen if you lost power or connection during flashing)
However it does require a FDTI tool, I explain how to do it in this tutorial: https://oscarliang.com/flash-expresslrs-receivers-uart/
Flashing SPI ExpressLRS Receiver
Some older whoop flight controllers uses SPI receiver – basically the receiver is connected via SPI instead of UART. A good example would be the Happymodel X12 AIO 5in1 FC in the Mobula7 ELRS Edition.
SPI receivers bring challenges to firmware flashing:
- you can’t use Betaflight Passthrough
- you can’t use WiFi
The ExpressLRS firmware in SPI receivers is embedded in the Betaflight firmware, which means, in order to update the RX firmware, you’d have to update Betaflight. All the build options (such as domain, switch mode etc) are in Betaflight CLI (type “get expresslrs” will list them all).
To check if you have a SPI ELRS receiver, simply go to Betaflight Configurator, Receiver tab, and see if it’s set to SPI RX / ExpressLRS.

Binding Receiver
If you set a bind phrase before flashing both your transmitter and receiver, they should be bound automatically. If you want to change binding phrase, you can simply do this in the WebUI (via WiFi), or you can re-flash firmware.
If you want to manually bind your receivers to a transmitter, there are many ways as explained in this tutorial: https://oscarliang.com/bind-expresslrs-receivers/
When the receiver first powers up, it looks for the transmitter with the matching binding phrase. Once the connection is established it will get synced up, and another device won’t be able to connect to it.
However if someone else uses the same bind phrase on their radio and has a stronger signal than you, it’s possible your receiver will bind to theirs first, and they can control your quad. This would be an extremely rare scenario and even if someone wants to do this on purpose it would be very difficult to pull off. Still, it’s best if you keep your bind phrase a secret and unique.
Receiver LED Status Indicator
Monochrome LED meaning:
- Solid LED means bind successfully or connection established
- Double-flash means it’s in bind mode
- Flash slowly means waiting for TX module connection
- Flash fast means it’s in WIFI hotspot mode, you can connect to the RX’s WiFi network to upgrade RX firmware by visiting 10.0.0.1 in your browser (password: expresslrs)
- Triple blink then pause – Model Mismatch (make sure Model Match is either disabled on both TX/RX, or the ID are the same at both ends)
Color RGB LED meaning:
- Rainbow fade effect: Starting up
- Green heartbeat: Web update mode enabled
- Slow blink: Waiting for connection from transmitter
- Red rapid flashing: Radio chip not detected
- Orange double blink then pause: Binding mode enabled
- Orange triple blink then pause: Connected to transmitter, but mismatched model-match configuration
- Solid single color: Connected to a transmitter, color indicates packet rate and mode
Display LQ and RSSI in OSD
Further Reading: What are LQ and RSSI?
In a nutshell:
- RSSI – Signal strength, how loud the signal is (value from -130dBm to 0dBm)
- LQ – Link Quality, how well your receiver can understand the signal (value from 100% to 0%)
Both indicators are useful, but if you have to pick one, LQ is probably more important.
To display LQ properly you should use the latest version of Betaflight (4.2 or newer), where they introduced a new RFMD:LQ% format for the LQ OSD element.
- In the Receiver tab, Disable RSSI_ADC, set RSSI Channel to Disable
- In the OSD tab, enable Link Quality and RSSI in dBm
It’s useful to have both measurements. For example:
- High LQ, high RSSI = healthy radio link
- Low LQ, high RSSI = noisy RF environment
- High LQ, low RSSI = If you are very far away, caution is needed as you are approaching the end of range; If the receiver is very close to the transmitter, that can be an indicator of antenna problem
- Low LQ, low RSSI = the end of range, you should turn back as failsafe is likely to happen
Antenna Mounting
My recommendation is to mount your RX antenna vertically if possible. You can also mount it horizontally if you only fly short range. See this post for more detail.
Setup Failsafe
Digital RC protocols typically contains a failsafe flag in the data packet that the flight controller can detect automatically, so there’s no need for manual setup on the radio. However, it’s crucial to review the Failsafe tab in Betaflight and determine what action the drone should take in the event of a failsafe.
To ensure failsafe is working properly, conduct a bench test. Remove all propellers, plug in the battery, arm the quad, and turn off the radio. The default failsafe settings in Betaflight should stop all motors from spinning within a couple of seconds. Be prepared to unplug the battery in case of any issues.
ELRS LUA Script Settings
There are 3 main settings you should know in ExpressLRS Lua script: Packet Rate, Telem Ratio (telemetry ratio) and TX Power. Note: when the arm switch is engaged, some of the settings cannot be changed.
Best Settings
Obviously the best settings depend on your applications. But majority of the people who fly freestyle should find this settings a good starting point:
- Telemetry Ratio – Standard.
- Switch Mode – Wide.
- Packet Rates – 250Hz (This is a good balance between latency and range. For long range I’d probably go with 150Hz or even 50Hz to prioritize signal strength over latency).
TX Power
Available options are: 25mW, 50mW, 100mW, 250mW, 500mW and 1W. Note that with EU LBT firmware, the RF power is limited to 100mW.
Some modules only support up to 250mW, while some are capable of up to 1W. Tests have shown that just 2.4GHz at 100mW can achieve 33km range, which can easily outperform most 5.8GHz video links, so you don’t always have to use the highest power available. Not to mention higher power consumption can significantly reduce radio battery life, and increase the risk of overheating without proper cooling. With RF power higher than 250mW, turning on the fan is recommended, so this by setting fan threshold to 250mW.
By enabling the option Dynamic Power, it allows the system to automatically adjust output power based on signal strength. Dynamic Power uses SNR (signal to noise ratio) instead of RSSI to determine power as RSSI doesn’t factor in the noise floor or if the receiver has an amplifier. This can potentially save battery life as it will lower the power when the receiver is close by, it only increases power when it’s needed. If you have Dynamic Power on, MAX Power will be the upper limit.
The appropriate power level for your FPV drone depends on the desired packet rate and range. Running ExpressLRS at 50Hz can provide extraordinary range, even at 100mW. However, if you plan to use a higher packet rate, like 500Hz, your range will be significantly reduced, and you may need more output power to maintain the same range. Familiarize yourself with dB and you can perform calculations using receiver sensitivity and output power to determine the range difference between various packet rates and power levels, this will help you make a decision.
250mW, or even just 100mW, should be enough for most people flying within a couple of miles of range even at 500Hz, but of course higher power will give you better signal penetration too, not just range. Regardless the power, if you want the most reliable link or want to fly long range, it’s generally advisable to stick to a lower packet rate such as 150Hz or even 50Hz, as it offers higher signal sensitivity.
Packet Rate
Packet rate is the number of data packets transmitted per second. Higher packet rates reduce latency, while lower rates improve range robustness. It’s a tradoff, you just can’t have both.
The packet rate modes available are:
- 500Hz, 250Hz, 150Hz, 50Hz – These are the normal modes, using LoRa modulation which has longer range and better resistance to RF interference.
- F1000, F500 – These are F modes, or FLRC, they offer faster modulation and lower latency, but shorter range than the normal modes. It supports 500Hz and 1000Hz. Great for racers. The F1000 mode has the lowest latency. It’s not about “feel”, I doubt most people can even tell the difference between 150Hz and 500Hz, but sending your command even just 1ms faster means you could react 1ms sooner which is crucial when reacting to critical situations like racing and might help you to avoid a crash.
- D500, D250 – These are D mode, or DVDA (Deja Vu Diversity Aid), provides better link connection in complex interference environment by sending the same data packet multiple times to reduce the chance of data loss. D500 and D250 indicate that the same data packet is sent twice and four times respectively. D mode keeps your LQ high and prevent chance of jitter at the cost of slightly higher latency. Great for racing. It works at the FLRC mode (F1000) therefore range will be less than normal mode
- 333Hz Full, 100Hz Full – up to 16 full resolution (10-bit) channels in 100Hz and 333Hz packet rates. These are suitable for fixed wings.
1000Hz is the best mode for racing, since it has the lowest latency. LoRa modes (normal mode) have the best range, 150Hz is a great option for long range flying. Note that 500Hz or higher update rates are not available in some radios, for example the Tango 2 only supports up to 250Hz.
Telem Ratio
What’s telemetry?
Telemetry is a feature commonly available in radio links. It allows the receiver to send data back to the radio, such as battery voltage, signal link quality, RSSI, GPS coordinates and so on.
Telemetry is enabled by default in ExpressLRS, it sends radio link related data like RSSI and LQ back to the radio. If you intent to use Telemetry to send info about your drone back to the transmitter, such as battery voltage, you have to enable “Telemetry” feature in Betaflight’s Receive tab.
Telemetry Ratio in ExpressLRS settings is how often telemetry data get sent. A larger number means slower telemetry update, e.g. 1:8 means telemetry data is sent every 8 frames, while 1:128 is every 128 frames (e.g. 1:8 is more frequent update than 1:128). Note that when adjusting packet rate it also have an impact on how often you get telemetry updates, the good news is ExpressLRS allows you to set it to “Standard”, which changes the ratio for you when adjusting packet rates. The standard option should work in most cases.
More frequent telemetry updates will increase latency to the control link, so you can choose to lower telemetry rate or even disable it entirely in the LUA script if you want the most consistent control link (some hardcore racers might want to do this). But I recommend having telemetry if you fly long range.
If you get “Telemetry lost” warnings while your link quality is still looking good, it could be that your telemetry ratio is set too low. Try increasing Telem Ratio one step at a time until the “Telemetry Lost” warning stops.
Channels
How many channels does ELRS support? 9 to16 channels depending on packet rate and switch mode.
For examples:
- At 500Hz or 1000Hz, in Hybrid or Wide switch mode, you get 12 channels.
- At 100Hz or 333Hz, in Full Res 16CH, you get 16 channels.
The first 4 channels are for your sticks – roll, pitch, throttle and yaw. These channels are 10-bit full resolution and their commands are sent every transmission.
The rest of the channels are AUX channels, typically used for switches on a radio.
The resolution the channels are determined by the option called “Switch Mode”. Higher resolution channels result in higher latency.
The first AUX channel, AUX1 (channel 5) is designed to be used for the arming switch, and it’s always a 2-position channel (when OFF it sends 1000, when ON it sends 2000) regardless switch mode (with the exception of Full Res 16ch Rate/2).
Switch Mode
ExpressLRS has different switch configuration modes that affect how AUX channels are sent. There are trade-offs between channel resolution, switch positions, and update behavior.
For most people, leave this at the default unless you specifically know why you want something else.
Channel 1 to 4 are the control channels (roll, pitch, throttle and yaw) and are always 10-bit full resolution. But for the rest of the channels (AUX1-AUX8), these are normally used for switches and their resolution depends on your requirements.
The Switch Mode setting controls how the channels AUX1-AUX8 (channel 5 to 12) are sent to the receiver, there are two options: Hybrid and Wide.
With Hybrid switch mode, the AUX channels will only be 2- or 3-position, this is ideal for less latency. Wide switch mode makes your channels 64 or 128 position which offers more than enough resolution for most things we want to do.
For FPV drones, I generally recommend to use Wide switch mode.
One thing to note about wide switch mode is that it sends transmit power so it can be displayed on your OSD. This is useful if you are using dynamic power. With hybrid channels, power level is not sent.
Gemini Mode (Antenna Mode)
Gemini mode is designed to enhance the stability of data transmission and reception by simultaneously using two different antennas and frequencies to transmit and receive a single packet of data. Basically, it makes your radio link is more reliable. However, it doesn’t increase the maximum range, which is primarily determined by output power, antenna gain and packet rates.
Most people probably won’t need Gemini Mode, because it’s overkill. If you normally fly alone, and there’s no strong interference around where you normally fly, your probably don’t need it. Some other downsides are:
- Gemini mode may lead to increased battery consumption in the radio, because it’s basically two transmitters working at the same time.
- Also, you need a receiver that supports Gemini mode, they are usually more expensive than regular receivers.
Learn more about how Gemini mode work in this article: https://oscarliang.com/expresslrs-gemini/
To activate Gemini mode, follow these steps:
- Start the ExpressLRS Lua script on your radio.
- Set the “Antenna Mode” to “Gemini”.
- Select the receiver you are binding with from the “Other Device” menu.
- Set the “Rx Mode” to “Gemini”.
Gemini transmitters can also work with regular receivers that don’t support Gemini mode, you just need to switch to Ant1/Ant2 modes in ExpressLRS LUA script.
Antenna Mode Options
| Transmitter Antenna Mode | Description |
|---|---|
| ANT1/ANT2 | Utilizes only one of the two antennas for communication. |
| Switch | Alternates communication between two antennas. |
| Gemini | Activates Gemini mode for simultaneous use of two antennas on different frequencies. |
Popular transmitter modules that support Gemini are:
Not Using CH5 For Arming
In ExpressLRS 4.0, you can now use any channel/switch for arming, and it can free up Ch5 to be used as a regular control channel. For ordinary pilots it really doesn’t make a difference, but if you really want to use Ch5 for something else rather than arming then you can do this.
This alternative arming method requires EdgeTX 2.11.0 or newer.
Go to Model Setup in your radio, scroll down to Internal RF (or External RF if you are uisng an external module).
In Arm using, change it from Ch5 to Switch, and select any switch you wish to use for arming.
That’s it.

Additional Receiver Settings
There are more settings when you connect to the receiver via WiFi (on the page where you flash RX firmware).

First, power on the receiver and wait until it goes into WiFi hotspot mode. It does it automatically after being powered for 60 seconds by default (LED flashing rapidly when it’s in WiFi mode). Or you can also force the receiver to go into WiFi mode in the radio’s LUA script.
Now, connect to the WiFi network (the WiFi password is: expresslrs). In your browser, go to 10.0.0.1
On this page, scroll down and you will find the additional settings like Model Match. For PWM receivers, you will also have settings like PWM Output and Failsafe Positions for each channel, and the option to invert the channel outputs. These setting are not yet available in the LUA script.
Performance Enhancement Settings
In Betaflight, you should apply the suitable RC_Link preset for the particular packat rate you are using. Failure to do so will result in problems with feedforward.
Here’s a detail explanation why: https://oscarliang.com/rc-link-preset-betaflight/
Adding Home WiFi Network
It makes it much easier to flash firmware when you setup “Home WiFi Network” in ExpressLRS. When you put your ELRS transmitter module or receiver in WiFi mode, it will connect automatically to your home WiFi network, then you would be able to flash firmware on a browser from your computer. Easy!
To set it up, you first need to flash your TX module and RX with “HOME_WIFI_SSID” and “HOME_WIFI_PASSWORD”. These are your home WiFi network name and password. Even if you are already on the latest firmware, you have to re-flash to let your transmitter module and receiver know your network login for this to work.

Once that’s done, you can turn on WiFi mode. You can do this in the LUA script.
Open ExpressLRS Configurator, and it will automatically detect your ELRS device. Click on DNS (elrs_tx.local or elrs_rx.local), or the IP address (192.168.0.xxx), if it doesn’t work just try the other, one of them should work.
This will bring you to the page to upload the firmware, same as flashing using the WiFi method we covered before.

How to Use Model Match
Model Match is a number you can assign to a receiver, this allows you to use a model profile on the radio to only control a particular receiver.
If you normally use one model profile to control all of your models (because they are all using the same type of radio receiver and setup the same way) instead of having individual profile for each model, you probably don’t want to use “model match”. But model match is useful for models the requires trims, for example for planes and wings.
To use model match in ExpressLRS, go to Model Setup on your radio, scroll down to Internal RF (or External RF if you are using an external ELRS module). In Receiver, set it to a unique Model ID (any number between 0 and 63, in this example, I will use 2).

Put your receiver in WiFi mode, go to the webpage configuration, Model, and enable Model Match. Set Model ID to the same number you entered in Model Setup on your radio.

Go to ExpressLRS LUA script, and enable Model Match.
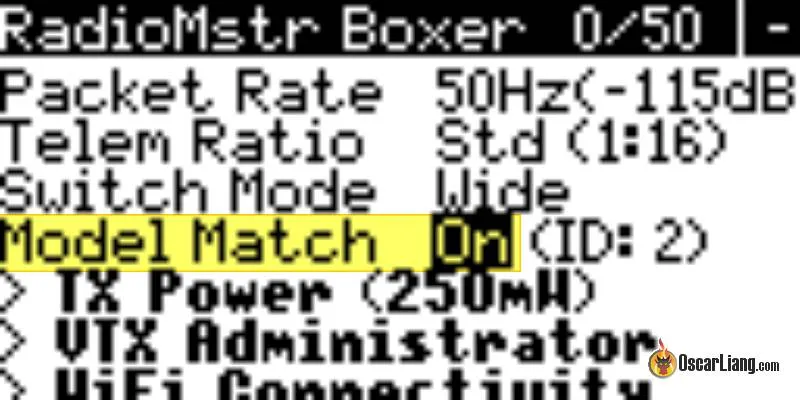
Now your receiver can only talk to this particular model profile with Receiver ID 2. That’s it.
SPI Receiver
If you have a SPI receiver, or a receiver that doesn’t have WiFi capability, you can set Model ID in CLI. You can’t set the ID by just rebinding while model match is on, so i had to go to betaflight CLI and enter:
get expresslrs_model_id
to show me its ID and i had to:
set expresslrs_model_id = "your ID number"
How to Output SBUS
ExpressLRS receivers by default output CRSF signal, which requires 2 wire connections (TX and RX). However you could configure your receiver to output SBUS which only needs 1 wire, follow tutorial here: https://oscarliang.com/how-to-output-sbus-from-an-expresslrs-receiver/
SBUS is an old and slow protocol and doesn’t support telemetry, therefore I wouldn’t recommend it unless it’s the only protocol you can use with your flight controller.
Initialization Rate
When you switch on the receiver, there may be a delay of a few seconds while the receiver tries different packet rates until a match is found with the transmitter. The delay will depend on the packet rate – the slower the rate, the bigger the delay.
If you always transmit at the same packet rate, you can reduce the delay by doing this:
- Turn on your radio and power the receiver, make sure they are bound.
- Select a different packet rate, then switch back to the desired packet rate. Receiver should remembers the packet rate when you change it.
Now power off and on the receiver, the connection should be virtually instant.
EdgeTX Telemetry Low/Critical Alarms
EdgeTX and OpenTX use link quality (RQly telemetry) instead of RSSI for the low/critical alerts. Recommended thresholds are 50% for low alarms and 20% for critical alarms. You can enter these values in the Telemetry page of your radio.
Configurations For Fixed Wings
These settings would be ideal for fixed wings without a flight controller or stablizer (if the receiver is connected directly to servos and ESC).
Using Full Modes
In Packet Rate, use either 100Hz Full or 333Hz Full.
These modes provide full 10-bit resolution (1024 positions) for all channels which is crucial for precise control if you want to drive servos and ESC directly from a PWM receiver. Between 100Hz and 333Hz full modes, there is a trade off between range and latency. 100Hz is better for range while 333Hz is better for latency.
Then you also want to decide which switch mode you want to use, the options are:
- 8 Channel (1 to 4 and 6 to 9 are sent 10bit full rate).
- 16 Channel (all channels sent 10 bit but half rate).
- 12 Channel mixed (1 to 4 are 10 bit full rate, 6 to 13 are 10bit but half rate).
For most fixed-wing models, 333Hz Full with 8-channel switch mode offers an ideal balance, ensuring each channel is updated with each transmission for the lowest latency and highest resolution. The 16-channel option might be tempting but it does introduce more delay as channels are sent alternately (half rate).
Note: All of the switch modes use CH5 for arming, which has only two positions. Channel 5 must be high for the system to transition from standby to active mode. This requirement can be seamlessly integrated into fixed-wing configurations by using a throttle cut switch to control both the throttle and Channel 5’s state. This approach not only simplifies setup but also ensures your model is ready to fly when you are, without wasting a channel on the receiver. I have a tutorial on how to setup a throttle cut switch here: https://oscarliang.com/setup-arm-switch-for-wing-no-fc/
Remap PWM Receiver Outputs
Modern PWM receivers offer the flexibility to remap output channels. Given the current requirement of keeping Channel 5 high during flight, it’s practical to remove Channel 5 from the output mapping in a fixed wing without an FC, ensuring no output is wasted.
Setup Failsafe
You can setup failsafe in the WebUI by assigning a predefined value to each channel when the radio link is lost. It’s important to ensure the throttle is set to low in failsafe so your model will glide to a safe landing.
Check If Your Setup is Working Properly
Do the following to verify your radio link is working properly:
- Set your ExpressLRS module to the lowest power level using LUA script (any packet rate).
- Place your radio 1m away from the receiver and power them up. Make sure the receiver and TX module antennas are oriented in the same way.
- Take note of the RSSI dBm value on your OSD, or the 1RSS telemetry data on the Telemetry Page of your radio.
RSSI dBm value is a negative value, a larger negative RSSI = weaker the signal.
On 900MHz hardware, a value of around -20dBm is a good indication that your hardware is working well. On 2.4GHz hardware, that number should be around -40dBm up to -25dBm.
If you are getting much lower numbers, check the following:
- The antenna on your radio (or ExpressLRS TX module) could be loose.
- The antenna pigtail inside the radio may be damaged or not connected properly to the module’s mainboard, inspect closely by opening the radio.
- With receivers using SMD ceramic antennas, expect lower RSSI dBm values than those equipped with wire antennas. If the SMD antenna is wrapped in heat shrink, enclosed in a whoop canopy, surrounded with carbon fibre parts or buried inside a plane/fixed wing, expect some more signal attenuation.
- Swap out antennas on the receiver and/or the radio.
FAQ
What’s ExpressLRS TX BackPack?
The TX Backpack is an optional feature within the ExpressLRS ecosystem. It enables wireless control of FPV-related devices directly from your radio transmitter. For instance, you can conveniently adjust the channel of your analog FPV goggles using the radio control.
To utilize TX Backpack, both the ExpressLRS transmitter and the device being controlled must be equipped with an ESP8285 chip. This chip, integral to the functionality, is what we refer to as the “TX Backpack.”
Tips for Long Range
- Set the highest legally possible transmit power
- Select a lower update rate, e.g. 50Hz will have better range than 500Hz at the same power
- Choose a true diversity receiver with PA and LNA capability
- Use high-quality antennas on your receiver, preferably half-wave dipole (T-shaped) ones. Avoid using ceramic antenna for long range
- Optimize antennas placement as explained here: https://oscarliang.com/antenna-positioning/
- Get a higher gain antenna for your transmitter
- Consider using 900Mhz instead of 2.4Ghz for ultimate long range. (2.4GHz is still very capable though)
- For more tips on long range check out my tutorial: https://oscarliang.com/long-range-fpv-flying-mini-quad/
Unable to use F1000 packet rate or prompts “Baud rate is too low”
F1000 requires a baud rate higher than 400K, and the radio transmitter’s baud rate is 400K by default.
First update the baud rate (greater than 400K) setting in the Hardware in Radio Setup menu, then restart the radio transmitter to ensure the baud rate setting has been applied. Then change the Packet rate.
If your radio don’t support higher baudrate then your can’t run F1000 mode.
When the F1000 is turned on, packet rate is less than 1000
This could be due to outdated EdgeTX version. You need to update to 2.8.0 or newer.
Same radio controlling multiple receivers simultaneously
What happens if you power up multiple drones that are all bound to the same radio?
You can control all of these drones at the same time, but telemetry won’t work properly as they all trying to send telemetry back to the radio and they will interfere with each other.
To avoid this from happening, you could use model match (each receiver would require an unique ID and a separate model profile). See “How to Use Model Match” in this guide for instructions how to set it up.
Why Does My Radio Keep Saying “Telemetry Lost”?
Occasionally, you might get a warning from your radio saying “Telemetry lost,” yet still retain full control and a perfectly fine video link. So, what’s the reason behind this?
Your ExpressLRS radio link is bi-directional, meaning your receiver is not only receiving signals but also transmitting them. While some transmitters in radios can output up to 1000mW, receivers typically have a much lower power output, usually around 25mW. Some newer receivers might reach up to 100mW, but this is still considerably lower than the transmitter.
A general rule of thumb is that 4 times the transmission power doubles the range. According to this, 1000mW would only have 6.3 times the range of 25mW. To learn more about FPV range, check out this article: https://oscarliang.com/calculate-fpv-range
Given that the receiver has a much shorter range than the transmitter, when your transmitter isn’t receiving data from the receiver, you will hear the constant “telemetry lost” warning. It’s usually not an issue as long as you still maintain full control of the aircraft. It simply indicates that you’re not receiving telemetry data, which isn’t essential for maintaining a control link. However, be aware that your transmitter relies on telemetry for certain features, such as dynamic power. If telemetry is weak, your transmitter might unnecessarily use maximum power, even though less power might suffice for reaching the receiver.
If you want to eliminate this annoying warning, consider the following suggestions:
- Upgrade to a receiver with higher telemetry power (currently, the highest is 100mW).
- Turn off the telemetry warning in your radio’s settings.
- Set Telemetry Ratio to standard, or a lower ratio might help
Lua Script just keeps Loading, Can’t Enter
When your run the ExpressLRS LUA script and “loading…” appears on the screen and nothing else happens, make sure you have enabled Internal RF (or External RF if you are using an external module).
Make sure you have the latest version, if in doubt, flash your module again and download the latest LUA script.
The baud rate of the radio transmitter is set below 400K in radio setup, and it should be adjusted to a higher baudrate value. If there is no option to modify the baud rate, ensure that EdgeTX is at version V2.7.0 or newer.
Receiver Update Warning: ”Not enough data uploaded!“
If you try to flash firmware of a different target, and force update, you will get this error “Not enough data uploaded”.
It’s a bug/feature in ELRS 2.5 that prevents target changing. If you still want to go ahead and flash a different target, you first need to revert the RX firmware back to 2.0 (on the original target), then flash the different target you wish.
LUA script only shows “Connecting…”
That’s an indication of the ExpressLRS TX module is not talking to the LUA script
Possible causes of the problem:
- TX Module is installed, or is installed incorrectly (pins in the module bay are not making proper contact or broken)
- Maybe the TX module is in WiFi update mode, restart the radio and try again
- Make sure you have set RF protocol to CRSF
- If you are running OpenTX, make sure the version is not too old (it has to be 2.3.12 or after)
Inconsistent Packet Rate – CRSFShot Not Working
In the ELRS lua script top bar, there is an indicator (e.g. 0:200) which tells you how many packets per second it’s getting from the radio. You can use it to confirm the consistency of the RC link.
Ideally it should always show a stable number that is the same as the packet rate you select. For example: 0:50, 0:150, 0:250, 0:500.
If it shows an inconsistent number like 0:63, or is stuck at 0:250 at every packet rate you select, then your radio does not have CRSFShot working properly.
The latest official release of OpenTX (2.3.12 or newer) already includes CRSFShot, so double check if your OpenTX version is outdated.
Using ExpressLRS Logo as Model Image
![]()
I made a logo you can use as model image in the TX16S/T16. You can learn how to use it here.
Image download: google drive.
Install USB to UART Driver
You might or might not need to install this driver on your PC if you want to update your TX via UART: https://www.silabs.com/developers/usb-to-uart-bridge-vcp-drivers
Settings in the LUA Script Don’t Save
Make sure your arm switch is up (not engaged), some settings don’t save and will reset themselves when the drone is armed.
Edit History
- Jun 2021 – Guide created
- Jul 2021 – Updated: ExpressLRS 1.0 official release
- Aug 2021 – Added info for BetaFPV ELRS Nano TX and RX
- Nov 2021 – Updated product list
- Feb 2022 – Updated the complete TX, RX and antenna options currently available on the market
- May 2022 – Updated instructions for version 2.5, added info about adding home network, updated screenshot of LUA script (V2)
- Oct 2022 – Updated guide for ELRS V3 release, added PWM receiver products
- Mar 2023 – Added info about model match, added more FAQ, updated product links
- Mar 2024 – ELRS 3.3 update, new products.
- May 2026 – Updated guide for ELRS 4.0, removed info that’s obsolete

