
Data engineers running Apache Spark jobs on Amazon EMR face a persistent challenge: understanding how data moves through Spark pipelines as it’s transformed, joined, and written to downstream tables . Tracking these transformations manually requires examining job logs, reviewing code, and piecing together transformation logic across multiple sources. As pipelines scale, this process becomes complex. The visibility gap affects key business activities: troubleshooting data quality issues takes longer – impact analysis for schema changes requires more effort – and compliance audits need extensive documentation of data provenance.
Amazon SageMaker is the center for all your data and analytics where you can find and access all the data in your organization and act on it using tools across various use case. This unified platform addresses the data visibility challenge by bringing together data governance, collaboration, and discovery into a single interface. At the heart of this platform is Amazon SageMaker Catalog, a centralized hub that enables organizations to catalog, govern, and discover all their data assets with complete visibility into lineage. By capturing data lineage across your entire data ecosystem from raw sources through transformations to final outputs, SageMaker Catalog enables you to track data provenance across your entire platform, enable collaboration with clear visibility into data ownership and quality metrics, build trust through comprehensive data lineage that supports compliance and confident decision-making, and accelerate discovery of trustworthy, governance-ready data assets. You can access and visualize this lineage directly in Amazon SageMaker Unified Studio, which serves as the unified interface to explore data relationships and collaborate across your analytics workflows.
Amazon EMR, starting from version 7.11, now includes native OpenLineage support that automates lineage capture. OpenLineage is an open-source framework for data lineage that automatically emits lineage metadata from your data transformation jobs directly into Amazon SageMaker Catalog, or other data governance solutions, without requiring customizations.
This EMR native support of OpenLineage is part of a growing set of integrations across AWS analytics services including AWS Glue, Amazon EMR Serverless, and Amazon Redshift. The complete list of services with native OpenLineage integration can be found in the data lineage support matrix.
In this post, you’ll walk through a practical, step-by-step example that shows how to capture and track data lineage from Spark jobs running on Amazon EMR directly into Amazon SageMaker Catalog using OpenLineage. You’ll see how lineage metadata flows automatically and explore data relationships and dependencies across your workflows in Amazon SageMaker Unified Studio.
Solution overview
Imagine you’re part of a large enterprise that relies on HR analytics to optimize workforce planning, compensation strategies, and talent retention practices. Your data engineering team owns the delivery of these analytical products by processing raw HR datasets (including employee records, attendance logs, and compensation details), with Spark jobs running on your Amazon EMR infrastructure.
With time, Spark jobs have grown in complexity. Your team now struggles to maintain visibility into how data moves through pipelines, who modified it, and how to map dependencies between datasets and final analytical products.
The following solution demonstrates how you can address these challenges by automatically capturing data lineage end-to-end from Spark jobs running on your EMR infrastructure and visualizing it in Amazon SageMaker Unified Studio so that you and the business understand data provenance of the final analytical products.
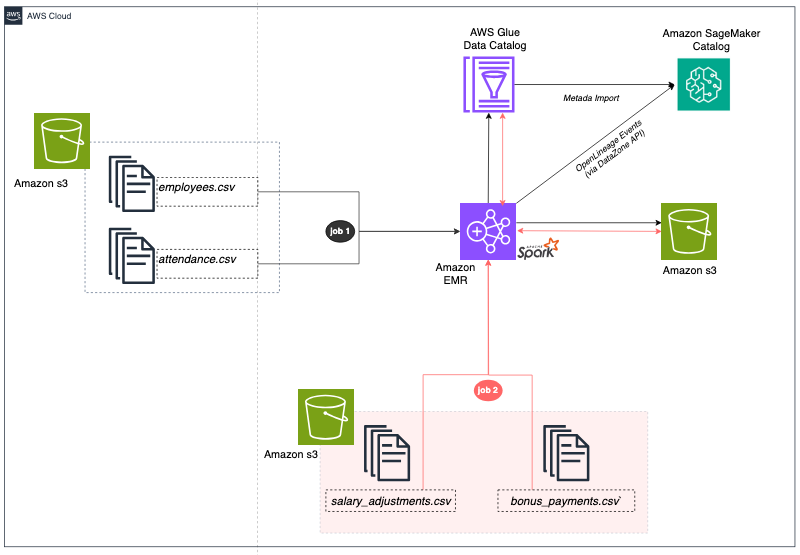
The architecture includes a Data Layer with CSV files containing employee, attendance, salary, and bonus data stored in Amazon S3 (Simple Storage Service), representing typical HR and payroll source systems.
The Processing Layer uses Amazon EMR cluster running Apache Spark jobs that transform raw data into analytical tables. The first Spark job joins employee and attendance data while the second Spark job combines attendance with compensation data. Both jobs use Apache Iceberg table format to provide ACID (Atomic, Consistent, Isolated, and Durable) transactions and time travel capabilities.
The Metadata Layer uses AWS Glue Data Catalog to store Iceberg table metadata, making tables discoverable and accessible across AWS analytics services. A Lineage Layer uses the OpenLineage integration in EMR to automatically track input/output datasets (CSV files and Iceberg tables), transformation logic at column level (joins, filters, aggregations), and job execution metadata.
Finally, the Data Governance Layer uses Amazon SageMaker Catalog to capture and process OpenLineage events posted by the EMR Spark jobs and automatically build a comprehensive lineage graph that shows complete data provenance from CSV source files through Spark transformations to Iceberg analytical tables.
Before you deploy this solution, make sure you have the following resources in place.
Prerequisites
For this walkthrough, you should have the following prerequisites:
- An AWS account.
- Your assumed role should have full access to Amazon EMR serverless, Amazon S3, Amazon Identity and Access Management (IAM) and AWS Lambda. Note that for production workloads, minimum permissions are recommended.
- A Amazon VPC (Virtual Private Cloud) with at least one subnet with internet access. You can provision this VPC as you create the Amazon SageMaker domain next.
- An existing Amazon SageMaker Unified Studio domain and project. To get started, use the quick setup option as explained here. To create a project, follow the instructions here.
- An S3 bucket with the sample data files and Spark scripts uploaded (see Prepare Your Source Data below)
- Default EMR service roles — if this is your first time using EMR in this account, run `aws emr create-default-roles` from the AWS CLI or CloudShell to create them.
With these prerequisites in place, let’s examine what the AWS CloudFormation template will deploy to your AWS environment.
Architecture components
The deployment creates several interconnected components that work together to capture and visualize lineage:
- An S3 bucket to store all data and artifacts for the solution.
- An EMR cluster (v 7.12.0) with Apache Iceberg support enabled and OpenLineage integration pre-installed, ready to run Spark jobs with lineage tracking.
- A set of IAM policies that grant the necessary permissions to the EMR cluster to post lineage events to your SageMaker Unified Studio domain.
- A set of AWS Lake Formation permissions that grant the EMR cluster to create, alter, and drop Iceberg tables in your specified Glue database.
With an understanding of what will be deployed, you’re ready to launch the CloudFormation stack.
Deploy the solution
Note: While this walkthrough uses the AWS EMR console and AWS CLI to verify the cluster and run Spark jobs, you can also perform these steps directly from Amazon SageMaker Unified Studio. SMUS provides a unified interface to create and manage EMR clusters, submit Spark jobs, and monitor execution — all within the same environment where you’ll later explore the lineage captured in Amazon SageMaker Catalog.
Prepare your source data
Before deploying the CloudFormation stack, clone or download the Git repository.
Upload the CSV files downloaded from git to the input/ prefix and the spark scripts in scripts/ prefix. You can run the following command to upload the files:
aws s3 cp employees.csv s3://YOUR-BUCKET/input/
aws s3 cp attendance.csv s3://YOUR-BUCKET/input/
aws s3 cp salary_adjustments.csv s3://YOUR-BUCKET/input/
aws s3 cp bonus_payments.csv s3://YOUR-BUCKET/input/
aws s3 cp emr-lineage-spark-job.py s3://YOUR-BUCKET/scripts/
aws s3 cp emr-lineage-compensation-job.py s3://YOUR-BUCKET/scripts/
To deploy the solution, complete the following steps in CloudFormation console:
- Create new stack by specifying the CloudFormation yaml file previously download from git repository
PutHereThe YMLFileName - Enter a stack name (such as,
emr-lineage-demo) and provide the following parameters:- SourceS3BucketName: S3 bucket containing your CSV files and Spark scripts
- SourceCSVPrefix: S3 prefix where CSV files are located
- SourceScriptsPrefix: S3 prefix where Spark scripts are located
- GlueDatabaseName: The name of the Glue database associated to your Amazon SageMaker Unified Studio project.
- DataZoneDomainId: Your SageMaker Unified Studio domain ID.
- VpcId: The id of the VPC that was deployed as part of the prerequisites.
- For EMRReleaseLabel, MasterInstanceType, CoreInstanceType and CoreInstanceCount, keep the default values.
- Acknowledge IAM resource creation, choose Next and then Submit. The CloudFormation stack takes approximately 10 to 15 minutes to complete.
- In the EMR console, wait for the cluster status to show as WAITING before moving to the next step.

Now that the EMR cluster is running with OpenLineage enabled, let’s examine how the Spark jobs are configured to capture lineage metadata.
Explore data lineage configuration in EMR
When submitting Spark jobs to EMR, specific configurations enable OpenLineage to create and post lineage events to SageMaker Unified Studio as the job runs:
spark.hadoop.hive.metastore.client.factory.class– Configures Spark to use AWS Glue as the Hive metastore.spark.jars– Path to the pre-installed OpenLineage library (available on EMR 7.11+).spark.extraListeners– Registers an OpenLineage listener to capture metadata of input / output datasets and transformations.spark.openlineage.transport.type– Uses the OpenLineage DataZone transport option to send lineage events directly into SageMaker Catalog.spark.openlineage.transport.domainId– The ID of your SageMaker Unified Studio domain, that serves as the target for lineage events.spark.glue.accountId– Your AWS account ID for Glue data catalog operations.
Now that you understand the configuration that enables automatic lineage capture, you’re ready to run the data pipeline.
When running this two-step pipeline, you will calculate the total employee compensation by combining salary adjustments, bonuses, and attendance data. The final analytical asset will serve payroll processing and budgeting.
Run employee attendance analysis job
The first job reads employee details (in employees.csv dataset) and attendance records (in attendance.csv dataset), joins the datasets on EmployeeID and creates a unified dataset (employee_attendance Iceberg table) in your Glue database.
Follow the steps below to run this first job:
- In the CloudFormation console, navigate to the stack’s Outputs tab
- Copy the value of the
Job1SubmitCommandoutput key. Note that this is the command you’ll use to submit the first job in EMR with the right configuration.
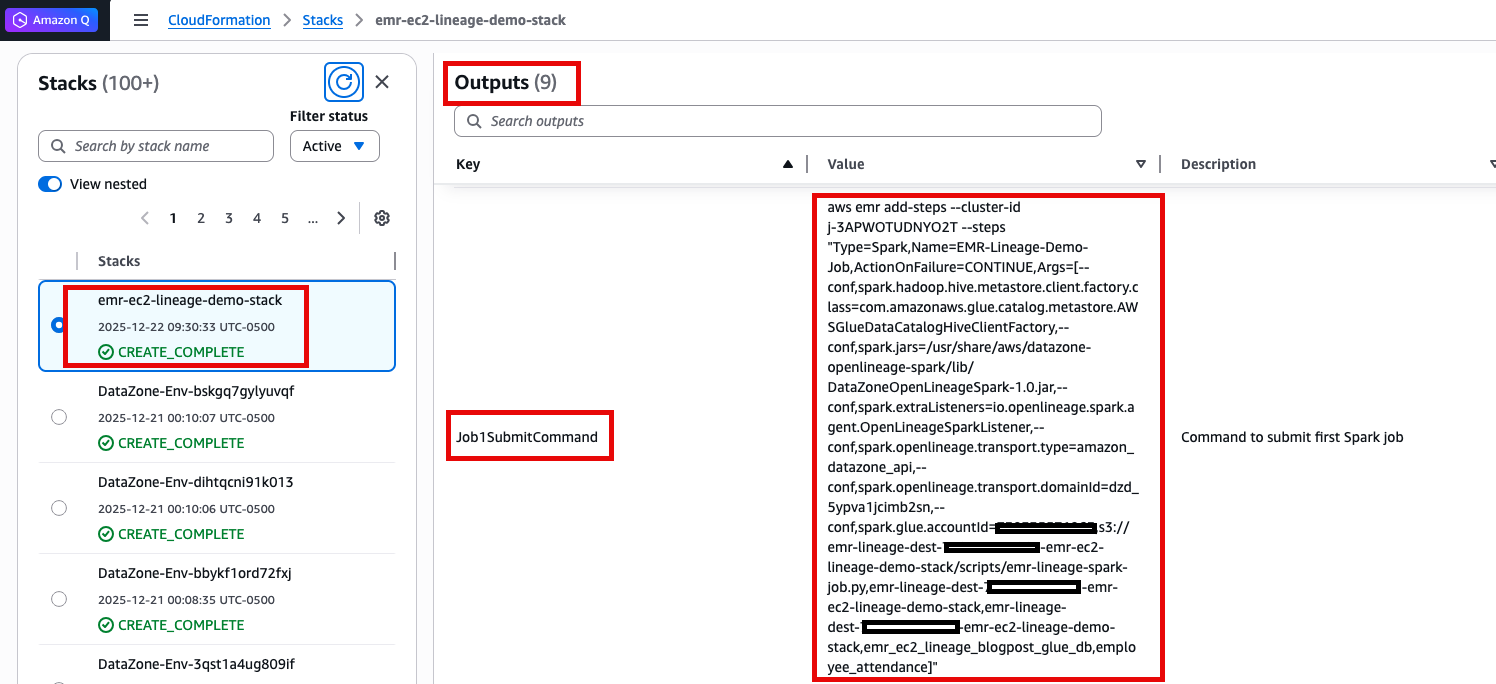
- Run the command in your terminal or AWS CloudShell.
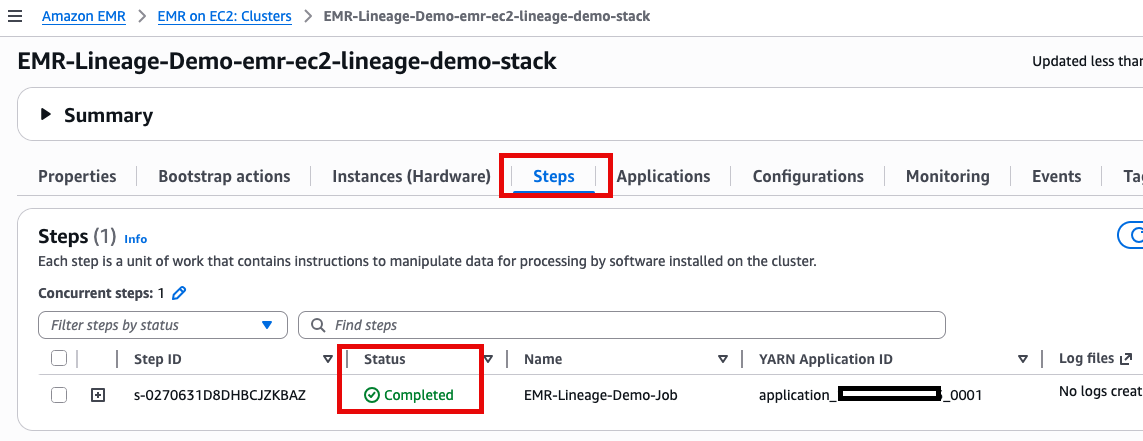
- Monitor the job in the Amazon EMR console under Steps.
Run employee compensation analysis job
Now, you will calculate the total employee compensation (Iceberg table) by combining salary adjustments (salary_adjustments.csv dataset), bonuses (bonus_payments.csv dataset), and attendance (calculated in the last step):
- Repeat the steps 1 to 4 to run Job 2.
- After completion, open the AWS Glue console.
- Navigate to Data Catalog, then Tables and select your SageMaker project’s database.
- Confirm that
employee_attendanceandemployee_compensationtables are listed.
With both Spark jobs complete, you can now visualize the complete data lineage graph in Amazon SageMaker Unified Studio.
Visualizing lineage in SageMaker Unified Studio
SageMaker Unified Studio provides a graph-based data lineage visualization that helps data engineers, analysts, and data scientists clearly understand which source datasets (files or tables) feed into each dataset, what transformations and logic are applied at every step, which downstream analytics assets consume the data, and how changes to upstream data or transformations may impact the rest of the data pipeline.
Now that the data pipeline run successfully, let’s review the captured lineage for the HR data in SageMaker Unified Studio:
- Navigate to the SageMaker Unified Studio console, sign in to your domain.
- Open your project and go to Data Sources
- Find your AWS Glue Data Catalog source
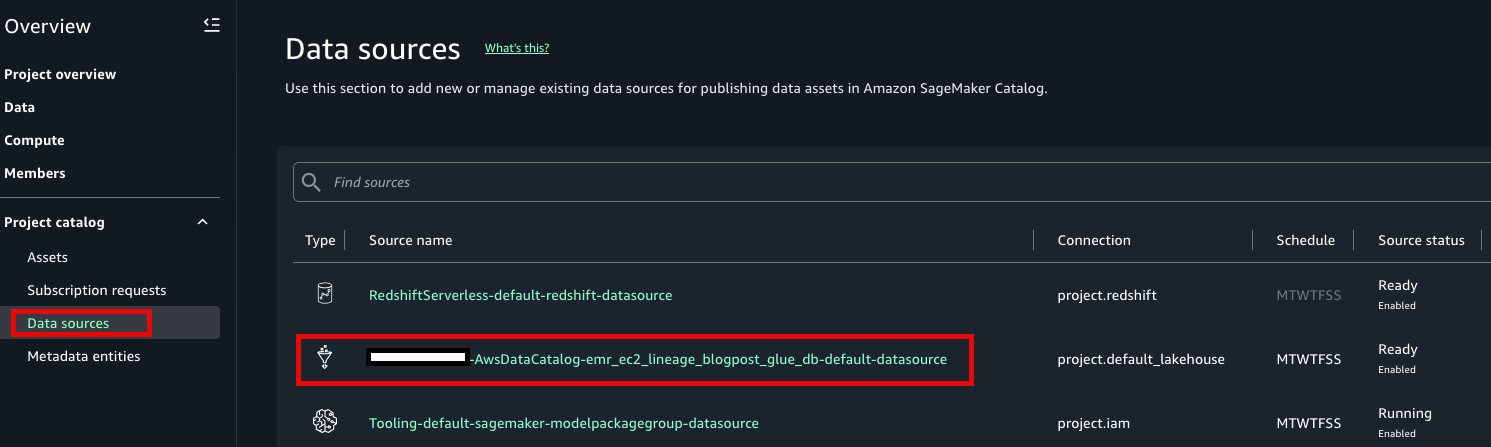
- Click RUN. Two new assets will be created.
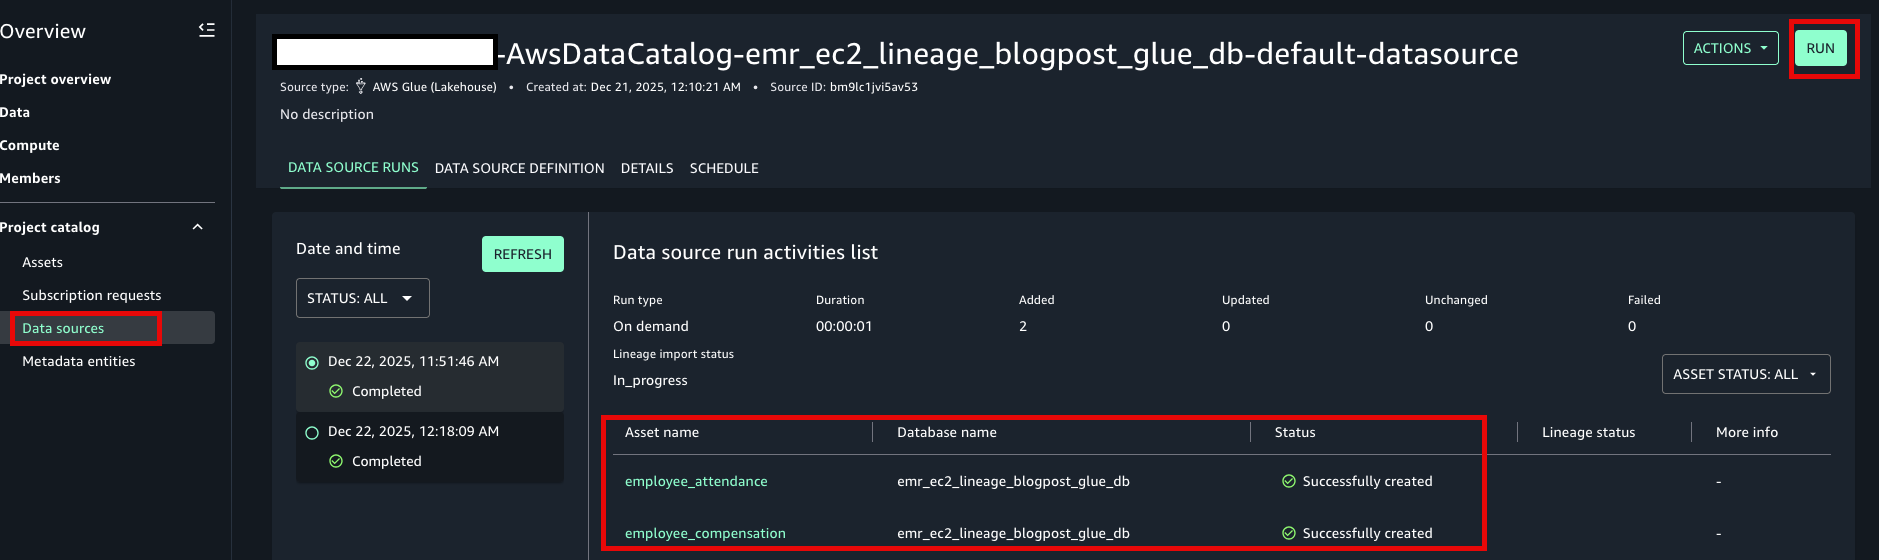
- Navigate to Assets and Click on employee_compensation. Under the LINEAGE tab you’ll find the lineage graph view that SageMaker builds based on the OpenLineage metadata captured from the EMR Spark jobs as they run.
-
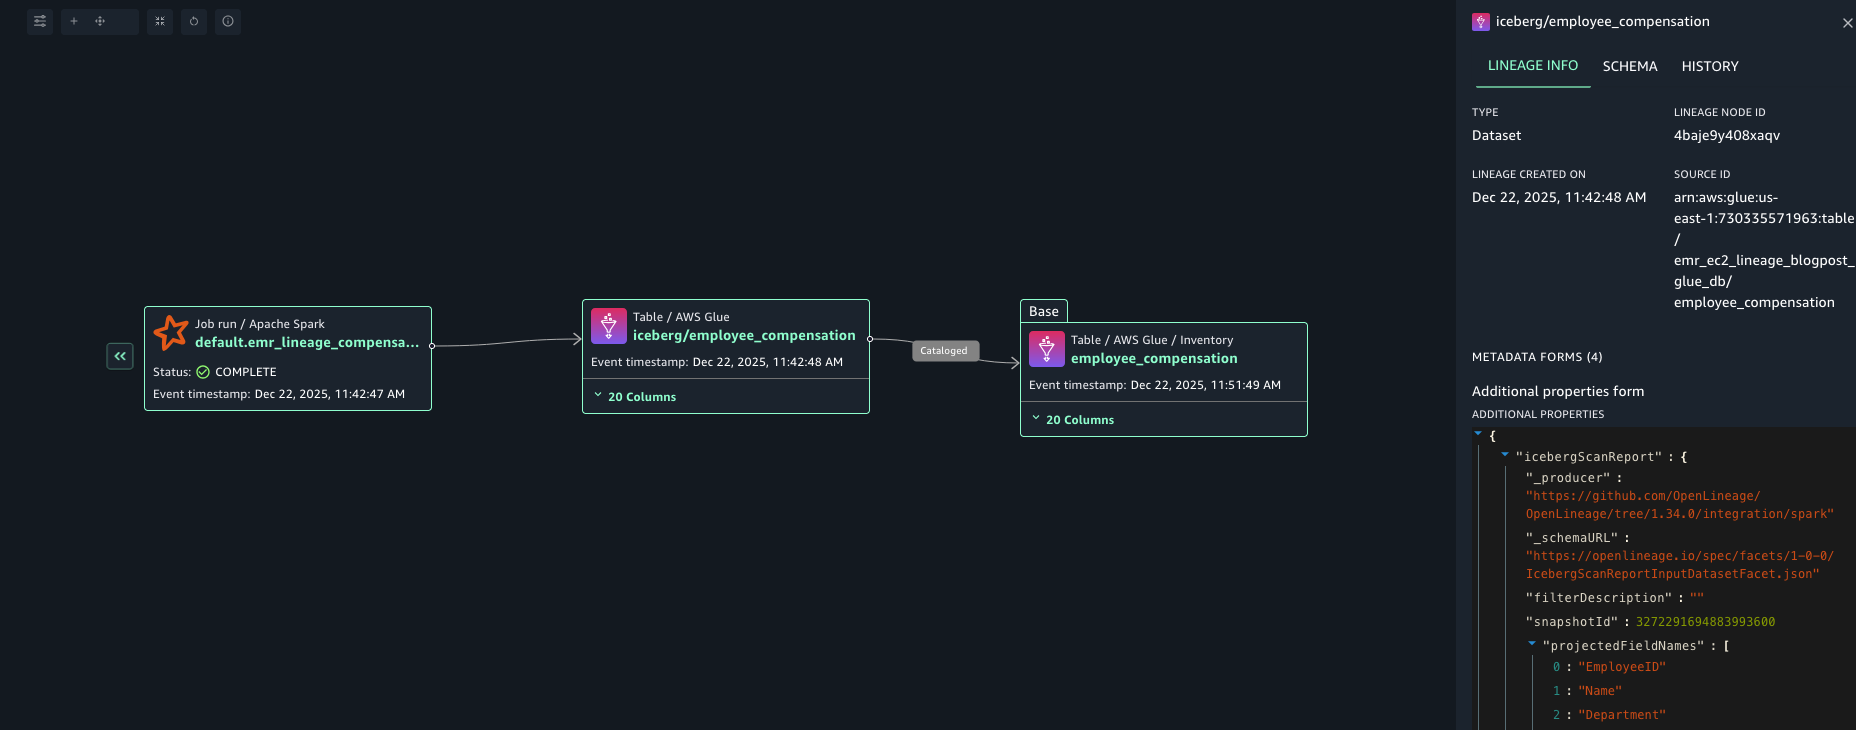
- You’ll first see three lineage nodes from left to right: one representing the EMR Spark job that created the final Iceberg table, a second one representing the actual Iceberg table in the Glue catalog, and a third one representing the data asset in the SageMaker Catalog inventory that maps to the Glue table.
- Click on any lineage node to view its underlying metadata in the details pane, including dataset names, S3 locations, schema, data types, job execution details and more.
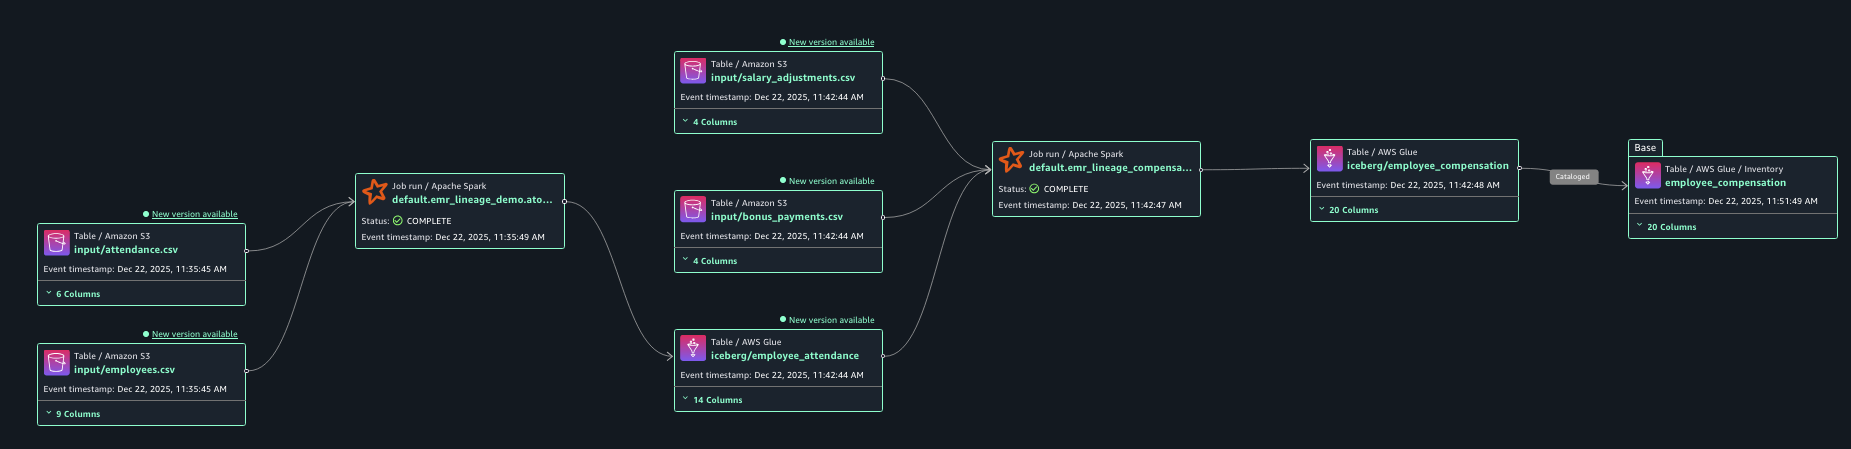
- Expand the lineage to the left by clicking on the double arrow next to the first lineage node. Keep expanding until you hit the originating datasets.
-
- Expanding the graph to the left reveals the complete data pipeline back to original CSV source files. You can see how compensation data depends on upstream attendance analytics.
- Note how each lineage node represents an element in the data pipeline you run, including both Spark jobs and even the intermediate employee_attendance Iceberg table that connects them.
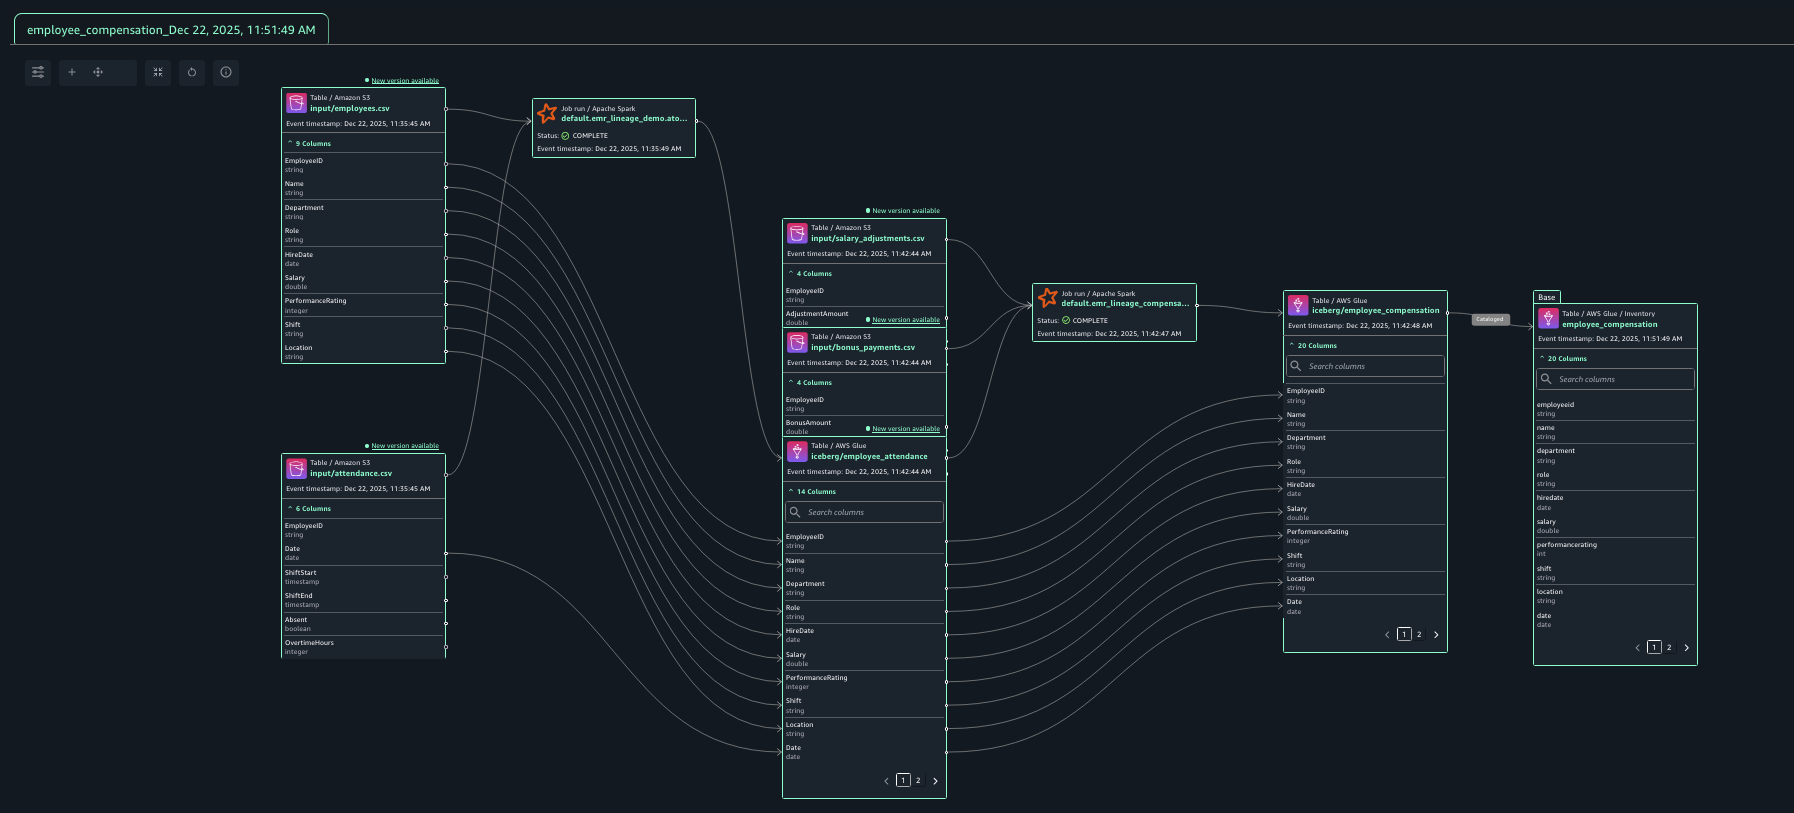
- You can expand column-level lineage by clicking on the column section of a lineage node of a dataset or data asset. This allows you to understand how data changes at a column level as it goes downstream your data pipeline.
Cleanup
To avoid ongoing charges, clean up the resources:
- First, empty the destination bucket by running the following command in your terminal or with AWS CloudShell.
aws s3 rm s3://${DEST_BUCKET}/ --recursive
- Delete the CloudFormation stack.
- On the AWS CloudFormation console, choose Stacks in the navigation pane.
- Choose the stack you created, then choose Delete and then Delete stack when prompted.
Conclusion
In this post, you explore how to capture data lineage from Spark jobs in Amazon EMR (v7.11+) directly into Amazon SageMaker Unified Studio. You learned how to set up an Amazon EMR cluster with native OpenLineage support to automatically track lineage metadata from Spark jobs processing your data. You also configured the integration between EMR and Amazon SageMaker Catalog to ensure lineage information flows seamlessly into your governance platform. Finally, you explored the resulting lineage graph in SageMaker Unified Studio and saw how it provides comprehensive visibility into data transformations, from source CSV files through Spark processing jobs to final analytical tables using Apache Iceberg format.
We encourage you to now test these capabilities with your own data pipelines running on EMR. By implementing automated lineage tracking, many customers have strengthened their governance frameworks while gaining valuable insights into data dependencies, impact analysis, and compliance requirements. This approach enables data teams to build trust in their analytics outputs while maintaining the agility needed to derive business value from their data assets.
About the authors

